11. Team
The Hub 2.0 Team feature allows WPMU DEV account holders to give multiple users controlled access to the Hub, including users who are not WPMU DEV members.
The level of Hub access you grant to additional team members can include as few or as many Hub features as you wish. The access you grant is restricted to Hub features only. It does not grant team members access to your WPMU DEV account, or any other features specifically related to your account. You can, however, purchase an optional add-on for any team member so they have access to live chat support. See Team Member Access to Live Chat Support below for details.
If you’re not yet a WPMU DEV member, visit our homepage to learn the benefits of membership and to sign up for the free membership plan.
You can create custom client roles in much the same manner as custom roles for Team members. While not all modules are available for custom client roles, the way the available ones work is identical to how they work for team members. See Team & Client Role Customization for more.
11.1 Overview
Copy chapter anchor to clipboardHub 2.0 team members can be configured to access as much or as little of the Hub as needed. They do not have access to the wp-admin area, or backend, of connected websites via their Hub credentials.
The Hub Team feature allows WPMU DEV account holders to provide access to the Hub for team members who do not necessarily require access to the admin side of websites, an account manager for example. At the same time, wp-admin users who are also Hub team members have a powerful set of additional tools at their disposal.
Defining Access
Before creating team members, it’s helpful to understand the various ways access is granted and controlled.
- By Site – Team members can be granted access to the Hub area for as many or as few sites as desired.
- By Area – Team members can be granted access to some Hub areas and restricted from others.
- By Task – Team members can be granted authority to perform some tasks in those areas to which they have access but restricted from performing other tasks.
- View only – Team members can be granted permission to view Hub screens but restricted from changing any settings on those screens.
Team members with access to all areas and tasks for all connected sites can be configured very quickly, as can those with view-only permissions. Team members with limited access or control require more time to configure and may involve creating a custom team role, as explained in the Team Members and Roles chapters below.
Location
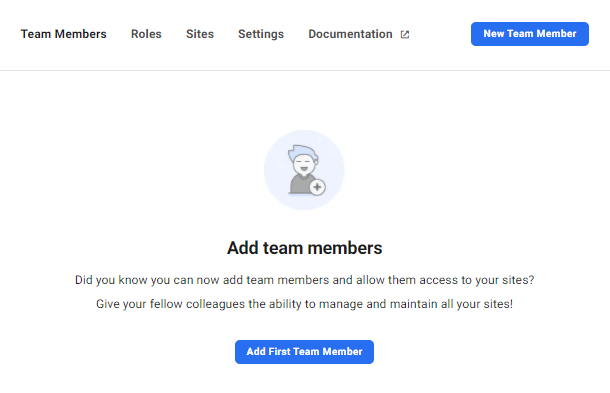
The Team feature can be accessed by clicking the menu tab at the top of any Hub 2.0 screen.
![]()
The Team area consists of four primary screens:
- Team Members – Create, modify, or remove team members.
- Roles – Create, modify, and remove custom team member roles.
- Sites – Create team members on a site-by-site basis.
- Settings – Customize the name and logo included in the confirmation email sent to newly-created team members.

The Documentation link opens this usage guide.
The features of each screen are discussed in the sections below.
11.2 Team Members
Copy chapter anchor to clipboardThe Team Members screen lists your team members with options for granting and changing permissions. If you haven’t created a team member yet, we recommend reading the Creating Team Members chapter of this guide before proceeding.

The Team Members list includes:
- Name – The username given to a role when it was created and the avatar, if one exists, for the account connected to it. Click the column title to reorder the list in alphabetical or reverse alphabetical order. If the team member has not yet accepted the invitation, a Pending label will appear next to their name.
- Email – The email address of the connected account.
- Role – The role assigned to that team member.
- Support Access – This indicates whether the Support Access add-on has been enabled for the team member.
- Sites – The number of sites a team member can access. Hover over the number to see a list of those sites. Click the column title to reorder the list based on the number of sites.
- Status – Active indicates a team member has confirmed the email invitation. Pending indicates the email invitation has not yet been confirmed.
Click the ellipsis icon on any team member’s row to reveal management options:

- Manage – Click to adjust the team member’s access in your Hub.
- Remove user – Click to remove the team member from your team.
11.2.1 Creating Team Members
Link to chapter 2If you haven’t yet created a Hub team member, click the Add First Team Member button to open the team member creation modal. Subsequent team members can be created using the New Team Member button.
If you want to ensure your team members only see your white labeled Hub Client portal on your own site, please be sure to invite them from that site, not from the WPMU DEV Hub. This way, the link in the invitation confirmation email will redirect them to your branded site instead of ours.
Note that if you are a free Hub user, you can only add one team member to your team. See Free Hub Restrictions for details.
Configuring a new Hub team member involves:
- Email Address – Team members are invited to accept Hub access in a confirmation email and must confirm the invite before access is granted.
- Name – Enter the name for your new team member.
- Select sites – Choose the websites that the team member can manage in the Hub.
- Select user role – The scope of access is determined by the role assigned to Hub team member when they are created. Choose a default role or create and assign a custom role, as discussed in the Roles section of this guide.
- Notes – Add any notes or extra information related to the team member here.
- Add-Ons – Select a Support Access add-on for the team member if needed.
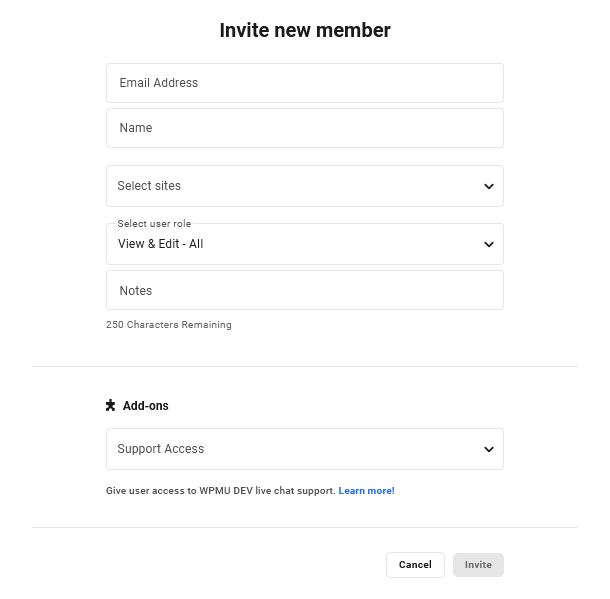
Select Sites
After entering the team member’s email address, click the Select sites dropdown menu to choose which sites this team member can access in your Hub.
Select All websites to grant access to all sites in your Hub, or select individual sites to limit access to those specific ones.
Note that the All Websites option only applies to sites currently in your Hub. If you want the team member to have access to all current sites as well as all future sites, please add the Access to all sites capability to the member’s role. You can find more information about custom role capabilities in the Customize Access chapter.

Select team member role
Hub team members have two default roles available, plus any custom role(s) you may have already created. You also have the option to create a new custom role right from this interface:
- View and Edit – All – The team member can access and modify every Hub feature for the selected sites.
- View Only – All – The team member can view every Hub screen for the selected sites but cannot modify any settings.
- Create Custom User Role – Team member access can be as narrowly or as broadly defined as necessary using custom roles. See the Create a custom role section for guidance on creating a custom user role.

Add-Ons
You can optionally select a paid support access add-on for the team member. This add-on grants the team member access to Live chat support exclusively for the sites you have given them access to above.
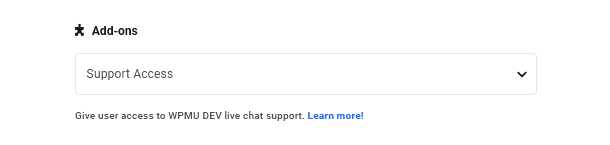
The available options depend on the number of sites to which you have granted the team member access:
- Livechat Support Single – This option is only available if you have granted the team member access to a single site.
- Livechat Support 3 sites – This option is available if you have granted access to 3 sites or less.
- Livechat Support 10 sites – This option is available if you have granted access to 10 sites or less.
- Livechat Support Unlimited – This option is always available regardless of how many sites the team member has access to.
Once the team member has been identified by name & email address, site access set, a role assigned, and optional live chat support access activated, click the Invite button to send the confirmation email.
You can retrieve a transcript of any chat initiated by a team member in the Live Chats section of your Hub Support page, but your team members cannot access that area of your Hub.
11.2.2 Confirming Team Members
Link to chapter 2New team member accounts are not active until the team members click the Confirm button contained in the invitation email.
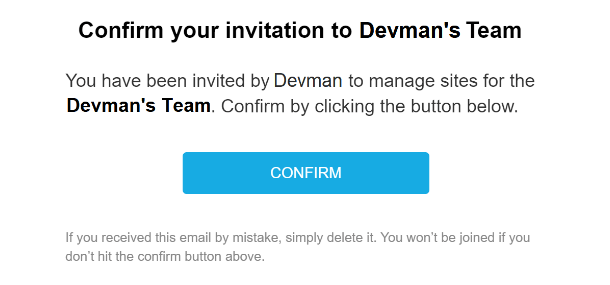
Clicking the Confirm button will open a new tab in their browser and direct users to one of two screens, depending on whether or not they are a current WPMU DEV member.
Current Members
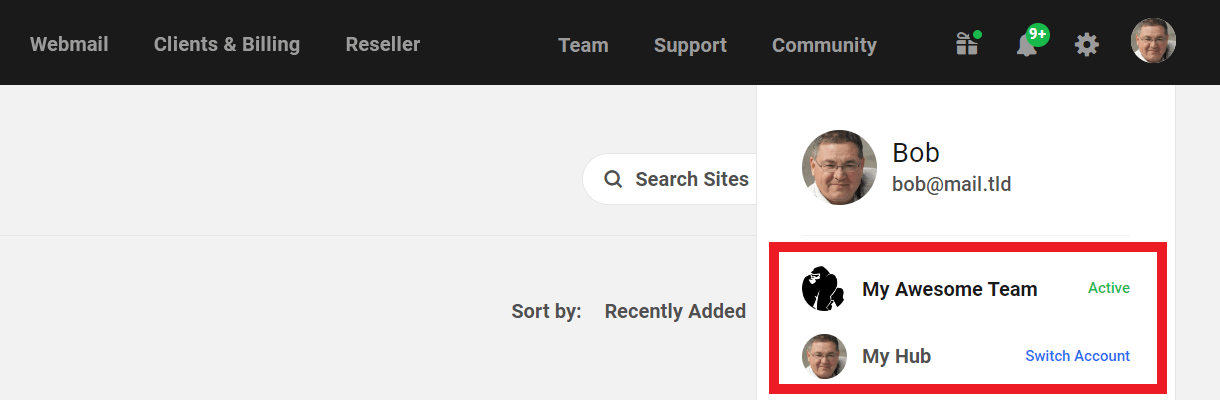
A current WPMU DEV member who confirms a Hub team member invite will be directed to a WPMU DEV login screen and prompted to log in with an existing username and password. Once logged in, the new account will be added to the existing account, and the member can move from one account to the other as necessary.
To switch between a member account and a Hub team member account, click the WPMU DEV profile picture in the righthand corner and then select Switch Account.
Non-member team members
Users who are not current WPMU DEV members will be directed to our Free Account setup screen and prompted to create a free account. Once the free account is created, the user will have access to both the team member account and their own Hub account.
Your invited team members can create a new account either by filling in the form or by using their Google account if available. Note that if they use their Google account to sign up, the Google email address must be the same as the address the invitation was sent to.
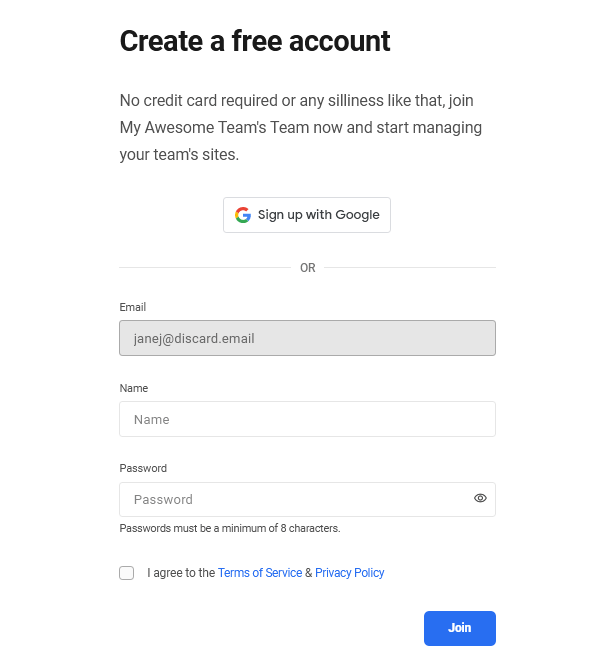
Note that the option to Sign in with Google is currently only available when invited from your WPMU DEV Hub. It is coming soon to the Hub Client plugin as well.
Free Account Policy
Hub 2.0 users have access to a Hub account of their own, independent of their team member accounts. The free account will remain free as long as the user does not wish to add sites to their own Hub.
If a team member does add a site to their own Hub on any of the standalone hosting plans or as a paid member on any membership plan, they will have full access to their own site(s) in their own Hub, and will continue to have the same management access to your sites as you have granted them in your team.
It’s important to note however that if you wish to transfer one of your sites to such a user, for example if they should have access to support for that site, the site would need to be first disconnected from your account before it can be connected to theirs.
11.2.3 Managing Existing Team Members
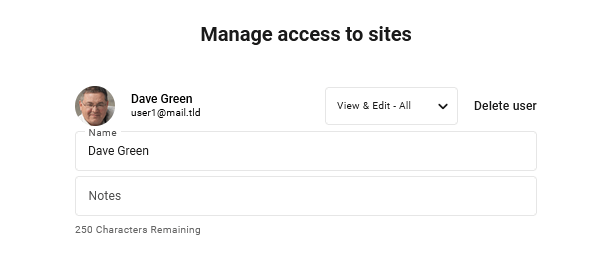
Link to chapter 2To modify an existing team member, click anywhere within the row for that team member to open the Manage access to sites modal.
In the topmost section of this modal, you can edit the Name of the team member as well as add any Notes.
Click the Role dropdown to see the available role options for this team member. The dropdown menu will display the default roles and any custom roles that you have created. Click the desired role to assign it to the current team member.
You can also remove the team member by clicking Delete user.
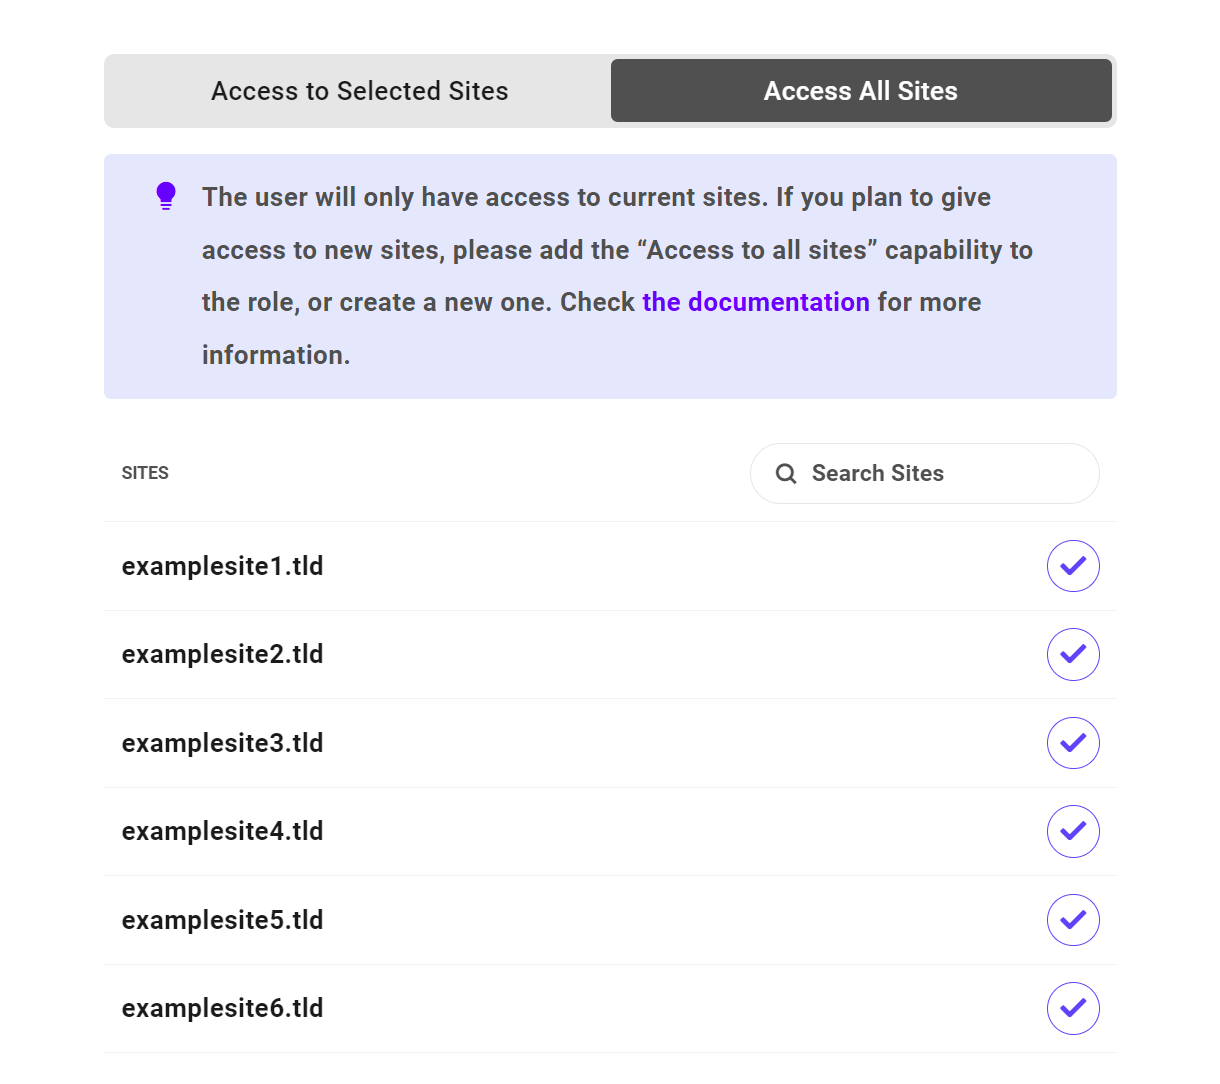
The sites that this team member can access will be listed in the section just below that, with checkmarks indicating those sites, and plus (+) signs indicating sites to which the team member does not yet have access but can be added.
To provide access to only some of these sites, choose Access to Selected Sites and then click the plus (+) sign next to the sites for which access is desired. Use the smart Search Sites field to locate specific sites if needed; just start typing and the list will filter itself to display only domain names and extensions that match what you type.
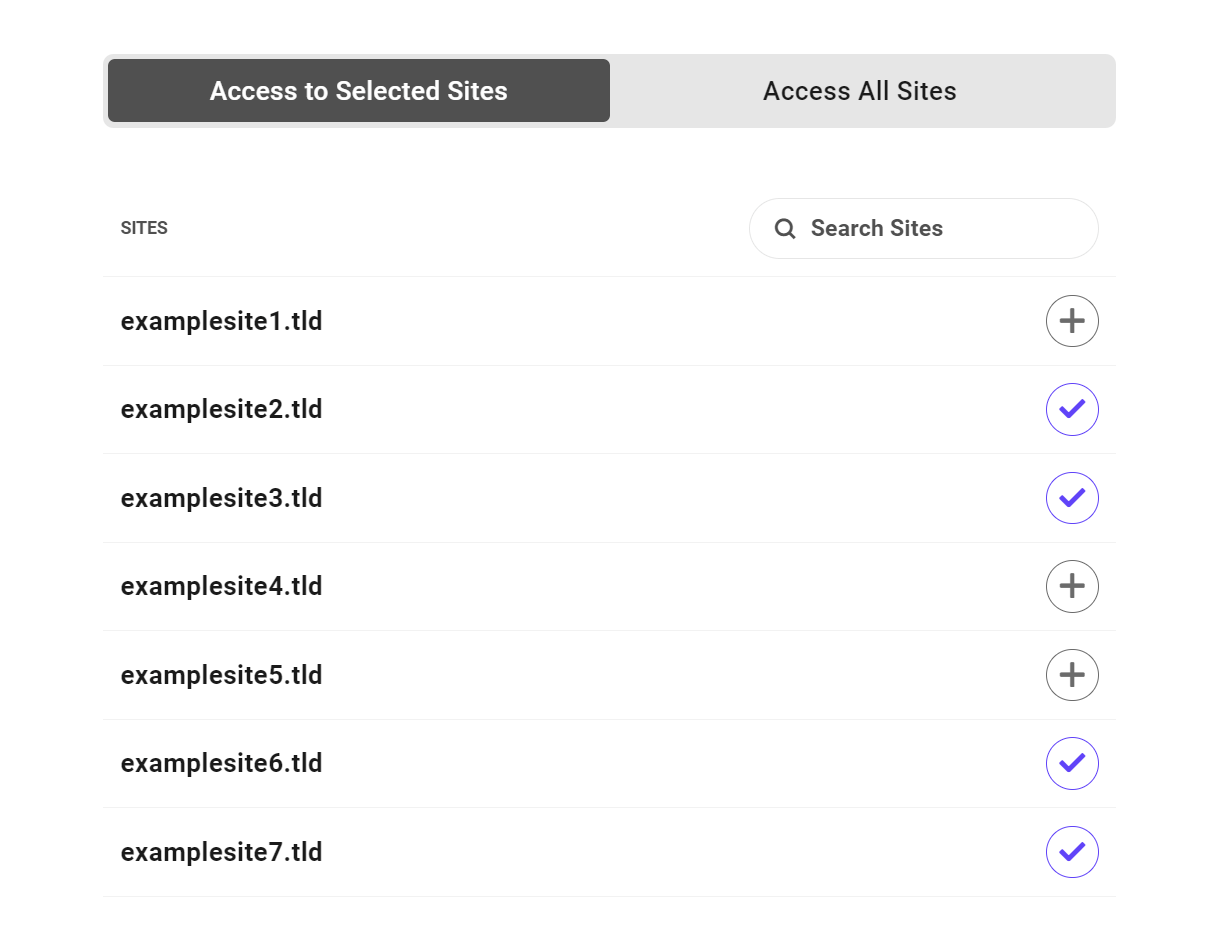
Choose Access All Sites if you want the team member to be able to access all sites connected to your Hub. Note that this only applies to current sites. If you want the team member to have access to all current sites as well as all future sites, please add the Access to all sites capability to the member’s role. You can find more information about custom role capabilities in the Customize Access chapter.
The bottom section enables you to activate or modify an optional paid support access add-on for the team member. This add-on grants the team member access to Live chat support exclusively for the sites you have given them access to above.
The available options here are identical to when you first created the team member, and depend on the number of sites to which you have granted the team member access:
- Livechat Support Single – This option is only available if you have granted the team member access to a single site.
- Livechat Support 3 sites – This option is available if you have granted access to 3 sites or less.
- Livechat Support 10 sites – This option is available if you have granted access to 10 sites or less.
- Livechat Support Unlimited – This option is always available regardless of how many sites the team member has access to.
Note that if you have activated a support access add-on for a member, then modify their site access to more sites than are covered by the support add-on, you would need to also upgrade the support add-on to a higher level. A notice will appear to remind you of this.

After making changes, scroll to the bottom of the modal and click the Update button to save your changes or click Cancel to close without saving.
11.2.4 Team Member Access to Live Chat Support
Link to chapter 2If you have purchased a Live Chat Support addon for any team member when creating or editing that team member’s profile as noted above, that team member will have access to WPMU DEV live chat support exclusively for the sites you have granted them access to in your Hub.
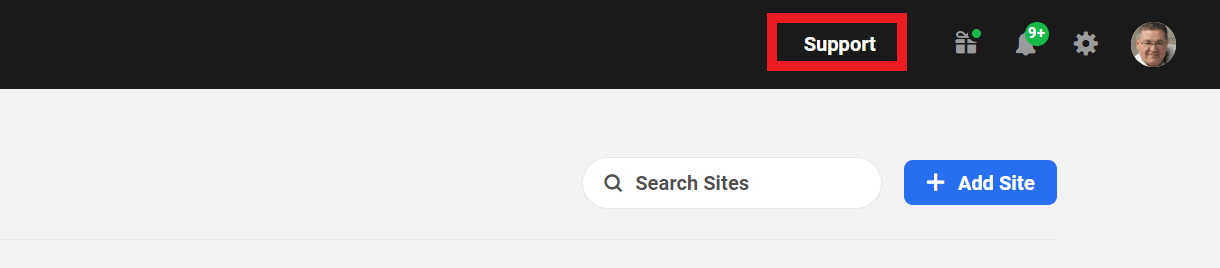
They need only click the Support tab in the main Hub menu to pop open the initial chat survey.
In the survey, they would select the general subject category, describe their issue and specify the site that the issue relates to.
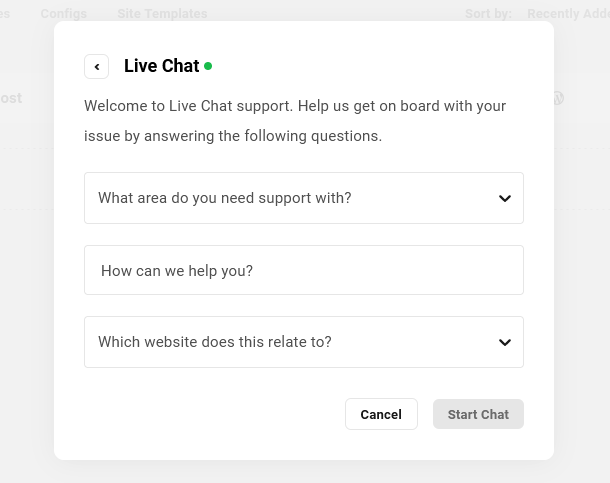
When they submit that form, the familiar chat bubble will pop open and they can start their chat session. See Using Live Chat for details if needed.
Live Chats Archive
Any chats initiated by your team members will appear in your Live Chats archive that you can access on the Support page of your Hub. The chat archive is only accessible to you as the WPMU DEV account holder, and you can download a transcript of any team member’s chat if needed.
Payments & Billing
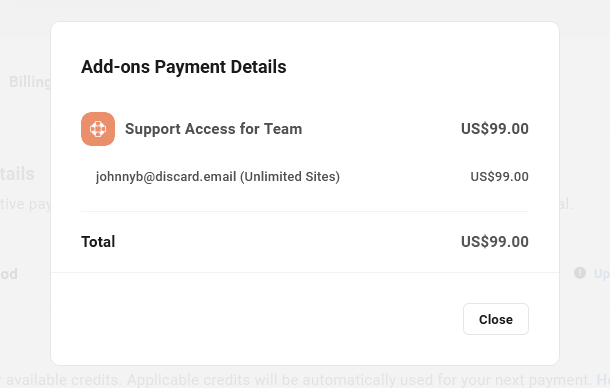
You’ll find the record of your Live Chat add-on purchases on your WPMU DEV Account page, under the Payments & Billing tab. Scroll down to the Next Payments section where you’ll see the Add-ons you have purchased. Click the View Details link to see a breakdown of all add-ons in your account.

The add-on will appear as Support Access for Team, and you’ll see a list of all team members for whom you have purchased the add-on.
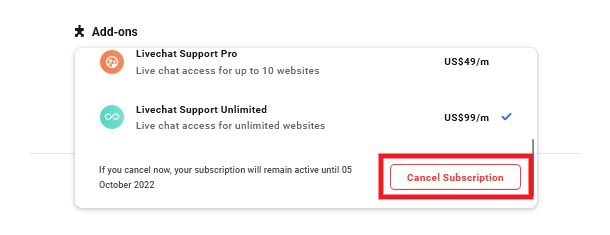
Canceling Support Access for a Team Member
If you ever need to cancel the Support Access add-on for a team member, go to Team Members and click on the member’s row to pop open the edit modal.
Then scroll down to the Add-ons section and click the Manage button there.

Finally, click the Cancel Subscription button at the bottom of the list of available subscriptions.
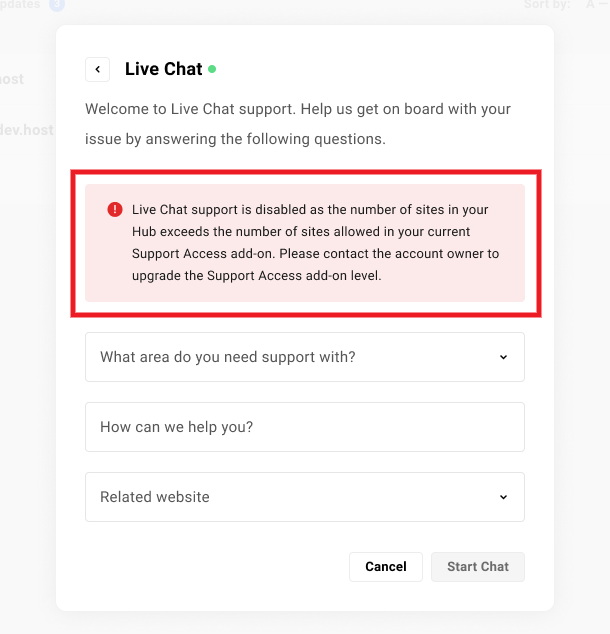
Exceeding Live Chat Support Access
If a team member who has the capability to create new WPMU DEV hosted sites does create one, they would have full access to all features & services for that site as expected.
However, if the addition of that new site makes the total number of sites they have access to greater than the number allowed by the Live Chat support access add-on you have purchased for them, access to Live Chat support would be disabled for all sites until the add-on license is increased accordingly.
They would see a notice like below if they access Support before the add-on license is increased.
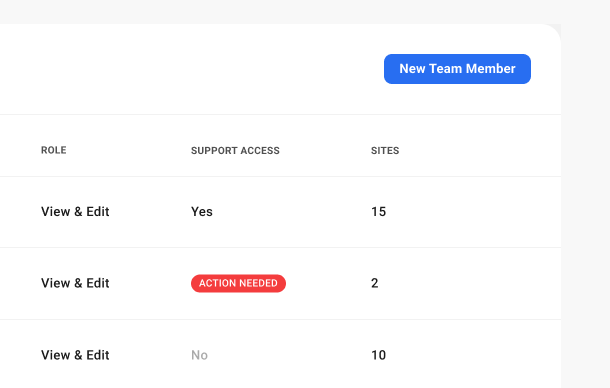
You would see an Action Needed flag in the Support Access column for that team member in the Team Members list in your Hub.
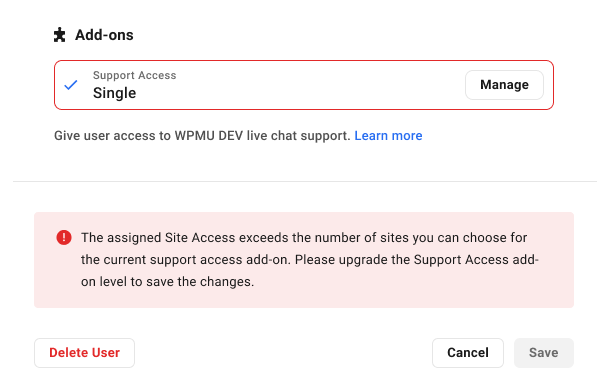
You would also see a notice in the Add-ons section when you edit the team member’s profile.
Team Live Chat FAQ
Is this restricted to any particular WPMU DEV membership level?
No. This add-on is available on all WPMU DEV memberships.
Do my team members also have access to forum support?
No. This feature grants your team members access to Live Chat support only.
Can I limit support access to only specific sites for a team member?
When you purchase a live chat support add-on for a team member, it grants support access for all sites they have access to in their role. So if you need to limit it to only specific sites, those sites must be the only sites your team member has access to in their team role.
Can my clients use this to get white labeled support from WPMU DEV?
No, this feature is for your team members only.
However, if you manage your clients as team members instead of using the Clients & Billing portal to manage them, then technically, they would have access to this. The support would not be white labeled though; your clients would be logging into wpmudev.com to get support from WPMU DEV, not from your brand. We also do not advise this as your clients would only be getting very restricted support for basic technical issues like “my site is down”, etc.
We strongly recommend this support approach for your clients instead:
- Ensure that you have followed our guide on how to white label the client experience with the Hub Client plugin on your own domain.
- Use one of the available chat integrations in the Hub Client plugin, and assign one or more team members as chat agents in the corresponding app.
- Purchase the support add-on as needed for those team members.
- Your team members will provide support to your clients and, if they have any difficulty with support issues from your clients, they can then hop onto live chat support from WPMU DEV to get the answers they need to help your clients.
Can I resell this to my clients as an add-on service in Clients & Billing?
No. As noted above, this feature is for your team members only and is not integrated in any way with the Clients & Billing portal.
11.3 Roles
Copy chapter anchor to clipboardThere are two default roles available in The Hub 2.0 Roles tab, plus the option to create custom team member roles:
- View & Edit – All – The team member can access and modify every Hub feature for the selected sites.
- View Only – All – The team member can view every Hub screen for the selected sites but cannot modify any settings.
- Create custom user role – The team member access can be as narrowly or as broadly defined as necessary using custom roles. See Create a custom role below for guidance on creating a custom team member role. Once created, new custom roles will appear in the drop-down menu along with the default options and can be assigned to other team members without having to re-create the access parameters.

See the Default System Roles chapter in the Team & Client Role Customization document for a full breakdown of all capabilities included in the default roles.
11.3.1 Create a Custom User Role
Link to chapter 3To create a custom Hub team role, click the Roles tab under Team and then click the + Create New Role button.
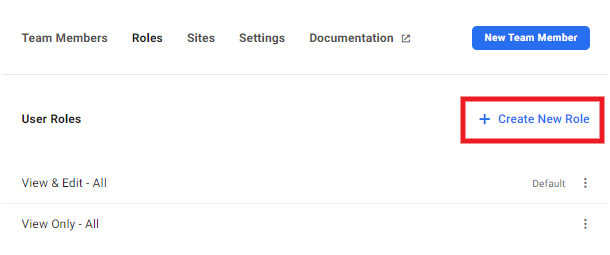
Enter a name for this custom role in the field provided. Once created, this role will be available to assign to your team members.

Click the ellipsis icon of any custom role to reveal management options for that role.
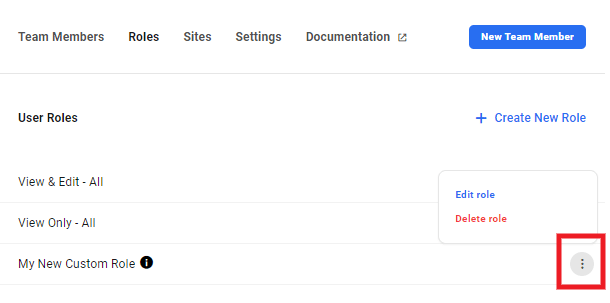
- Edit role – Click to edit the role name and/or adjust access settings.
- Delete role – Click to remove the role from your team.
11.3.2 Customize Access
Link to chapter 3The Customize Access list covers every feature of the Hub. See Team & Client Role Customization for details about all the capabilities that can be enabled in your custom roles.

11.4 Sites
Copy chapter anchor to clipboardThe Sites screen is where Hub team member access can be customized on a per-site basis.
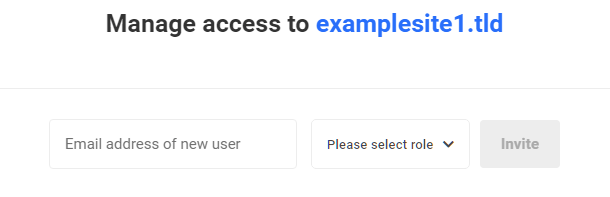
The Sites screen displays a list of sites connected to the current Hub and the number of Hub team members associated with each. Click the plus (+) icon next to any site to open the Manage Access screen for that site, where team members can be added or removed.

The Manage Access modal displays a list of both active and pending Hub team member associated with the site.
To add a new Hub team member, enter an email address into the field provided, select the desired user role from the drop-down menu and then click Invite. The user will receive an email containing a confirmation button that must be clicked to activate the team member account.
Note that the email icon for team members whose status is still pending appear in black. Click that email icon to resend the email invitation to any team member whose status is still pending.
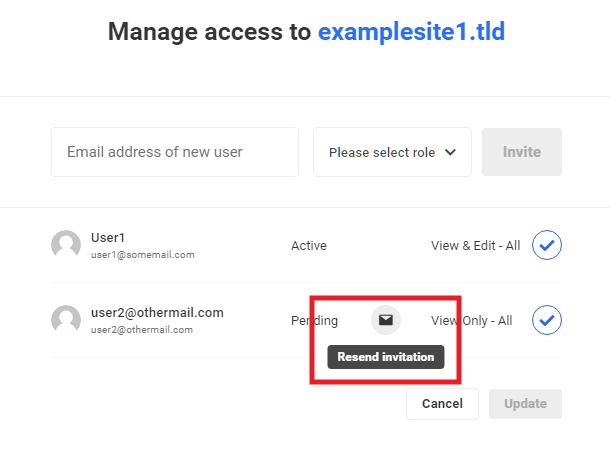
Click on the checkmark icon next to a team member to remove site access.
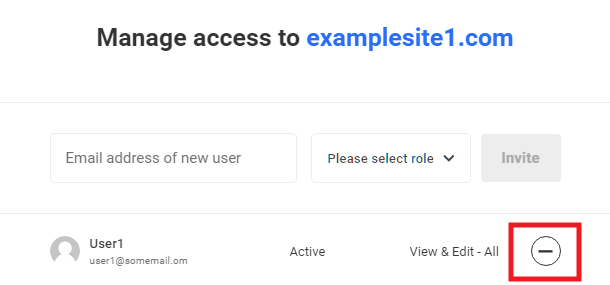
Click the Update button to save your changes or click the Cancel button to close the module without saving the changes.
11.5 Settings
Copy chapter anchor to clipboardThe Settings screen allows you to modify your business name and logo. Your business name will be used when inviting new team members via email, and your business name and logo will appear for your team members in the Hub 2.0 interface.
To update your business name, enter your desired business name in the field provided. To change your logo, click Change logo and upload a new image. Click the Save button to save your changes.
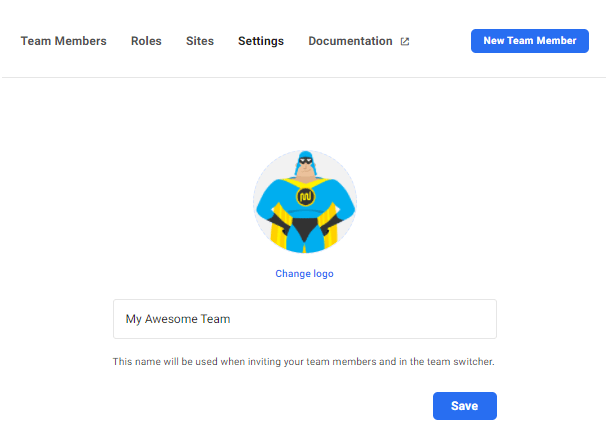
Your business name will appear in the invitation email when inviting a new team member to join Hub 2.0.

Your business name will also be displayed for your team members in the Hub 2.0 menu bar, and will appear along with your logo in the team switcher.

11.6 Get Support
Copy chapter anchor to clipboardIf you still have questions or need assistance after reading this document, please don’t hesitate to contact our support superheroes using the available options under the Support tab in your Hub or via the Support tab in your WPMU DEV Dashboard.


