13. The Hub Client Plugin
This guide explains how to use The Hub Client plugin to create a white labeled duplicate of The Hub on your own agency site, where you can rebrand it as your own, and fully customize the aesthetic to fit your brand.
The Hub Client requires PHP 7.4 or greater. See WPMU DEV Minimum Requirements for details.
Offer our complete suite of site management tools to your clients and team members from one convenient area on your branded site instead of on wpmudev.com.
You can also configure automated tools that enable you to resell WPMU DEV hosting and domain products to your clients, right from your own sites or social media pages.
You can install the Hub Client on either a single site instance of WordPress, or on any one site in a multisite. You can even install it on multiple sites, and brand each instance differently if you have multiple product or service brands.
To use The Hub Client plugin, the site(s) you install it on must be connected to the Hub in order to access its API. We recommend reading Add a Site to The Hub for a guide to connecting your site if needed.
Once installed and activated, navigate to The Hub Client in your wp-admin where you’ll find handy links to Support and Documentation at the top of every plugin screen should you have any issues or need help with configuration.

Upon activation or when certain features are configured, this plugin may add cookies to the user’s browser, store personal information in your database, or integrate with 3rd-party applications. You may need to disclose this information to your site visitors. For details, see Our Plugins in our privacy policy documentation.
Note that the Hub Client plugin cannot be installed by free Hub users. See Free Hub Restrictions for details.
13.1 Client Portal
Copy chapter anchor to clipboardThe Client Portal section is where you configure everything related to your brand and your customer’s experience in your white labeled Hub.
While configuring the Branding and Navigation options, the live Preview will show you exactly how your branded navigation will look on the frontend of your site.

13.1.1 Branding
Link to chapter 1Under the Branding tab, you can set the brand name & logo that appear in your Client Portal, as well as the navigation colors.
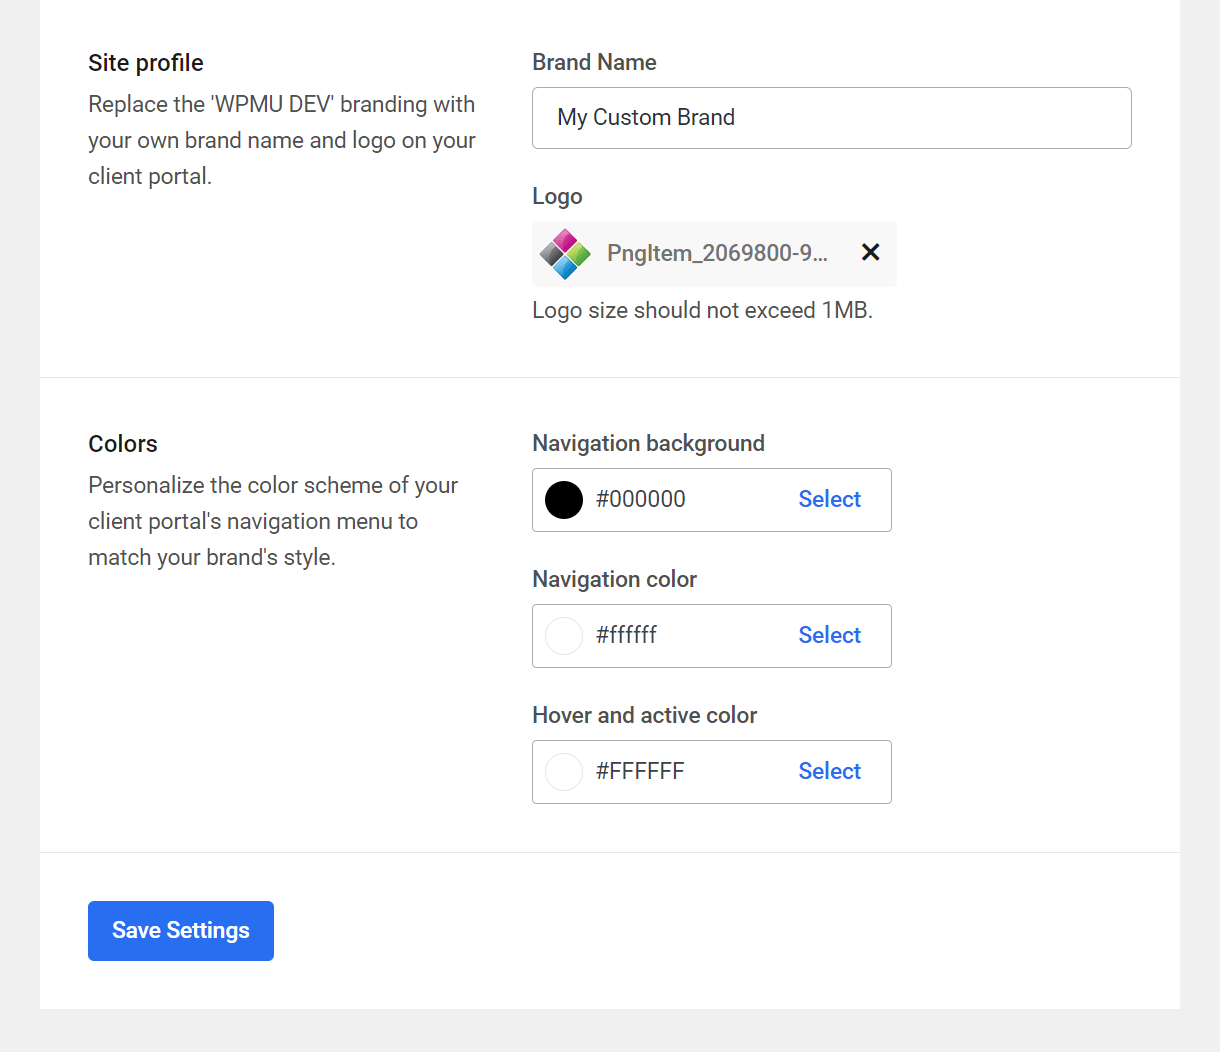
Site profile
If you have the Hub Client installed on more than one site, you can brand each instance differently on each site.
Brand name
The brand name that you set here is what will appear as the meta title of your Client Portal login page, and will display in the browser tab.
Logo
The logo that you set here will display at the far-left of your Hub Client Navigation, both when logged-in and on the Client Portal login page. The image must be less than 1MB and, for best results, ensure it has either a transparent background or a background that matches your navigation background color.

Colors
Click the Select link for any item whose color you wish to adjust, and set the desired color using the color selector, or enter the color’s hex value.
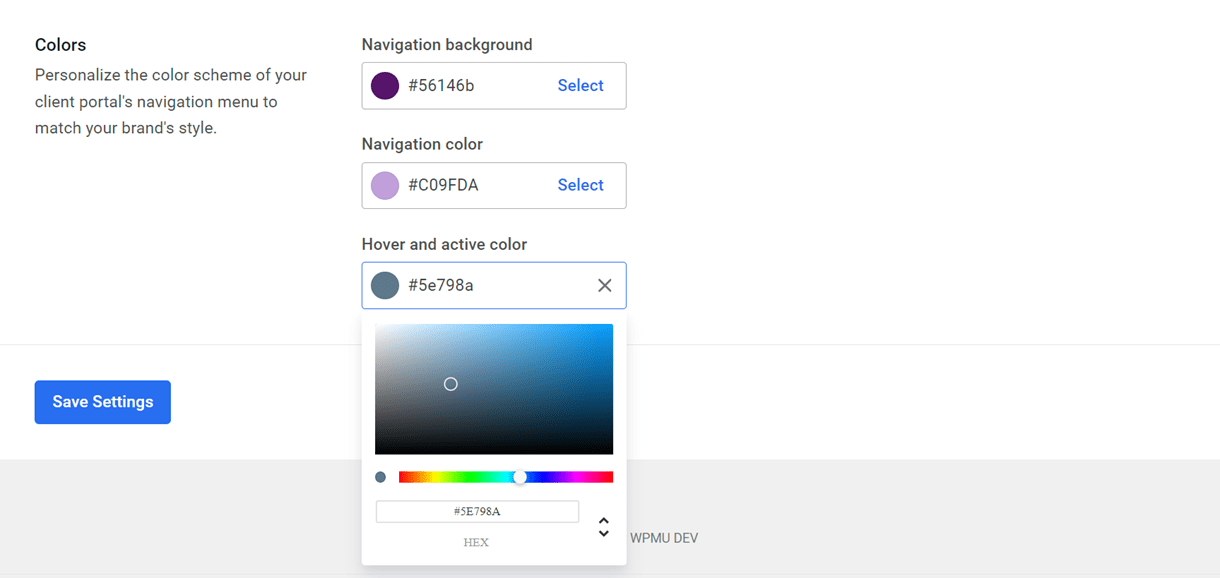
Navigation background
Sets the background color of the Hub Client menu bar.
Navigation color
Sets the color of link items in the Hub Client menu bar.
Hover and active color
Sets the color of items in the Hub Client menu bar when selected or hovered over.
13.1.2 Navigation
Link to chapter 1This is where you can customize the Hub navigation for your Client Portal, and select the network site it should appear on if you have The Hub Client installed in a multisite environment.
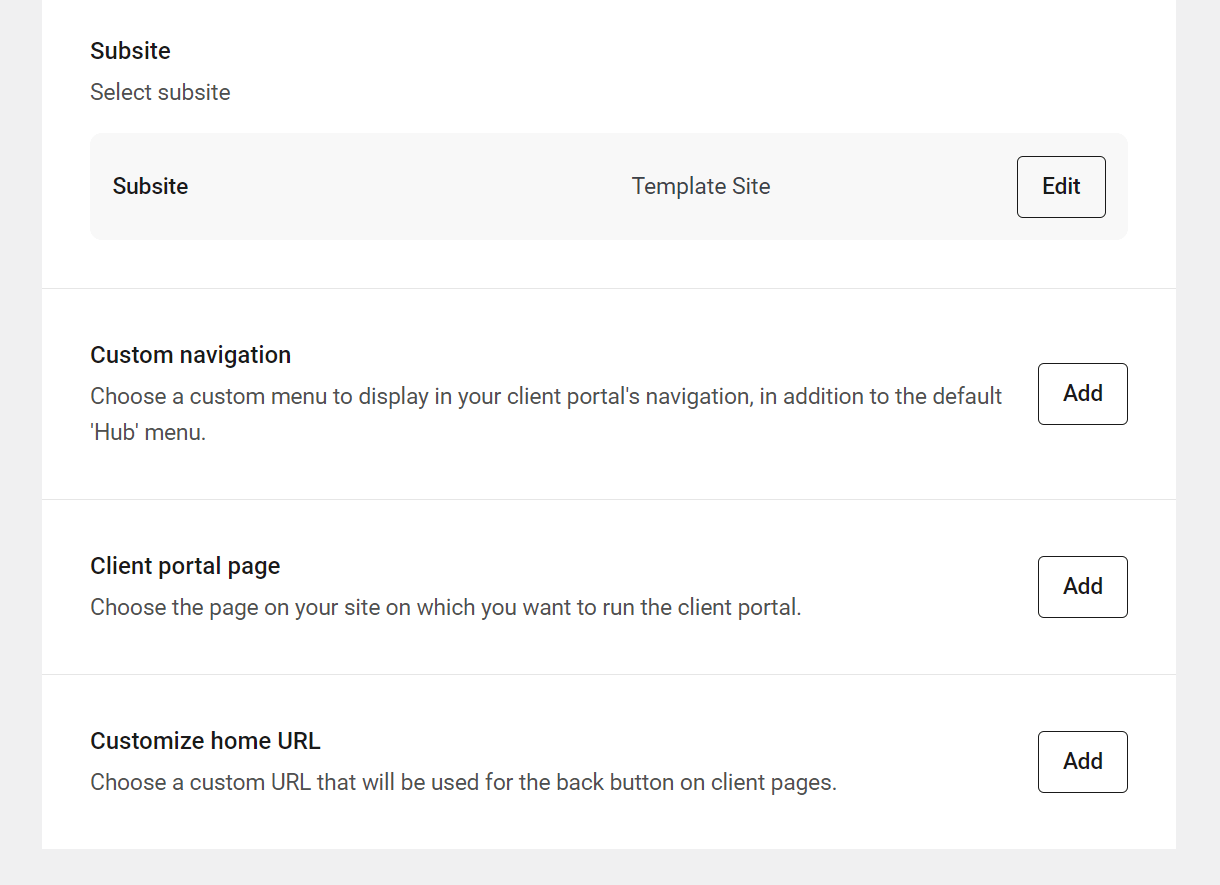
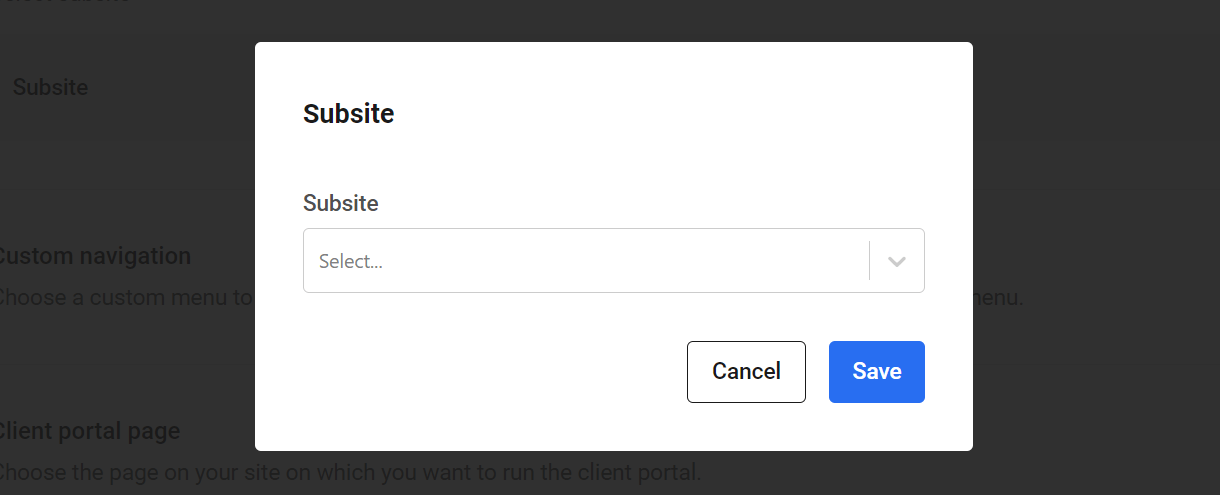
Subsite (Multisite only)
When The Hub Client is installed on a multisite, you can select the network site where the Client Portal will appear. By default, this is the main site of the multisite. If you wish to use a subsite instead, click the Edit button here and select the subsite you prefer.
Custom navigation
If you wish to add more items to your Client Portal navigation, click the Add button here and select the custom menu you want to add. If you don’t yet have a custom menu that you’d like to use, go to Appearance > Menus in your wp-admin, create the menu you want, then come back here and select it.
The custom menu that you select will appear in addition to the default navigation items that your logged-in team members or clients see according to the capabilities you have granted them in their user roles. See our Team & Client Role Customization documentation for details on Hub user roles & capabilities.
Note that only top-level items are supported in the Hub navigation.

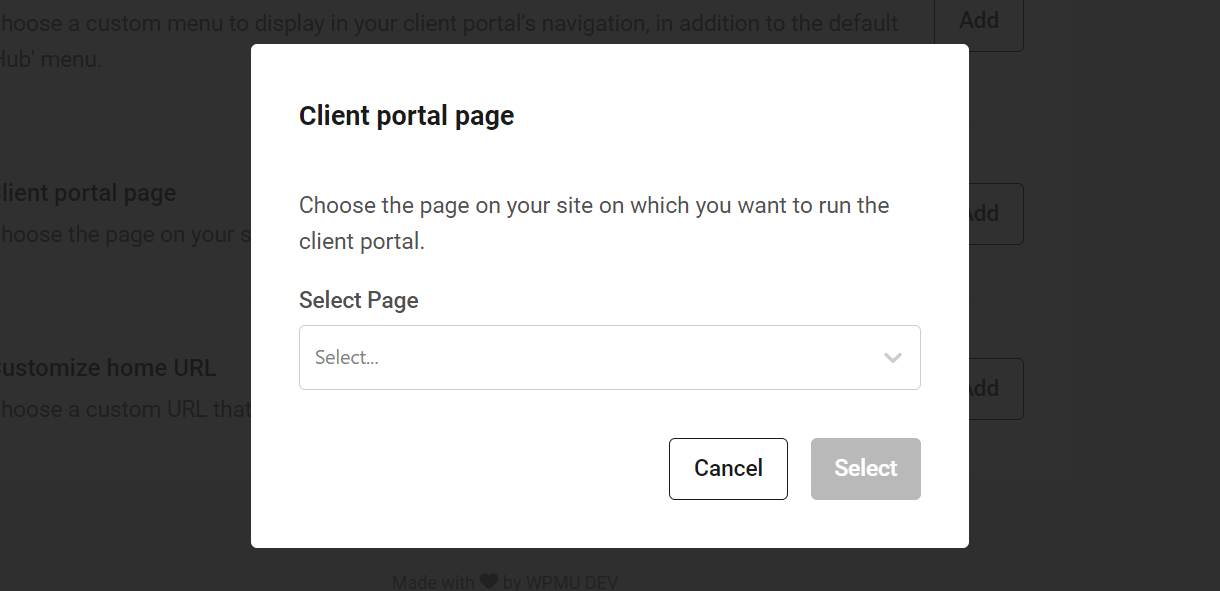
Client portal page
Click the Add button here and select the page on your site that should be used for your Client Portal.
Note that this only affects the URL of your Client Portal. You cannot add additional content to display on that page.
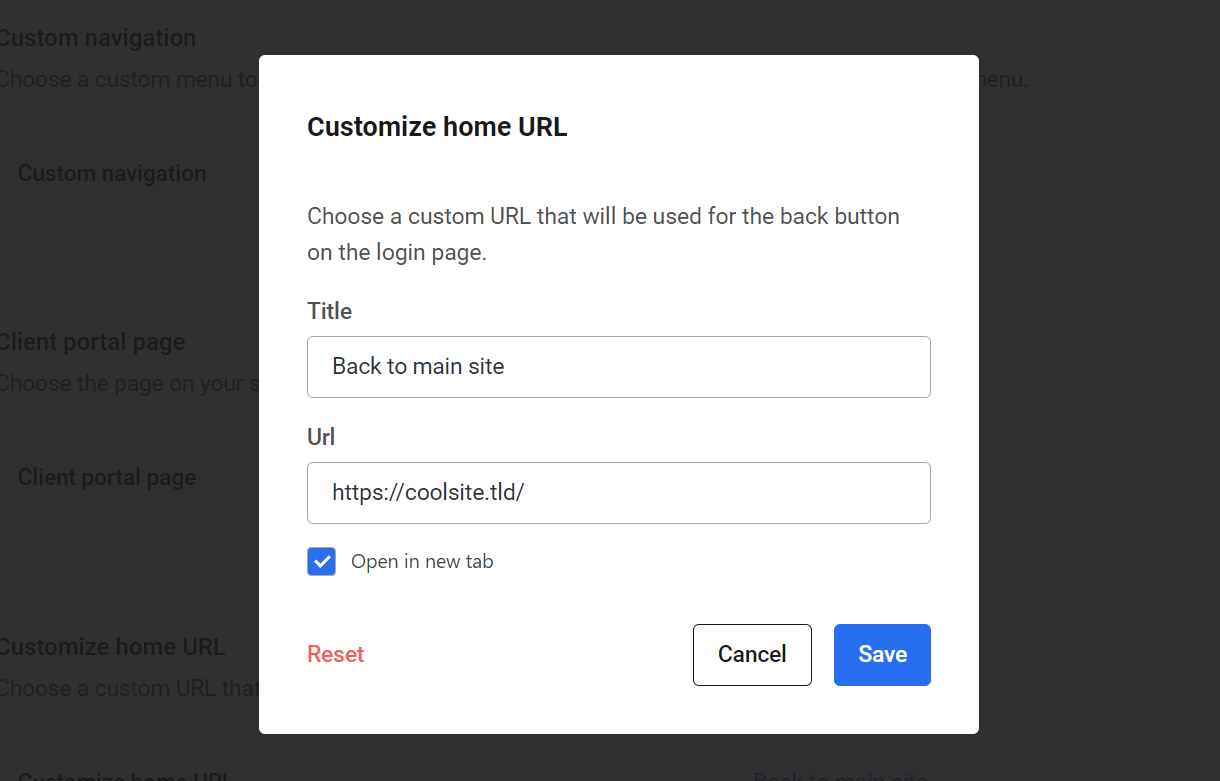
Customize home URL
By default, the back link on the Client Portal login page uses your site title as its label and points to the site’s homepage. This option enables you to customize the label and URL of that link if needed. Click the Add button and enter the Title and URL you prefer.

13.1.3 Login & Signup
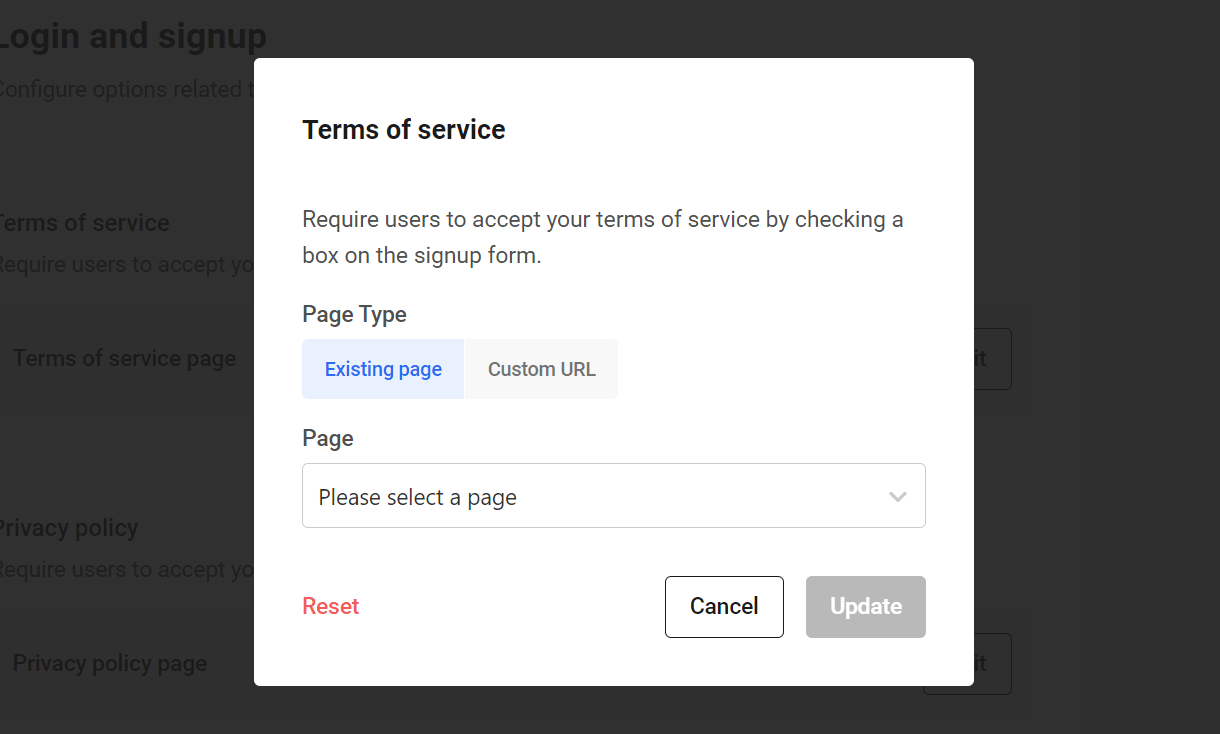
Link to chapter 1These settings enable you to specify your own Terms of Service and Privacy Policy pages. Specifying both of these pages will add a checkbox to the signup forms that your clients and/or team members must check when they create their account in your Hub. See Signup Forms below for examples.

For each page, click the Add button on the corresponding row and either select an existing site page, or enter a custom URL.
Remember to include information related to your reseller activities on your Terms of Service and Privacy Policy pages; service level agreement, cancellation procedures & costs, payment rules & suspensions, data handling & compliance, etc.
Signup Forms
The signup form looks a bit different depending on whether the user account being created is for a client or a team member, and which action triggered the process.
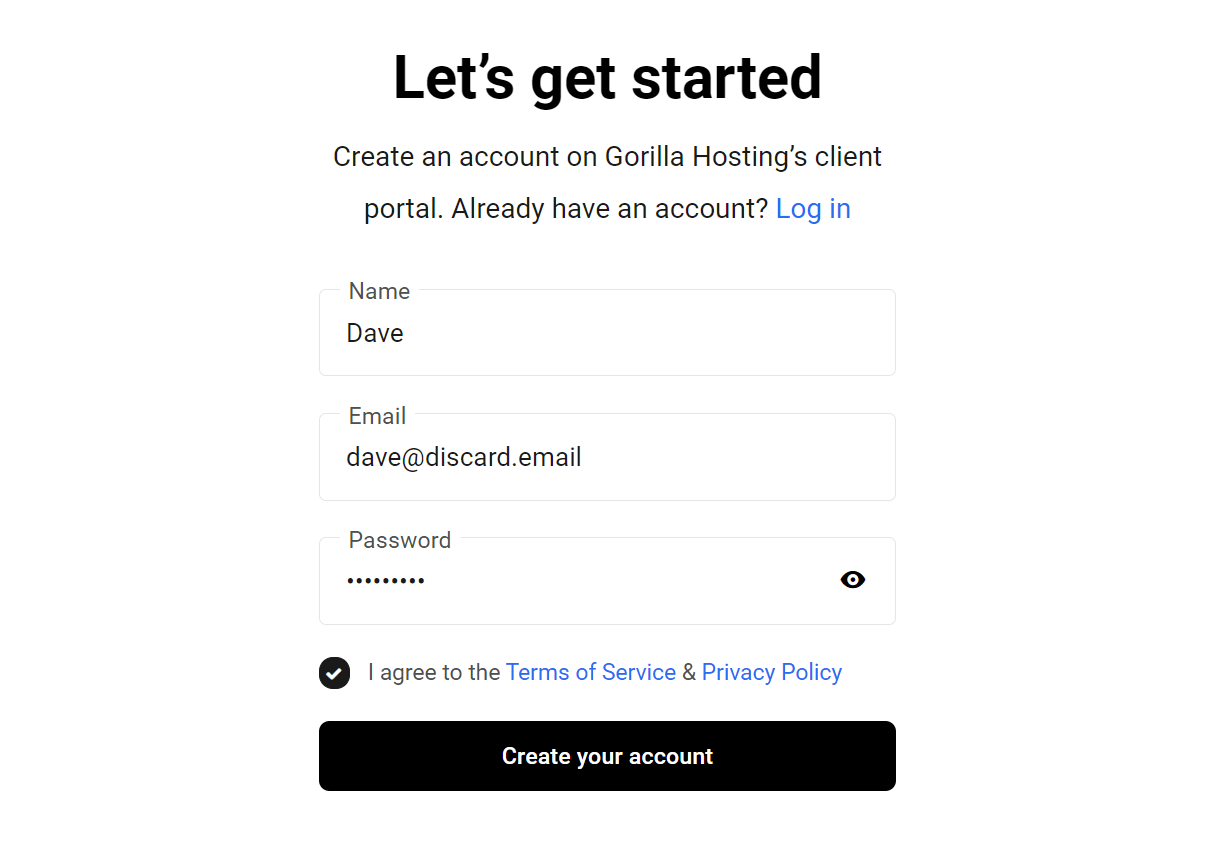
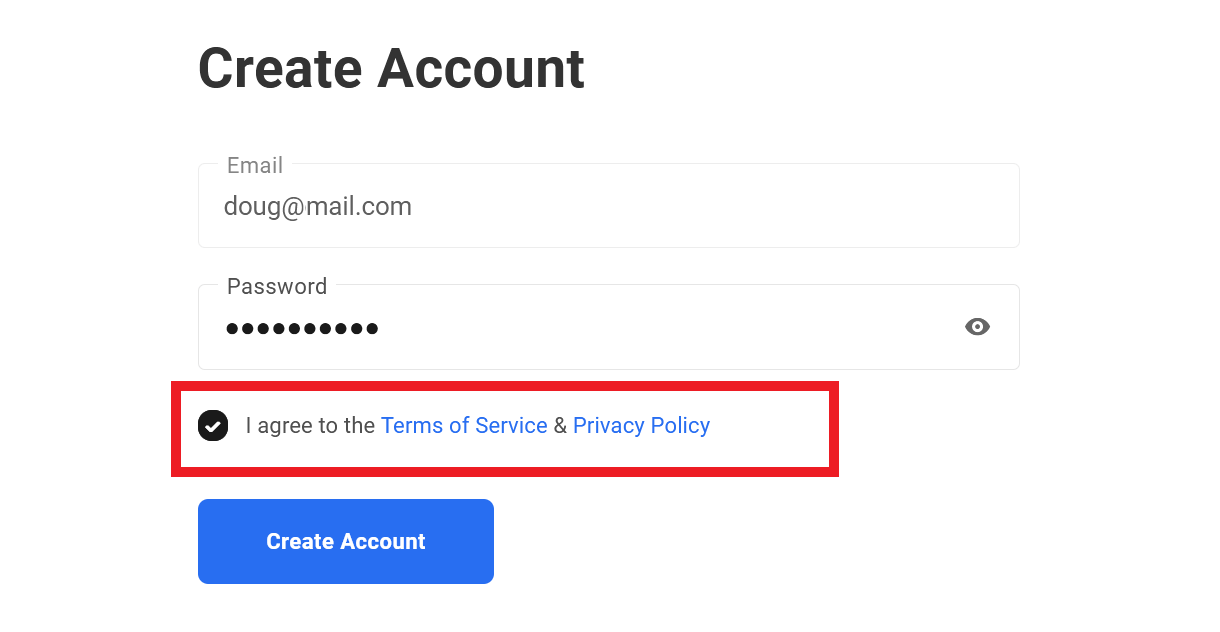
When a client purchases a reseller product from you, the Create Account form that they land on if they’re not already logged-into your Hub would look like this:
When you manually add a new client to your branded Hub, they must click a confirmation link in an invitation email sent to them. The Create Account form they land on would look like this:
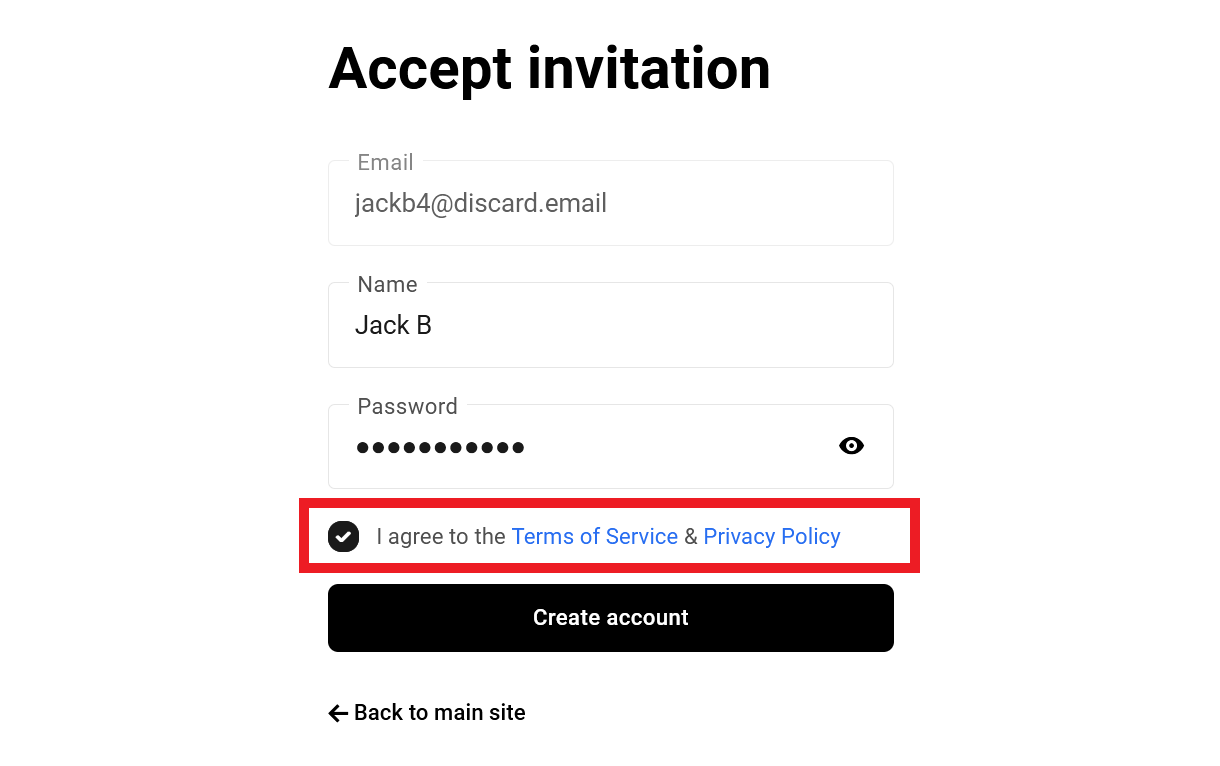
When you invite a new team member to your branded Hub, they also must click a confirmation link in an invitation email sent to them. The Accept Invitation form they land on would look like this:
Note that internal email validation is enabled by default on the signup forms of both clients and team members. This ensures that only valid email addresses can be used to create accounts.
The Hub Client Emails
The email system for The Hub Client on your own domain works slightly differently than the Hub at wpmudev.com. Typically, when a new user invite has been sent from the Hub, the email will be sent from [email protected] or [email protected]. In The Hub Client, the email will be sent from your own WordPress email.
However, if the site where you have installed The Hub Client is hosted by WPMU DEV, The Hub Client emails will be sent from our default [email protected] address. If you wish, you can whitelabel that address using SMTP. Note that for emails to be sent via SMTP, the Primary HUB should be set as a whitelabeled or custom HUB.
Note that password reset & 2-factor-authentication backup codes emails sent from the Hub Client will always have our [email protected] address as the send-from address, regardless of whether you have set up SMTP on your site. This is a security policy to ensure delivery and to avoid interception by bad actors.
If you are experiencing errors when sending out emails to invite your users, it may be due to our IPs not being allowlisted on your site. Specifically for this issue, we recommend adding the WPMU DEV Site IP, found in the WPMU DEV IP Addresses document, to your allowlist. However, in general, it is a good idea to add all of our IPs to your allowlist to ensure that all of our services can communicate with your site smoothly.
13.1.4 Client Support
Link to chapter 1This section enables you to configure your own support options for your Client Portal.
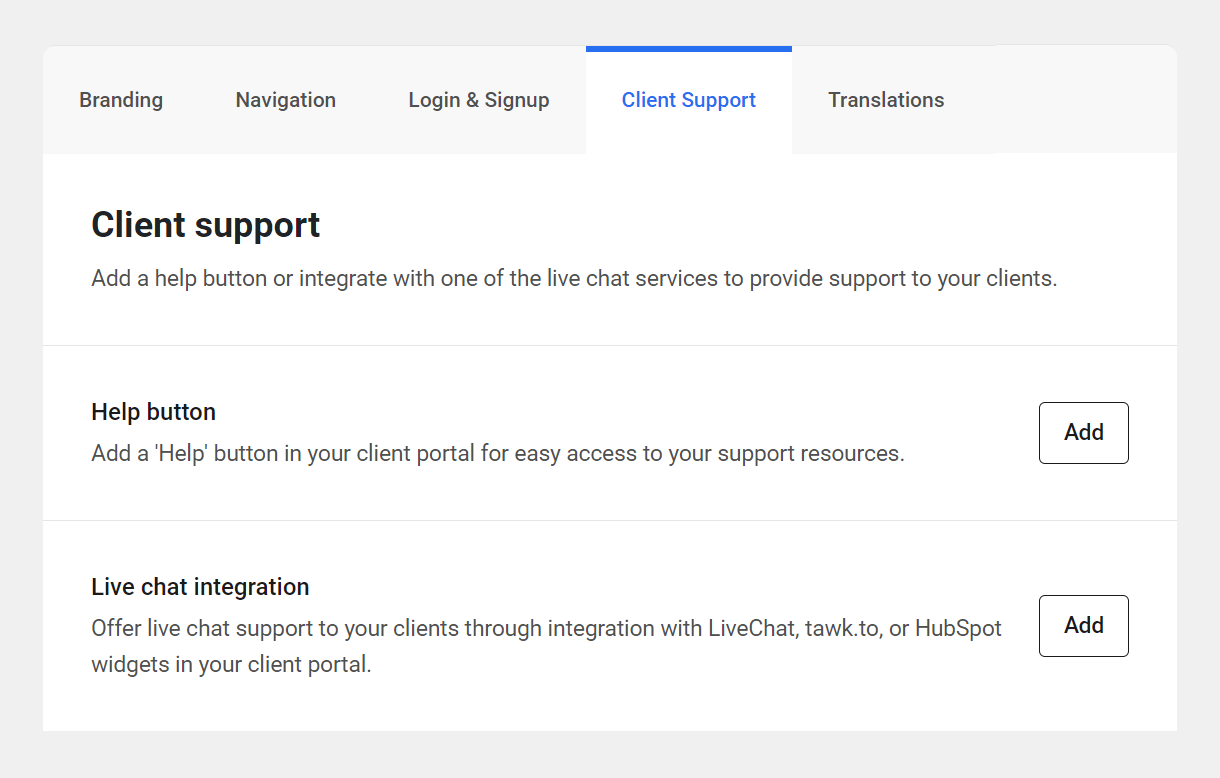
Help button
Enabling this option will add a floating Help bubble on your Client Portal page that, when clicked, will direct the user to a URL of your choice in a new tab.
Your page could include any resources you like; your own support documentation, a 3rd-party ticketing system, or even our white labeled video tutorials.
Click the Add button and select the site page you want to use for your help resources.
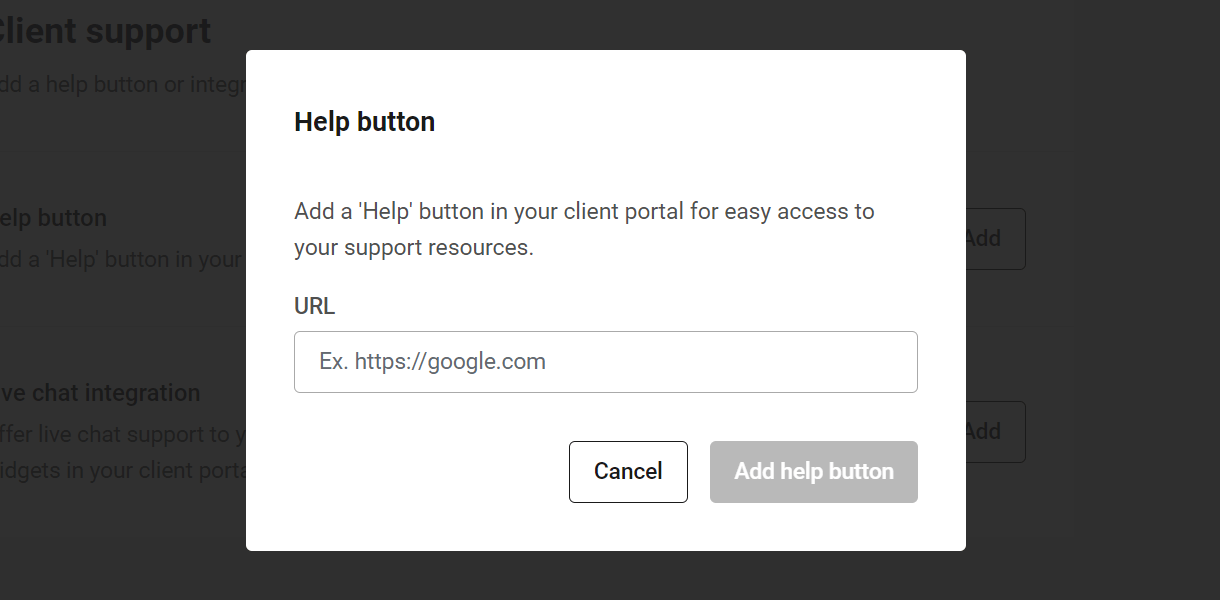
If you leave this configuration blank, the Help button will not show up on your Client Portal page. However, once a valid URL has been added, it will look like this:

Live chat integration
There are several live chat integrations available that you can choose from to offer live support to your clients. We’ve detailed those below in a separate Live Chat Integrations chapter.
13.1.5 Translations
Link to chapter 1This section provides language options that apply only to your client portal.

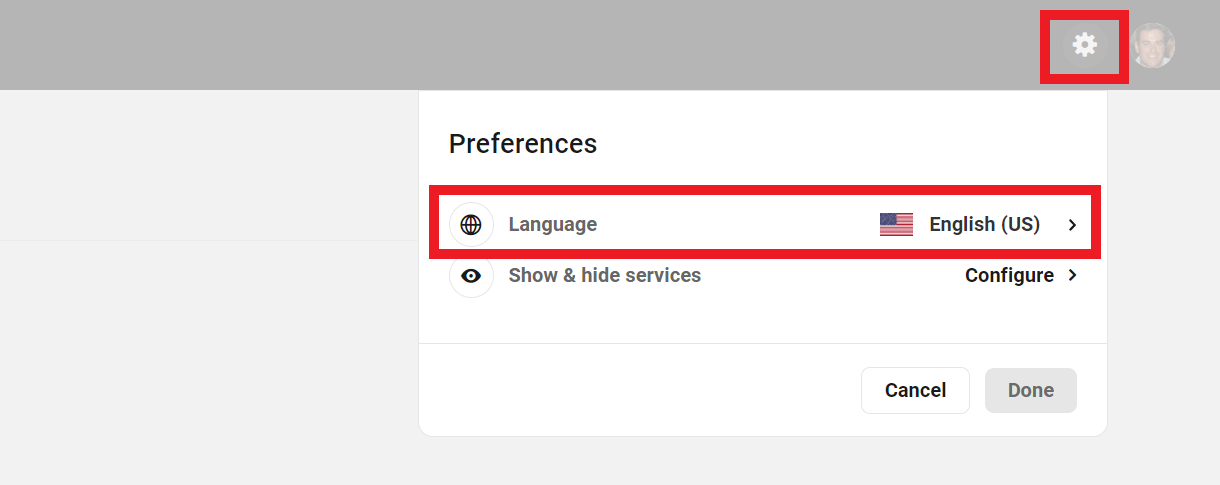
Client Portal Default Language
Select the language that should be used in your client portal for all new clients.
Your Login & Signup pages will always display in the language selected here, and new clients will see your client portal in this language the first time they log in. Clients can of course change the client portal language to their preferred one under Preferences once they are logged in.
Translate The Hub Client Widgets
This simply provides instructions on how to translate elements of the hosting pricing table and domain reseller widgets that can be embedded on your sites.
Here are those same instructions for your convenience:
- Go to Settings > General and set the Site Language to the same as the Client Portal Default Language above.
- Go to WPMU DEV > Settings > Translations and select the language you want to translate the widgets to.
- Update the translations for The Hub Client plugin. This will automatically download the latest translation file for the selected language.
Note that this method will not affect things like the product & plan names, description & features that you manually enter for your hosting & domain Reseller products when creating or editing them in your Hub. You would need to enter those text elements in your chosen language for them to appear in your widgets in that language.
13.2 Live Chat Integrations
Copy chapter anchor to clipboardThis chapter provides guidance on setting up and connecting third-party products that are compatible with The Hub Client.
The chat widget integrations detailed below enable you to offer live chat support to your clients or team members from the Hub Client on your own site. They do not connect in any way to WPMU DEV.
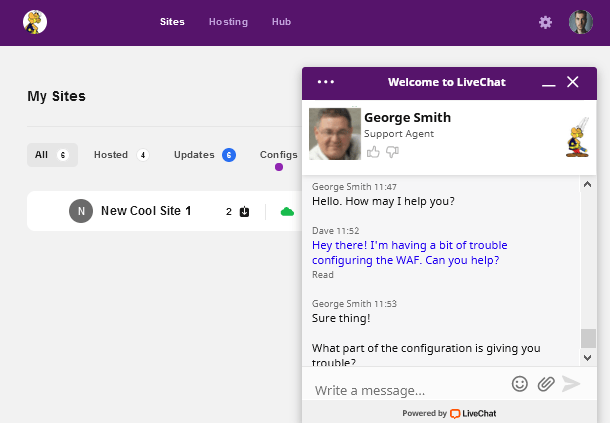
13.2.1 LiveChat Chat
Link to chapter 2This feature enables you to integrate a live chat support widget from LiveChat directly in the Hub Client on your site, branded with your Hub colors & logo. If you have also enabled the Help Button option in your Hub Client, that will appear beside the live chat trigger.
To get started with this integration, log into your account at LiveChat.com or create a free account there if you don’t already have one.
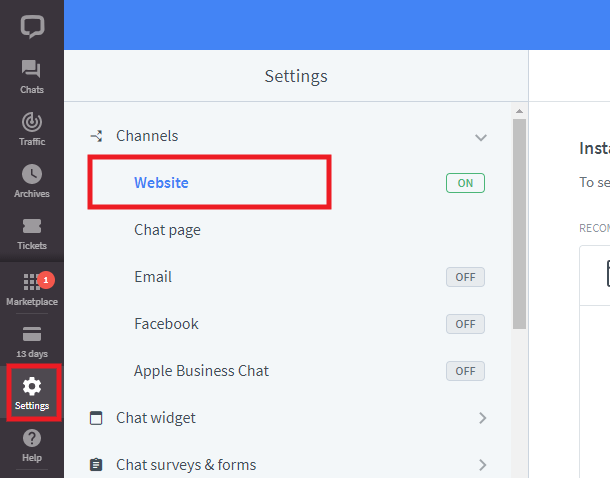
Once logged-in, click the Settings icon in the left-hand sidebar, then select the Website option.
In the right-hand pane, you’ll see a section where you can Install LiveChat code manually. Pop that section open and click the Copy code button to get the code shown there, and paste that into a simple text file.
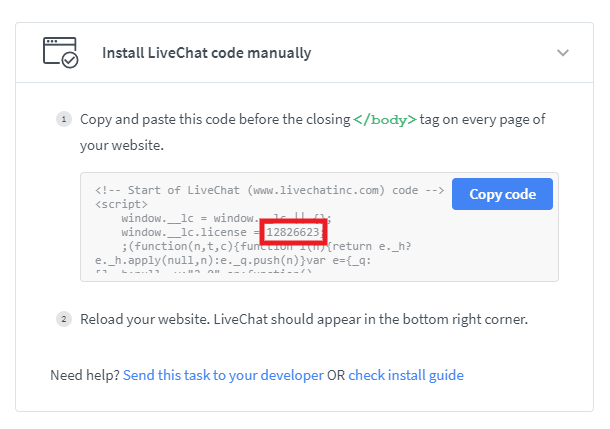
Then copy only the numbers from the license ID in that block of code; that’s all you need for this integration.
Once you have copied your LiveChat license ID, go to The Hub Client > Client Portal > Client Support in your site’s wp-admin and, in the Live chat integration section, click the Add button.

In the modal that pops open, select LiveChat and paste the license ID that you copied from your LiveChat account into the License ID field, then click Save.

Now when you visit your Hub page on your site, you should see your new LiveChat chat widget on the bottom-right corner.
Managing Chat Messages
By default, you’re notified of all incoming chats, as well as new messages, tickets, visitors and visitors in the queue, with a bell sound or voice message. You can adjust your Notification preferences when you click on your Profile menu at the bottom-left corner of your LiveChat account.

All ongoing chats can be managed by clicking on the Chats icon at top-left in your LiveChat account.
You can access and manage your support tickets by clicking on the Tickets icon.

Editing chat widget options and appearance
You can edit and brand the appearance of your chat widget at any time by clicking the Chat Widget > Customization option in your LiveChat account Settings.

You can also set up and customize the pre and post-chat surveys, email capture, ticket form when you’re offline, and a whole lot more. From the Settings menu, select Chat surveys & forms to get that done.

For help with anything else related to your LiveChat chat widget or account, please see the LiveChat help documentation.
13.2.2 Tawk.to Chat
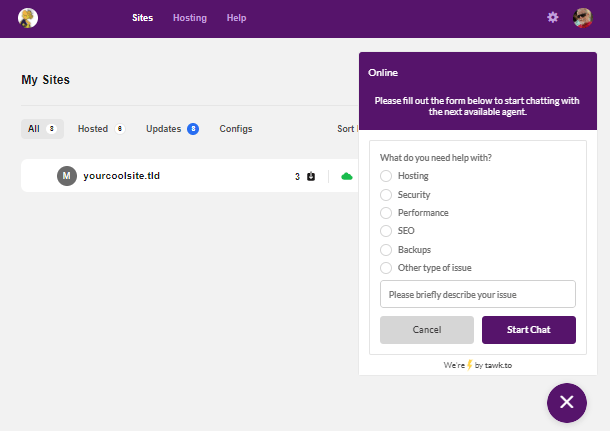
Link to chapter 2This feature enables you to integrate a live chat support widget from Tawk.to directly in the Hub Client on your site, branded with your Hub colors. If you have also enabled the Help Button option in your Hub Client, that will appear beside the live chat trigger.
To get started with this integration, log into your account at Tawk.to or create a free account there if you don’t already have one.
If you already have an active Tawk.to account with at least one widget already created, just click the + Add Widget button at top-right, and create a new one as detailed below.

If this is a new account, click the Administration icon in the left-hand sidebar once you’re logged-in. Enter any Widget Name you like for your new chat widget, and select either the Inline or the Embed option; both work fine for this integration. Then click the Create Widget button.
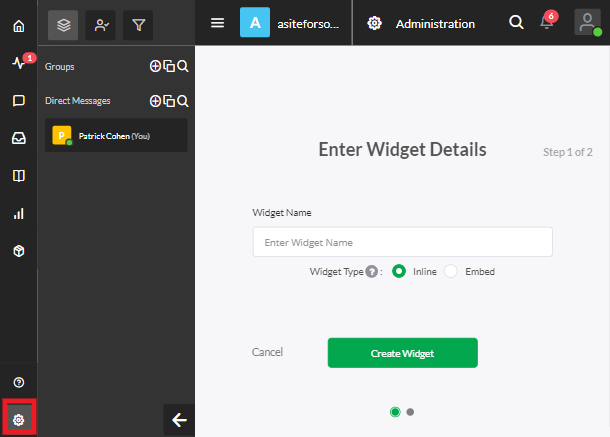
On the next screen, just click the Done button to create your chat widget.

The page will reload and you’ll now see all the info related to your new chat widget. What you want right now is the Widget code shown at the top-right of the screen.

Click to copy that code, and paste it into a simple text file. Then copy only the s1.src URL from that code. That’s all you need for this integration.

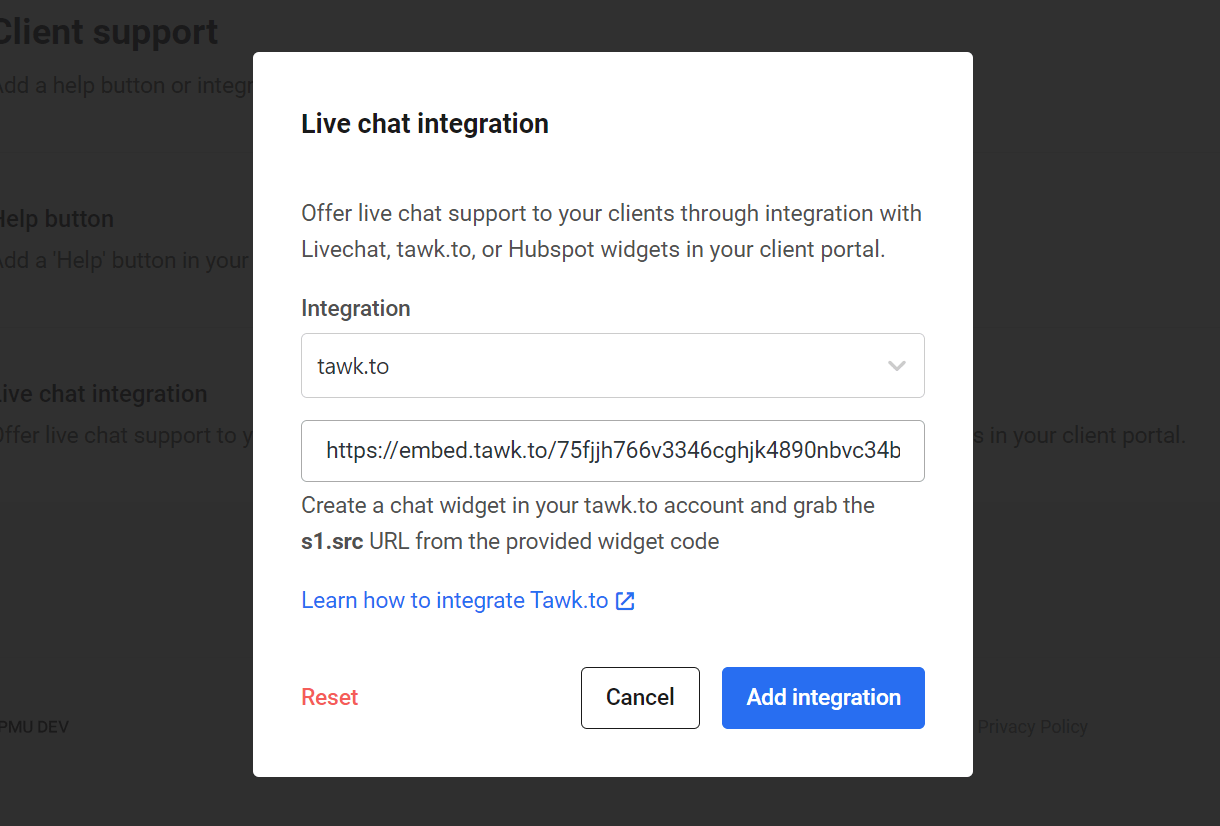
Once you have copied the s1.src URL, go to The Hub Client > Client Portal > Client Support in your site’s wp-admin and, in the Live chat integration section, click the Add button.
In the modal that pops open, select tawk.to and paste the s1.src URL into the s1.src URL field, then click Save.
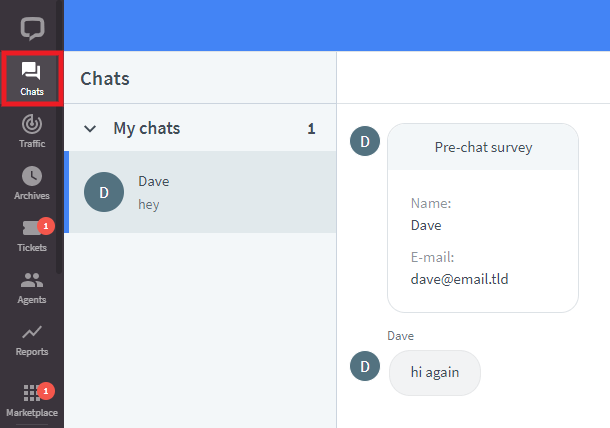
Now when you visit your Hub page on your site, you should see your new Tawk.to chat widget on the bottom-right corner.
Managing Chat Messages
By default, you’re notified of all incoming chats, as well as new messages, and visitors with various bell sounds. You can adjust the notifications by clicking Manage Sounds & Notifications from your Profile menu at the top-right corner of your Tawk.to account.

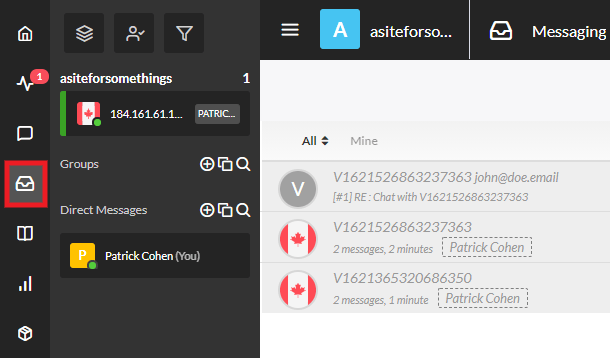
All ongoing chats can be managed by clicking on the Chats icon at top-left in your Tawk.to account.

You can access and manage your support tickets by clicking on the Messaging icon.
Editing chat widget options and appearance
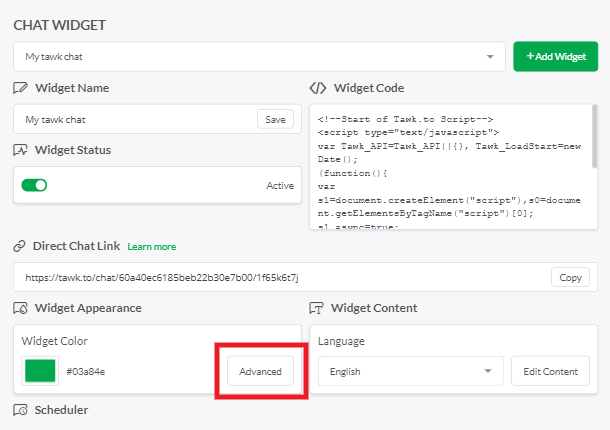
You can edit the appearance of your chat widget at any time by clicking the Advanced button in the Widget Appearance section of your Chat Widget settings.
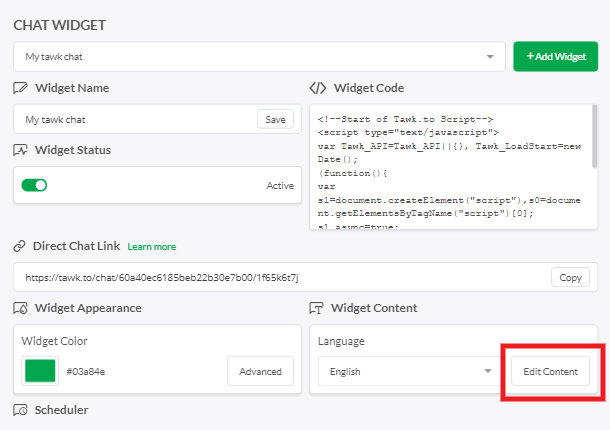
You can also set up and customize the pre and post-chat surveys, email capture, ticket form when you’re offline, and a whole lot more. Click the Advanced button in the Widget Content section of your Chat Widget settings.
For help with anything else related to your Tawk.to chat widget or account, please see the Tawk.to help documentation.
13.2.3 HubSpot LiveChat
Link to chapter 2This feature enables you to integrate a live chat support widget from HubSpot directly in the Hub Client on your site, branded with your Hub colors & logo. If you have also enabled the Help Button option in your Hub Client, that will appear beside the live chat trigger.

Create a Chatflow in HubSpot
To get started with this integration, log into your account at HubSpot.com or create a free account there if you don’t already have one.
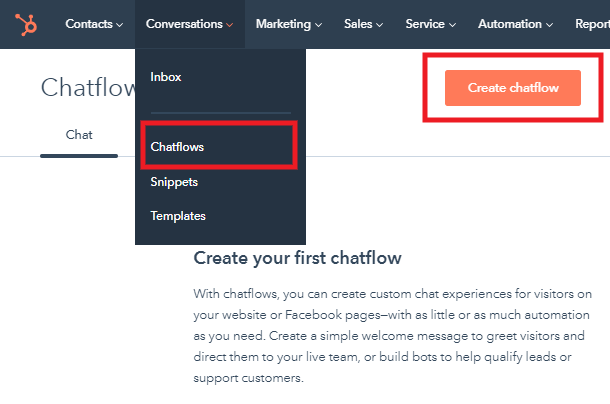
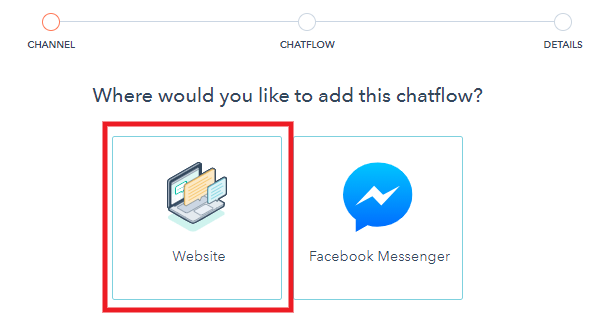
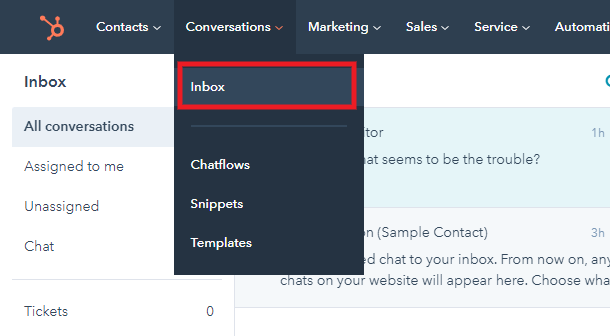
Once logged-in, click Chatflows in the Conversations menu, then click the Create chatflow button.
In the next step, select Website.
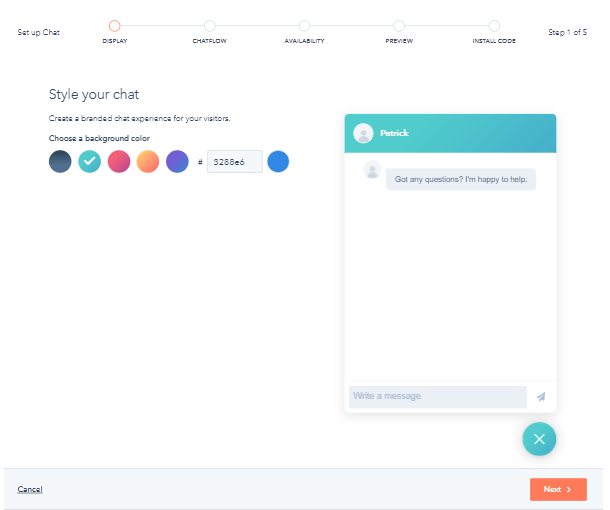
Then click the Set up chat button to configure the live chat widget for your Hub Client.

Go through the wizard steps to configure your chat widget however you want it and style it to fit your brand colors. You can always edit things later in the Chatflow settings in your HubSpot account.
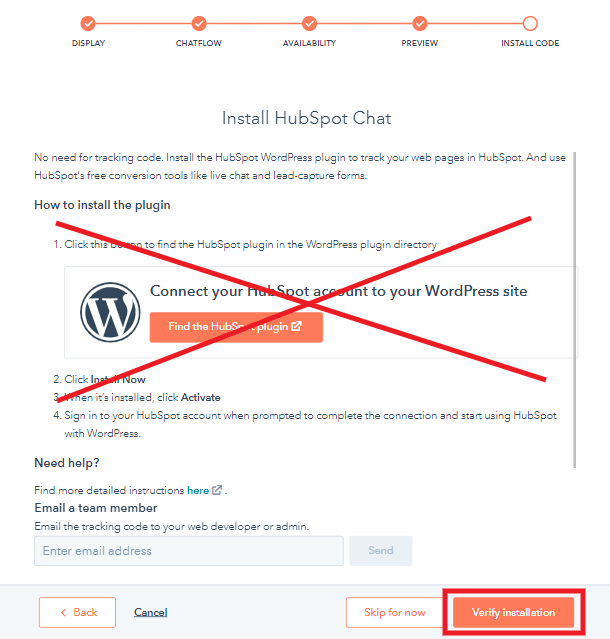
Once you’re done configuring your chat widget in their setup wizard, you’ll see a prompt to install their WordPress plugin. You do not need that for this integration, so just ignore that prompt and click the Verify installation button at the bottom-right.
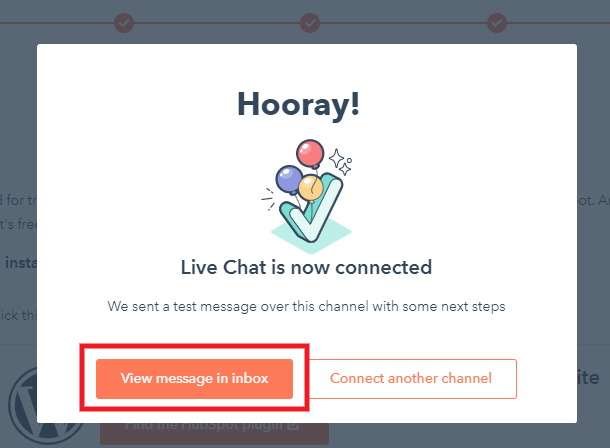
You should then see a confirmation message that Live Chat is now connected, and that a test message has been sent. Click the View message in inbox button to be redirected to your new HubSpot chat inbox.
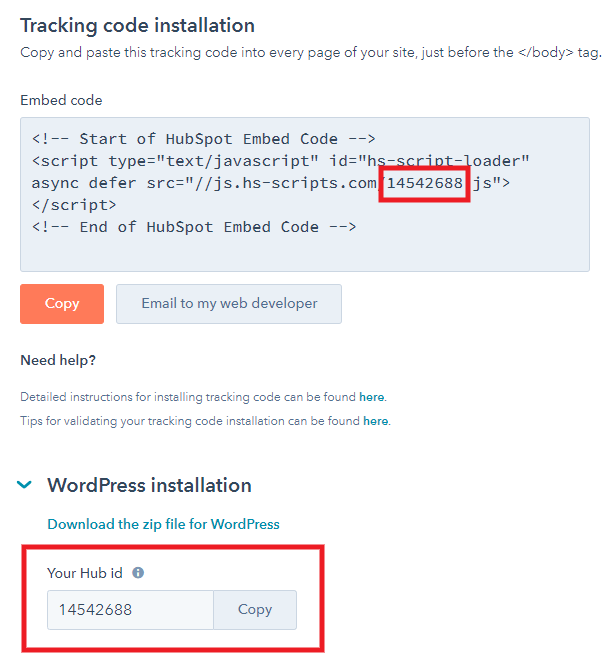
Get Your HubSpot Tracking Code
At the top of the Inbox screen, you may see a message saying Tracking code is not installed, with a button to get the code. Ignore that message and button, as that will just once again show you the prompt to install their plugin, which you do not need for this integration.
Instead, click the gear icon at the top-right of the screen to open your account settings.

Then click Tracking Code in the sidebar menu on the left.

In the Tracking code installation section, you’ll see an embed code. You need only copy your HubSpot ID from that code. You can also click the WordPress installation link below that and copy the ID directly from there.
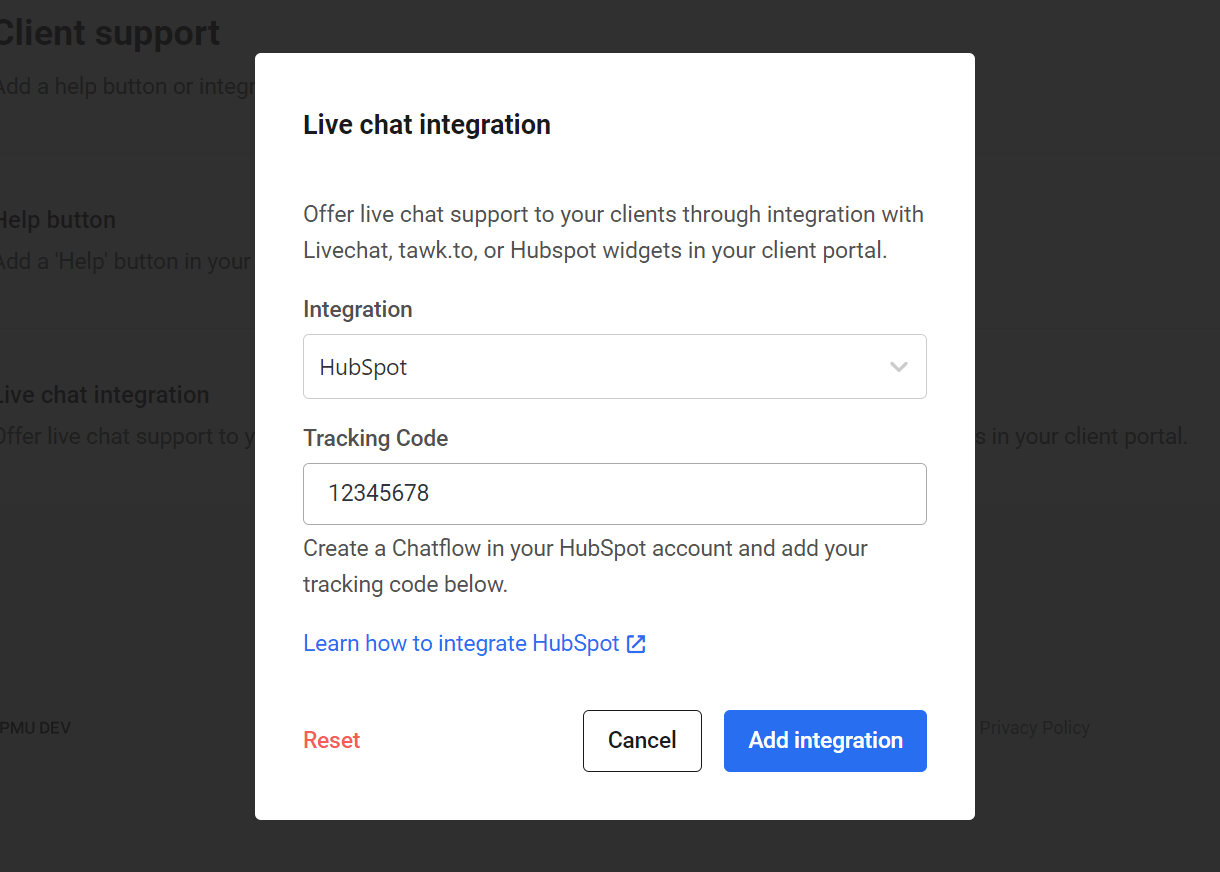
Once you have copied your HubSpot ID, go to The Hub Client > Client Portal > Client Support in your site’s wp-admin and, in the Live chat integration section, click the Add button.
In the modal that pops open, select Hubspot and paste your HubSpot ID in the HubSpot Tracking Code field, then click Save.
Now when you visit your Hub page on your site, you should see your new HubSpot Live Chat widget on the bottom-right corner.
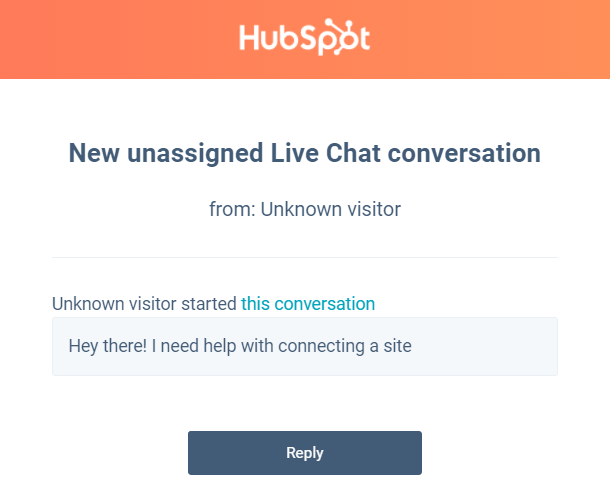
Managing Chat Messages
By default, you will be notified by email of every new conversation started by a user in your chat widget. The email would look like this:
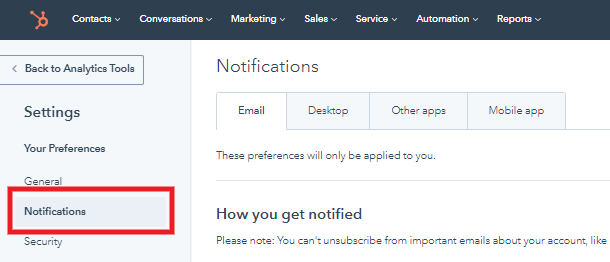
Every message sent by a user will also trigger notifications according to how you configure them in your HubSpot account. By default, you’ll be notified of every new message in the chat widget with a bell sound on your desktop or laptop computer.
You can set up numerous other types of notifications too, like browser popups and push notifications to your mobile device. To access all of the notification options, click Notifications in your HubSpot account Settings.
Any time a user sends a message from that chat widget, it will appear in your HubSpot Inbox. You can access that in your HubSpot account by clicking the Inbox option in the Conversations menu.
Creating HubSpot Contacts
HubSpot sets cookies in the user’s browser each time a new chat session is triggered. However, all chat sessions show up as “Unknown visitor” in the Conversations inbox, and HubSpot only logs the history of chats from known contacts in your contacts list there.
So if you wish to keep a history of all chats for each user in your HubSpot account, we recommend that you enable the option to capture their email addresses as soon as they send their first message in the chat (see below). Entering an email address in the capture form in the chat widget in your Hub Client will trigger the creation of a contact, or update an existing one.
This will ensure that every time a user initiates a chat and enters the same email address in the capture form, the conversation will be logged under that contact in HubSpot so you can refer back to it at any time.
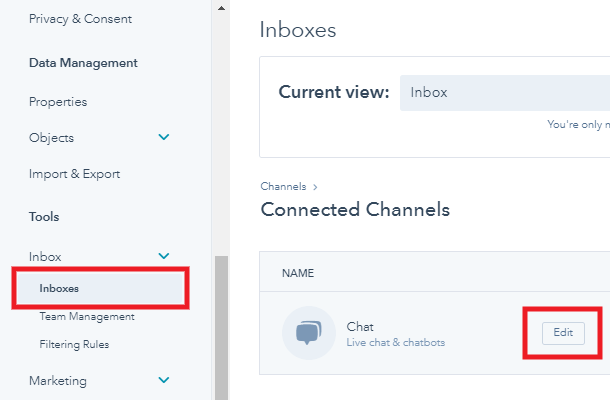
Editing chat widget options and appearance
You can edit the appearance of your chat widget at any time by clicking the Inboxes option in your HubSpot account Settings, then hover your mouse over the Chat section and click the Edit link there.
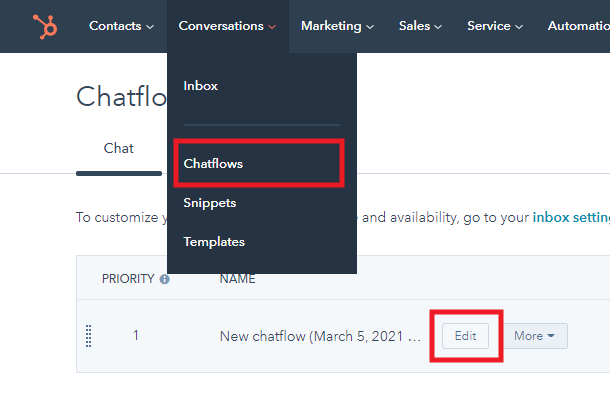
You can also edit the welcome message that displays to users in the chat widget, along with email capture if needed, default chat widget language, display behavior, triggers, chat widget position (left or right), and more To do that, click Chatflows in the Conversations menu in your HubSpot account. Then hover your mouse over the chatflow you want, and click the Edit button.
For help with anything else related to your Hubspot chat widget or account, please see the Hubspot help documentation.
13.3 Reseller
Copy chapter anchor to clipboardThis is where you select the Reseller products that you want to offer to your clients on your own site, and create the pricing table that you can embed anywhere on your site.
Of course, before being able to select any Reseller products here, you must first create them in your Hub. See Adding Hosting Reseller Products</a> and Adding Domain Reseller Products chapters in our Reseller documentation (coming soon).
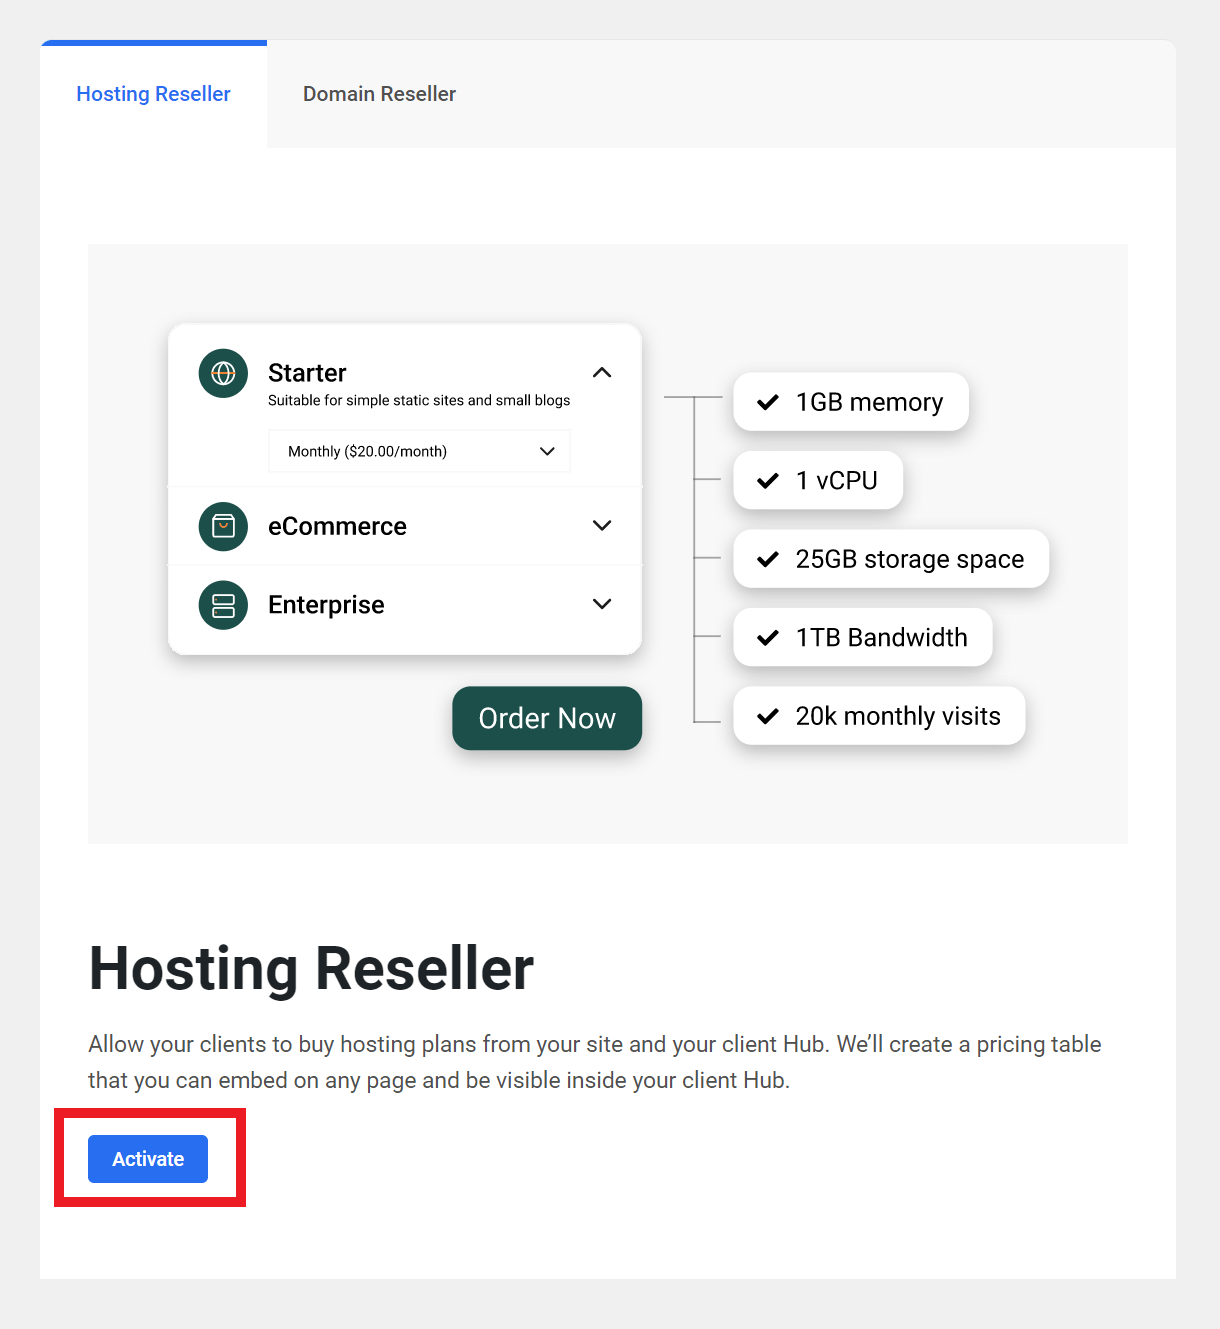
13.3.1 Hosting Reseller
Link to chapter 3To get started with setting up Hosting Reseller products on your site, click the Activate button.
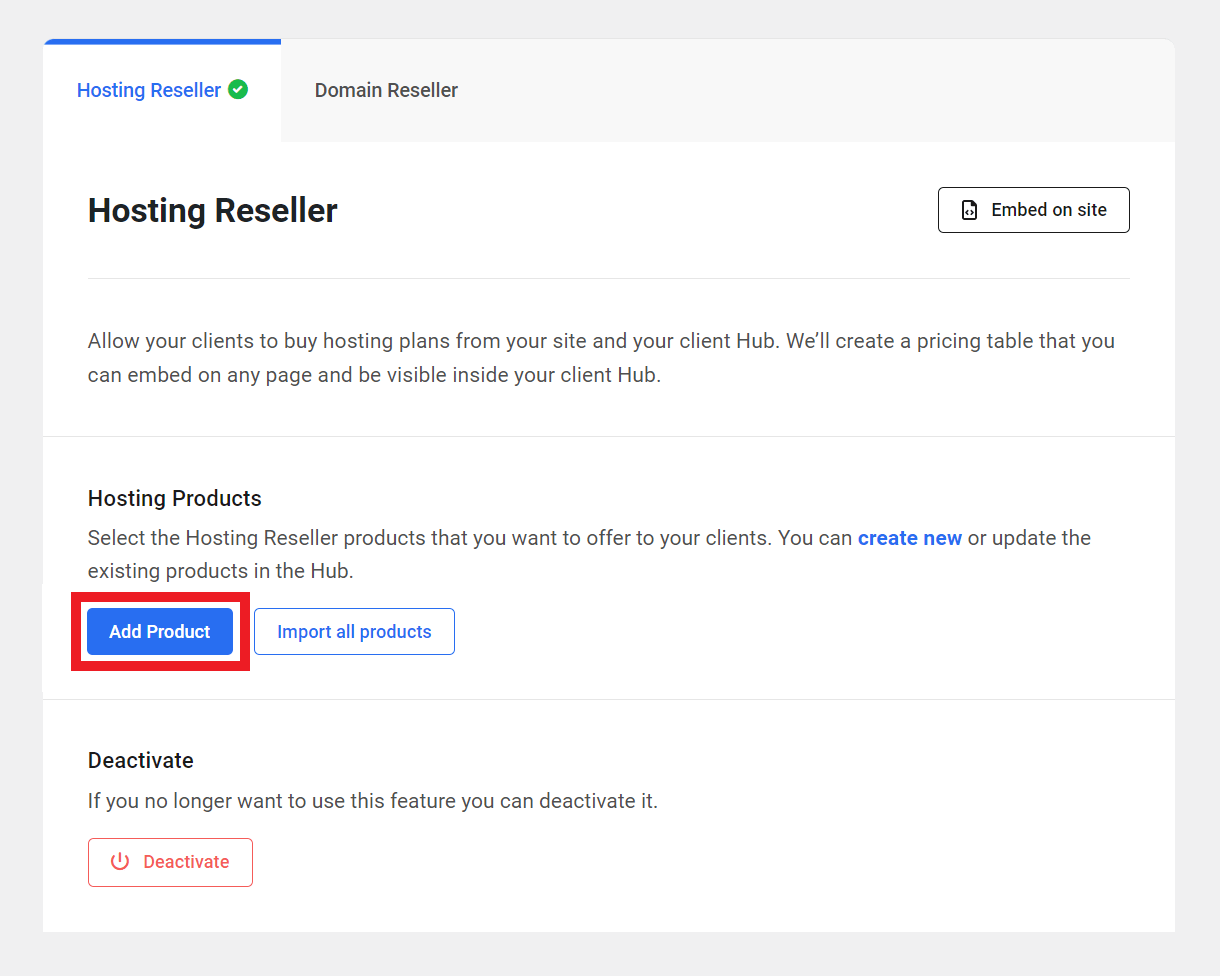
Adding Hosting Reseller Products
Once activated, the first thing to do is choose the hosting reseller products that you want to add to your pricing table.
Add Individual Products
If you wish to add only selected products & associated pricing plans, click the Add Product button to get started.
That will pop open a modal window where you’ll be prompted to select a product and its associated pricing plans, and specify where it should be available to clients using the Visibility options.
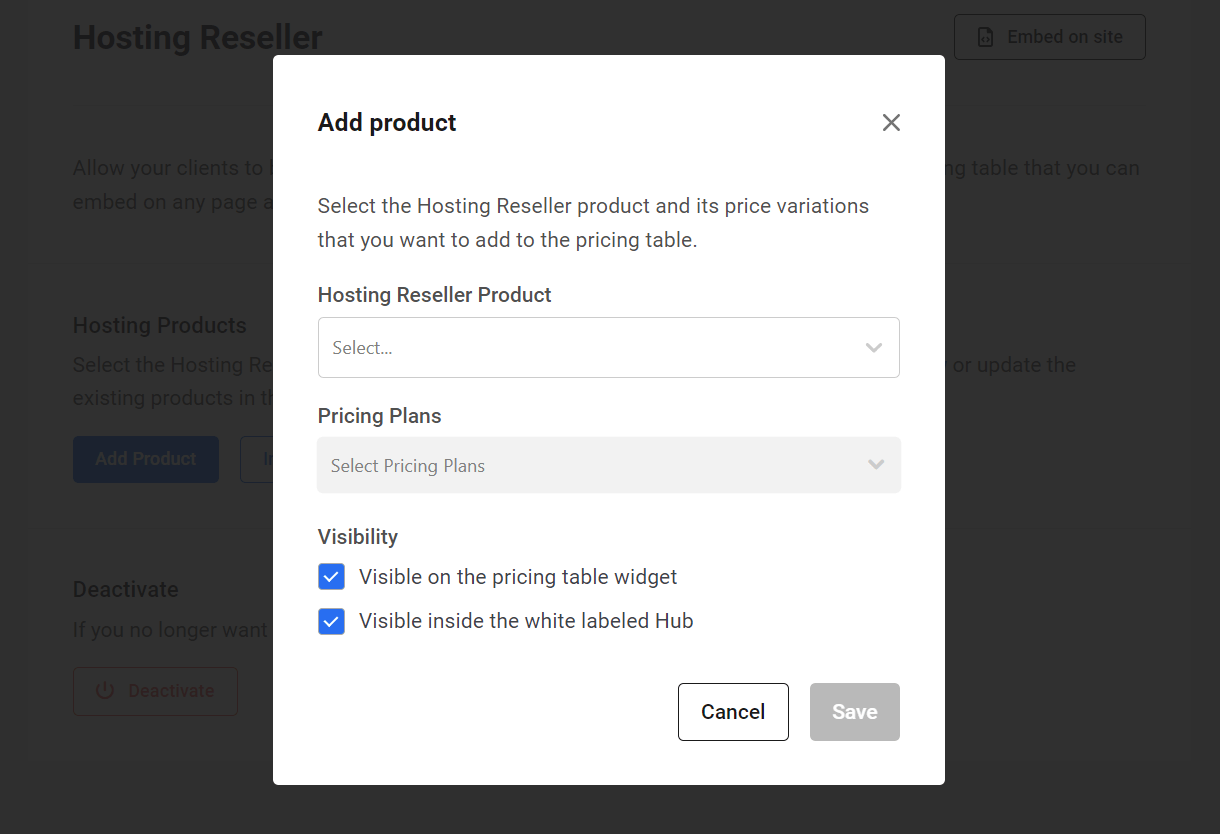
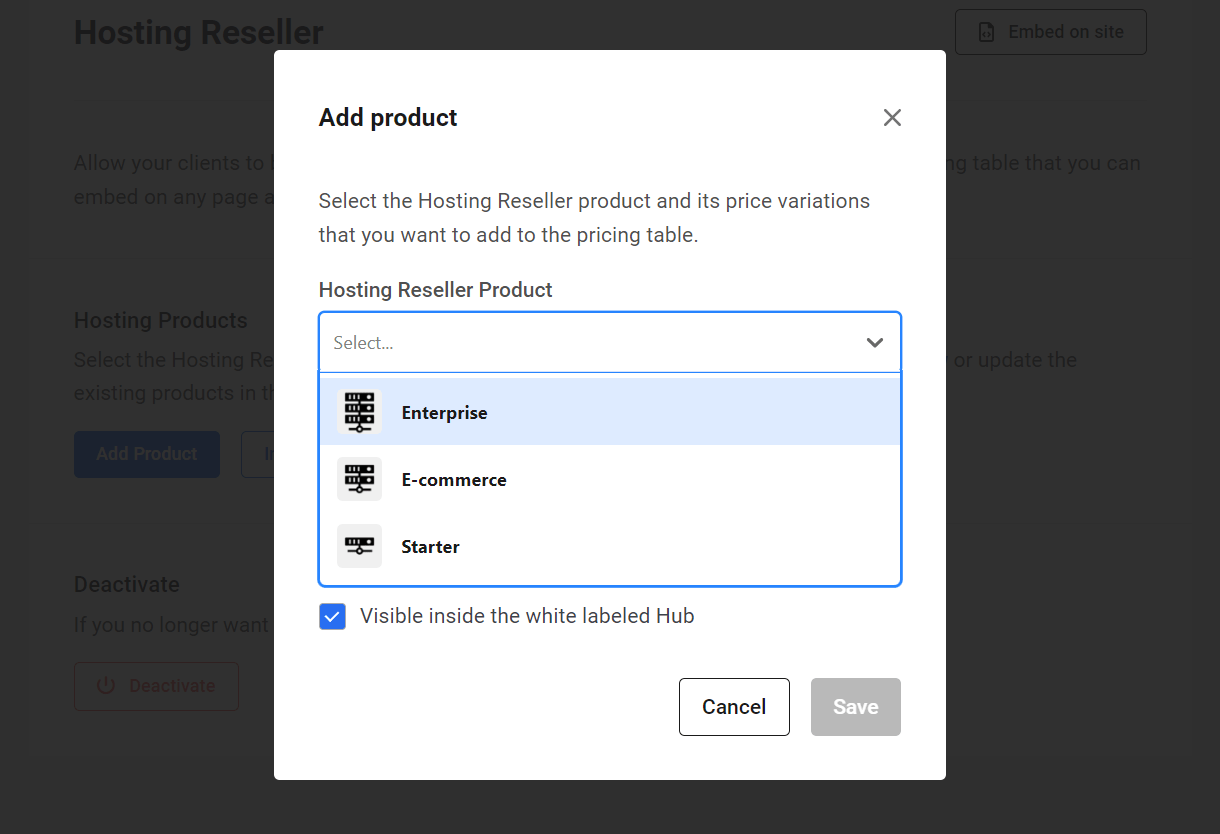
Click on the Hosting Reseller Product dropdown, and select the first product you wish to add to your pricing table. Remember, these are hosting reseller products that you have already created in your Hub.
Next, click on the Pricing Plans dropdown and select the plans associated with your product that you wish to include in your pricing table, and click the Save button.
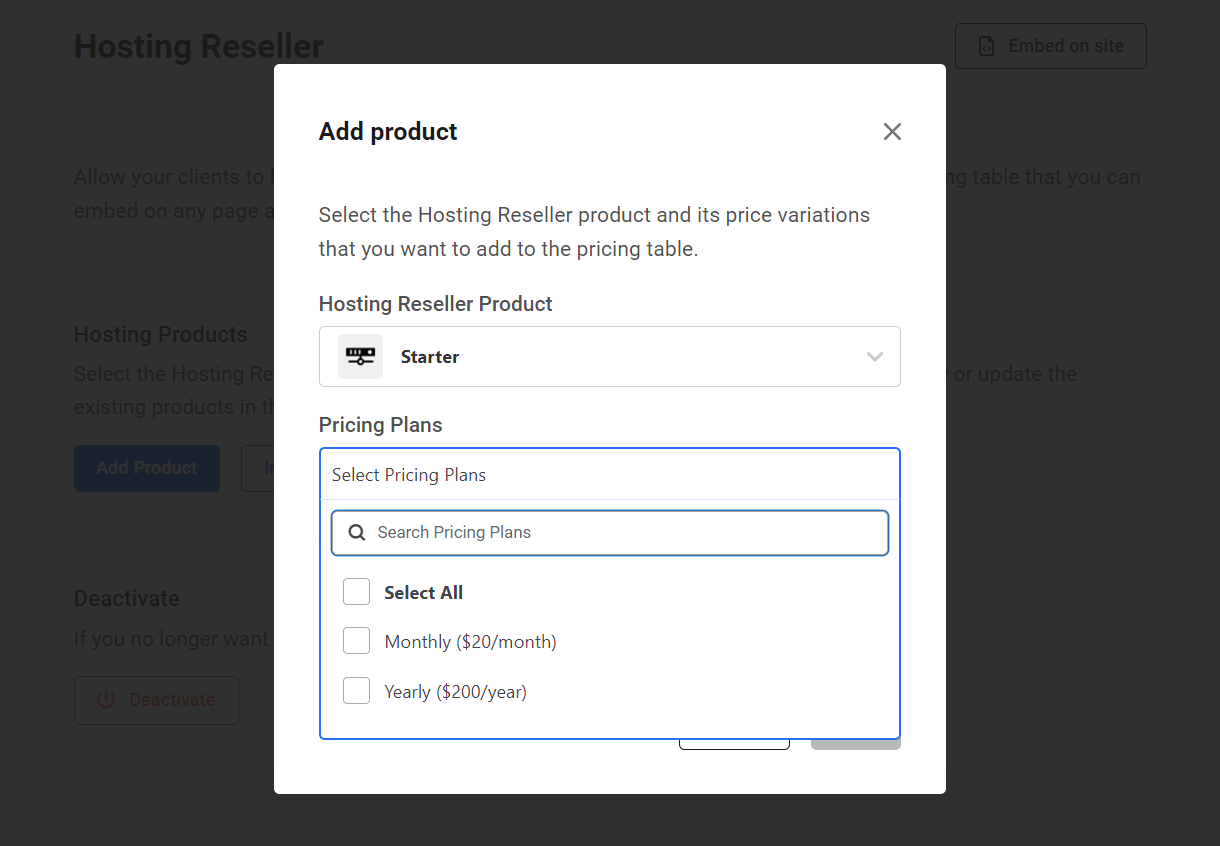
Finally, select where you want the product to be available using the Visibility options. You can choose to make it available in the pricing table widget, in your branded Hub, or both.

Add as many products as you like in the same manner.
Import All Products
If you prefer to add all the active products and pricing plans from your Hub in one go, click the Import all products button.

That will pop open a modal window where you’ll be prompted to confirm the action.

Both visibility options will be selected by default when using this option. You can edit products if needed after import.
Note that the Import all products option is limited to importing a maximum of 20 products and their associated pricing plans. So if you want to import more than this, you would need to add the rest individually as seen in Add Individual Products above.
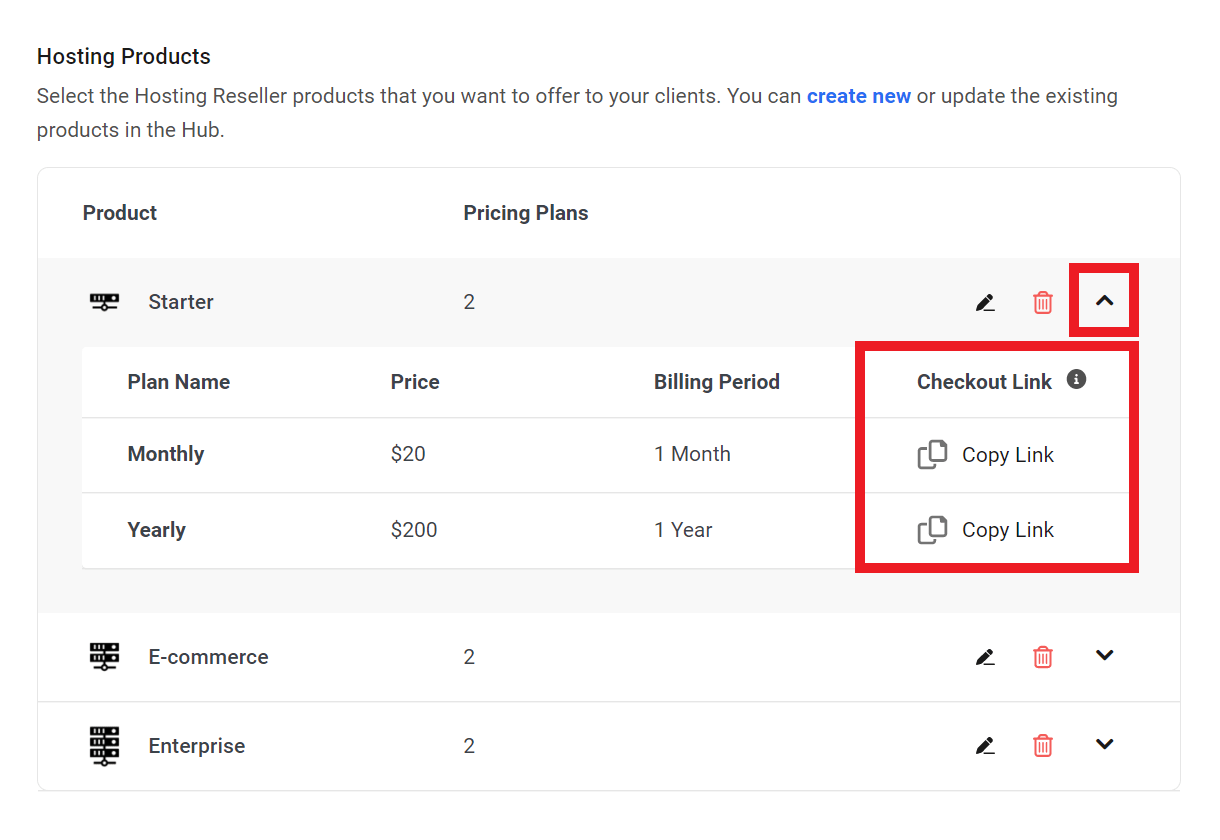
Hosting Reseller Products List
You’ll see all the products you’ve added in a list in the Hosting Products section.
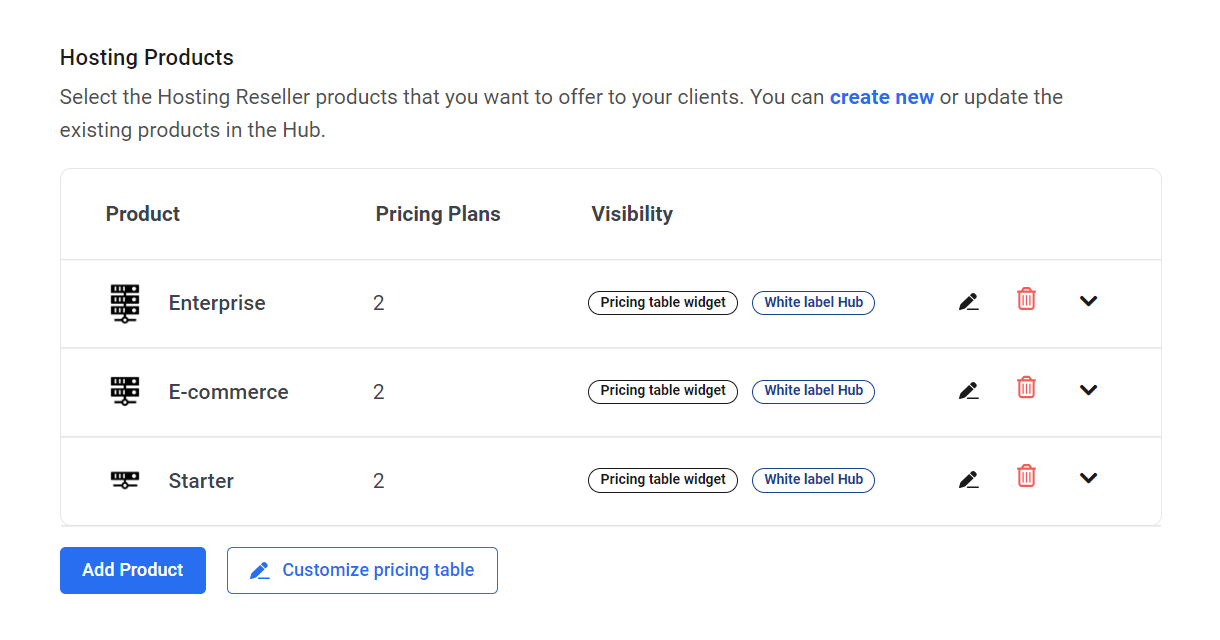
- Product – The name of the hosting reseller product
- Pricing Plans – The number of pricing plans imported for the product
- Visibility – Where the product has been made available to clients
The products will be displayed in your pricing table in the order they appear in this list, where top-to-bottom in the list equals left-to-right in the pricing table. If the order isn’t the way you want it, simply hover your mouse over any product to reveal the drag icon, then drag & drop it to the desired position.

To review the pricing plans you’ve included in any product, or to get their Checkout Links, click the arrow icon at the far-right of the product’s row to expand the details panel.

To edit a product, click the pencil icon in that product’s row.
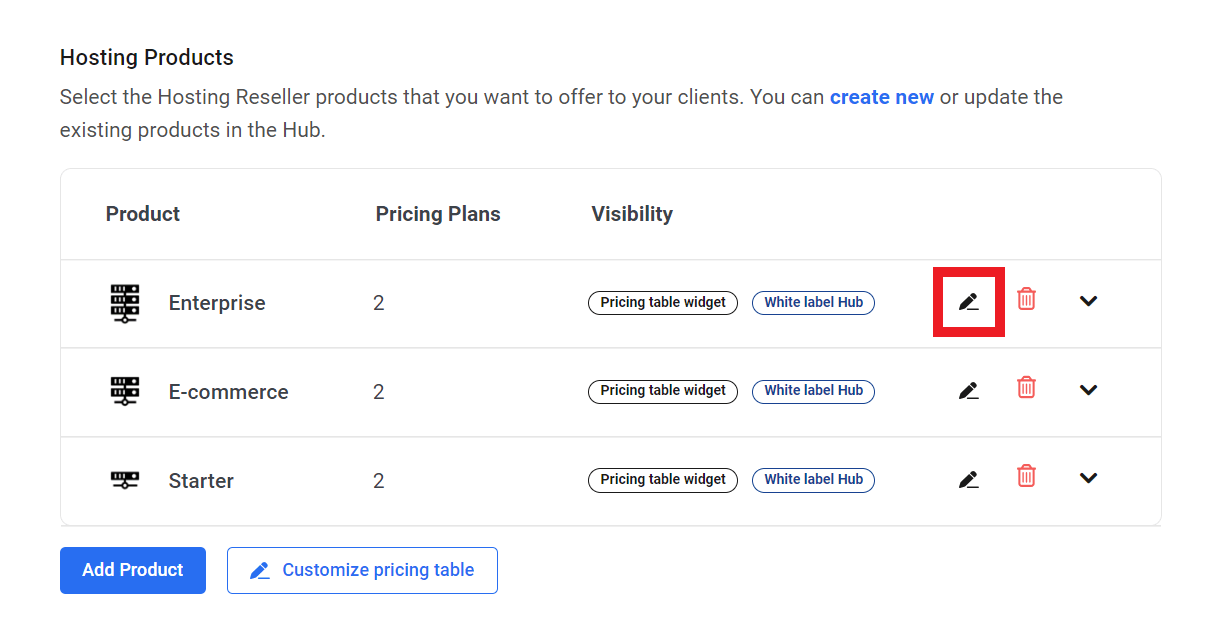
That will pop open a modal window where you can change the hosting product, the included pricing plans and/or adjust its visibility.

Note that editing details of the actual product or associated pricing plans can only be done in your Hub where the products were created, not in the Hub client.
To remove a product, simply click the trash icon in that product’s row.

Customize the Hosting Reseller Pricing Table
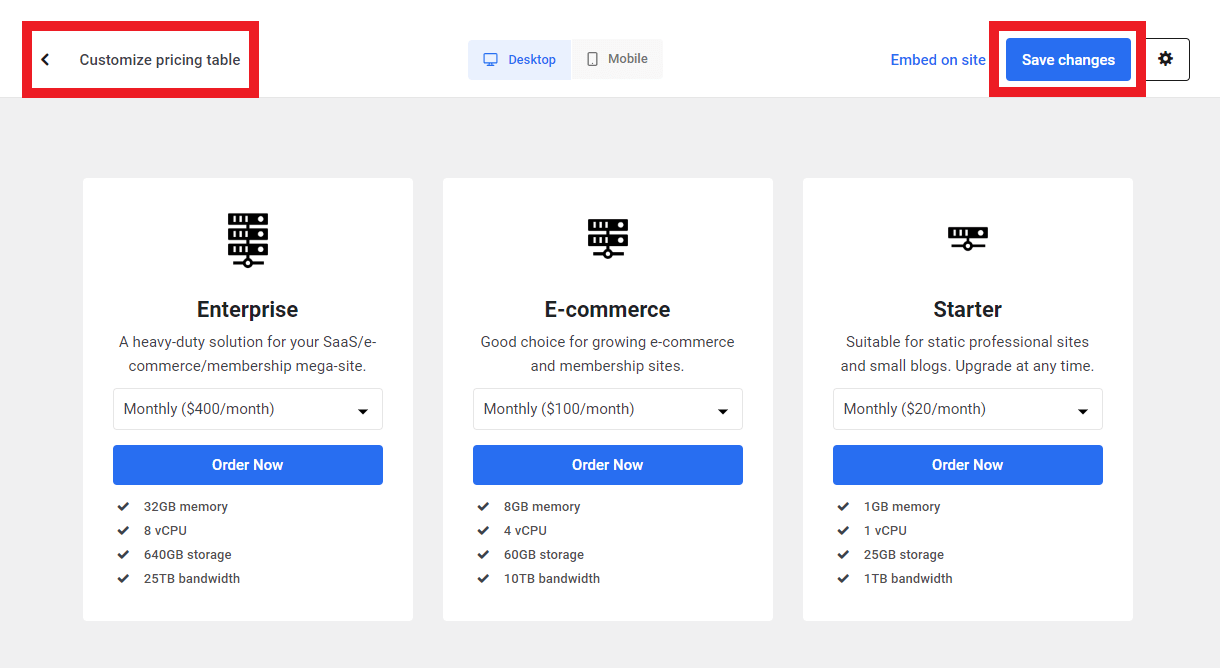
Once you have added all the products you want to include in your pricing table, click the Customize pricing table button to adjust its look and layout.
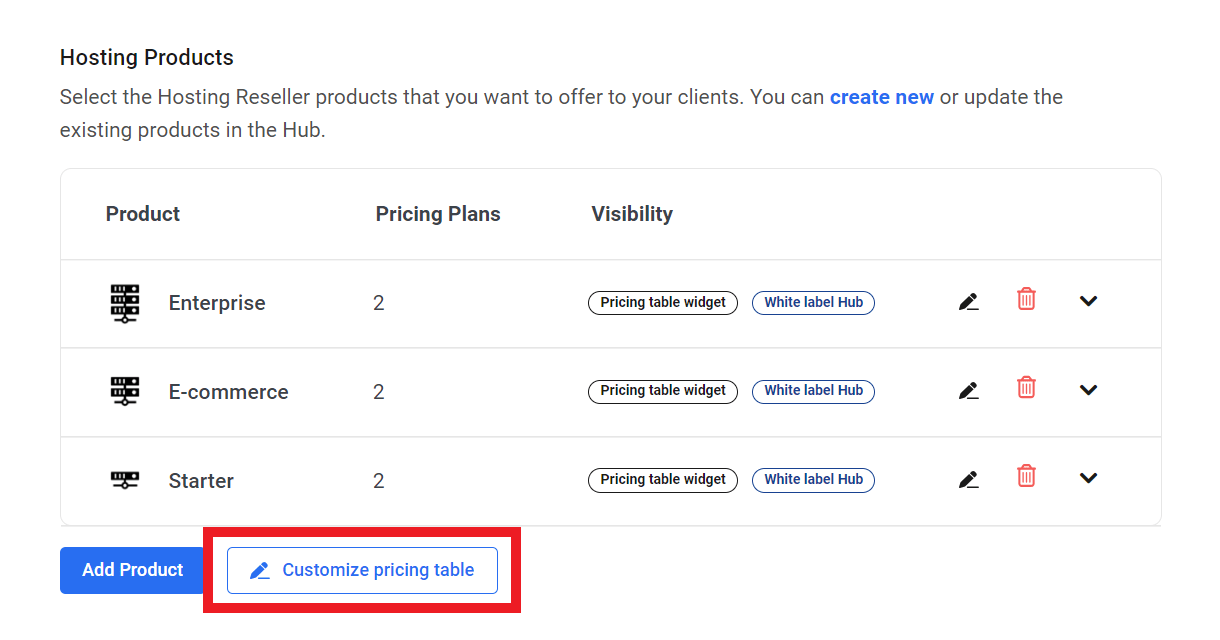
That will open the Preview window where you can see exactly how your pricing table will look. Use the toggle at the top to switch between Desktop and Mobile previews.

Click the gear icon at top-right to open the options panel where you can adjust the following elements to better suit your brand:
- Product Fields – Select which elements you want to display for each product in your pricing table; Product image, Product name, Product description and/or Feature list.
- Layout – Select between Grid or Stack layout.
- Button – Adjust the button Label text as well as the button Label color and Background color.
- Container – Adjust the Background color of each item in your pricing table.
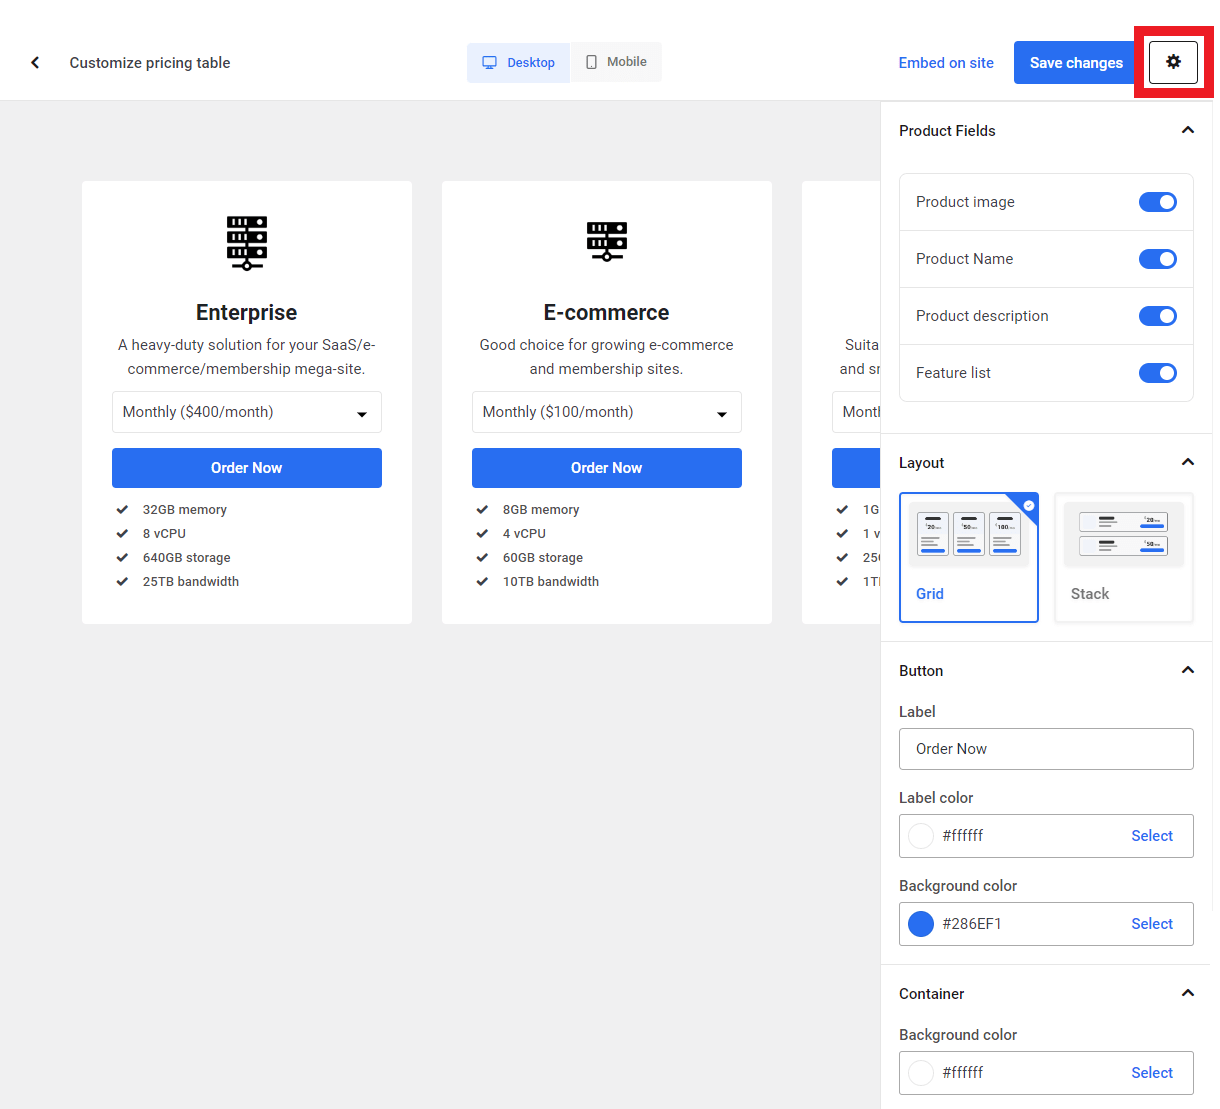
Once you’re done customizing the look of your pricing table, click the Save changes button at top-right. Then click the caret icon at top-left to exit the preview window.
Embed the Hosting Reseller Pricing Table
To embed your pricing table anywhere on your website, click the Embed on site link in the customizer.

Or click the Embed on site button on the Hosting Reseller page.

Clicking either option will pop open a modal window where you can choose the embed option that you prefer.
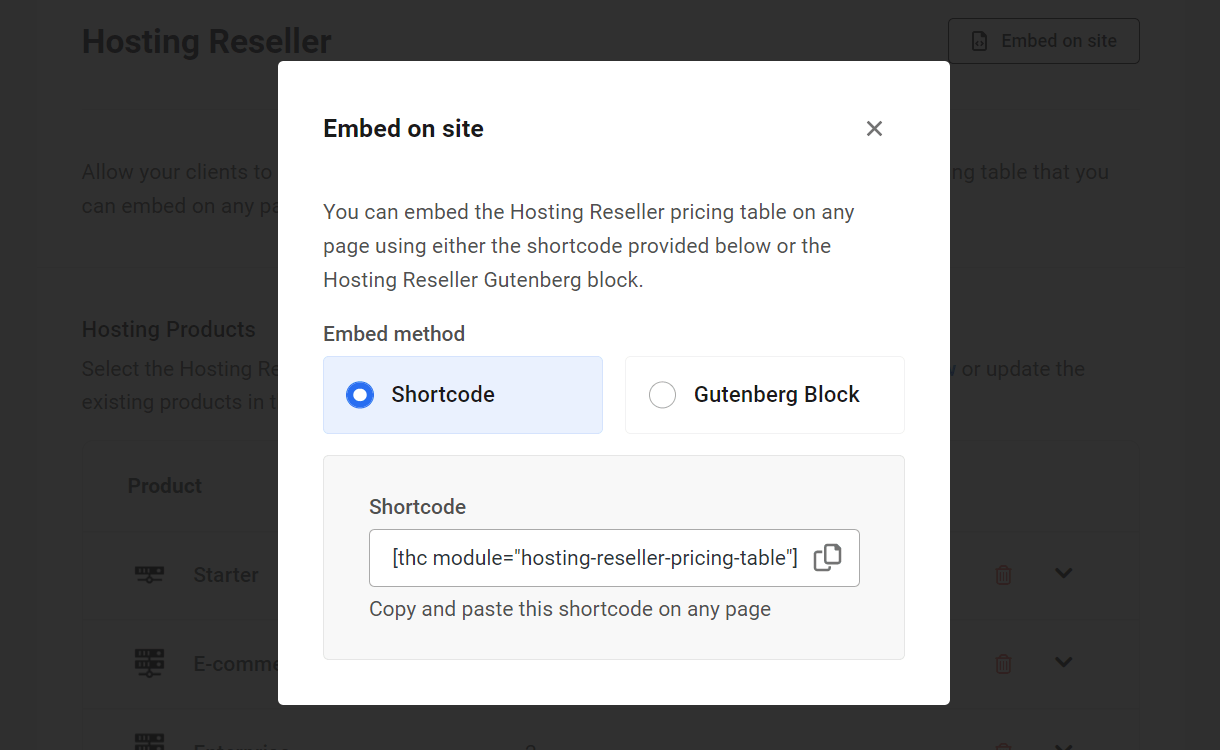
Shortcode
Simply copy the shortcode from the Shortcode field, and paste it anywhere you want to display your pricing table.

Gutenberg Block
Select this option to reveal simple instructions on using the Gutenberg block to embed your pricing table on any page, post or custom post type.
- Go to the page where you want to add the Hosting Reseller pricing table.
- Click on the (+) icon where you want to embed the pricing table, and search for the Hosting Reseller block.

Alternatively, you can click the (+) icon at the top-left of the editor and you’ll see The Hub Client blocks listed at the very top so they’re easy to find.
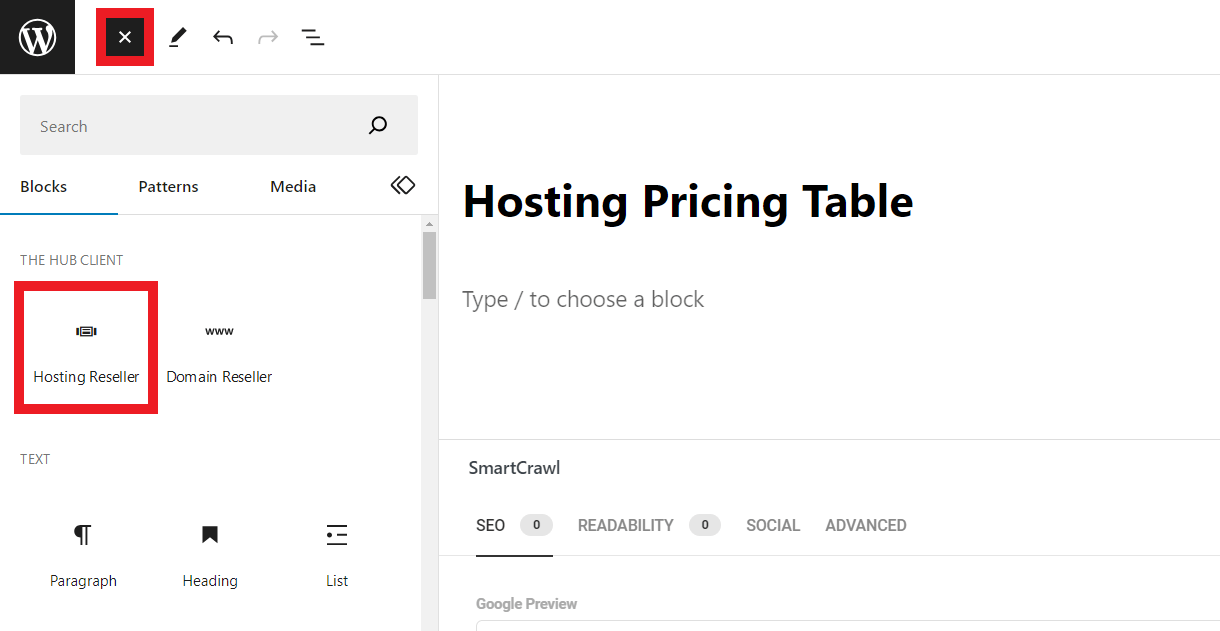
Note that if you don’t want the Hub Client blocks to appear at the top of the blocks list here, you can add the following filter to your active child-theme’s functions.php or in a mu-plugin to have the blocks appear in the default order.
add_filter('wpmudev_hub_block_category_is_first', '__return_false');
Checkout Links
Checkout links are provided for every pricing plan that you include in your hosting reseller products.
You can use checkout links anywhere you like; in your own custom pricing table, buttons in your sidebar, calls to action in popups, your blog post copy, even on other sites & social platforms.
A reseller checkout link looks like this:
https://yourhubsite.tld?_hub_client_page=1&_path=/hosting-create/11650/14756/
When a client clicks on one of your links, it triggers the checkout process for that specific pricing plan of your chosen product. See The Client Experience below for details on the checkout process.
To get a checkout link, navigate to the Hosting Reseller tab and click the arrow icon in the row of your product. Then click the copy icon in the Checkout Link column next to the pricing plan you want.
Next, add that link wherever you need it. For example, add it to the corresponding button in your custom pricing table plugin.

Or use the link in a custom button in your blog sidebar.
Use it in the call-to-action in a Hustle popup.

Even use it to promote your reseller product on another site or your social media pages.

Deactivate
If you no longer wish to use the Hosting Reseller feature, you can deactivate it by clicking the Deactivate button at the bottom of the Hosting Reseller tab.

13.3.2 Domain Reseller
Link to chapter 3Click the Activate button to get started with setting up Domain Reseller products on your site.
Domain Reseller Products List
Once activated, all the TLDs that you’ve set up under the Domains Reseller tab in your Hub will be automatically listed in the TLDs section.

- TLD – The domain extension you’ve made available to your clients.
- Yearly price – The price you’ve set for the TLD, shown in the currency you selected when you set up Clients & Billing.
If you need to add, remove or update any TLDs, you can do that in your Hub.
Customize the Domain Reseller Widget
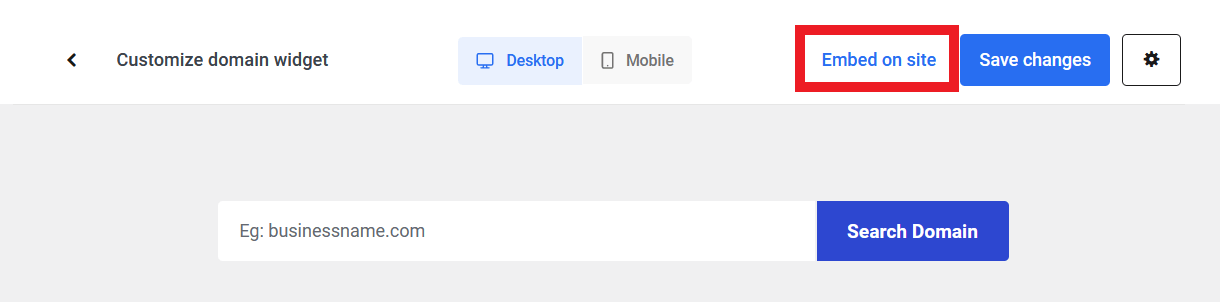
Click the Customize domain widget button to adjust the look and layout of the domains widget that you can embed on your website.
That will open the Preview window where you can see exactly how your domains widget will look. Use the toggle at the top to switch between Desktop and Mobile previews.

Click the gear icon at top-right to open the options panel where you can adjust the following elements to better suit your brand:
- Search Field – Enter the Placeholder text that should appear in the domain search field, and set the Placeholder color, the Input background color and the Input color.
- Search Button – Adjust the button Label text as well as the button Label color and Background color.
- Search Result – Select whether search results should include Matches & Suggestions or exact Matches only.
- Buy Domain Button – Adjust the button Label text as well as the button Label color and Background color.
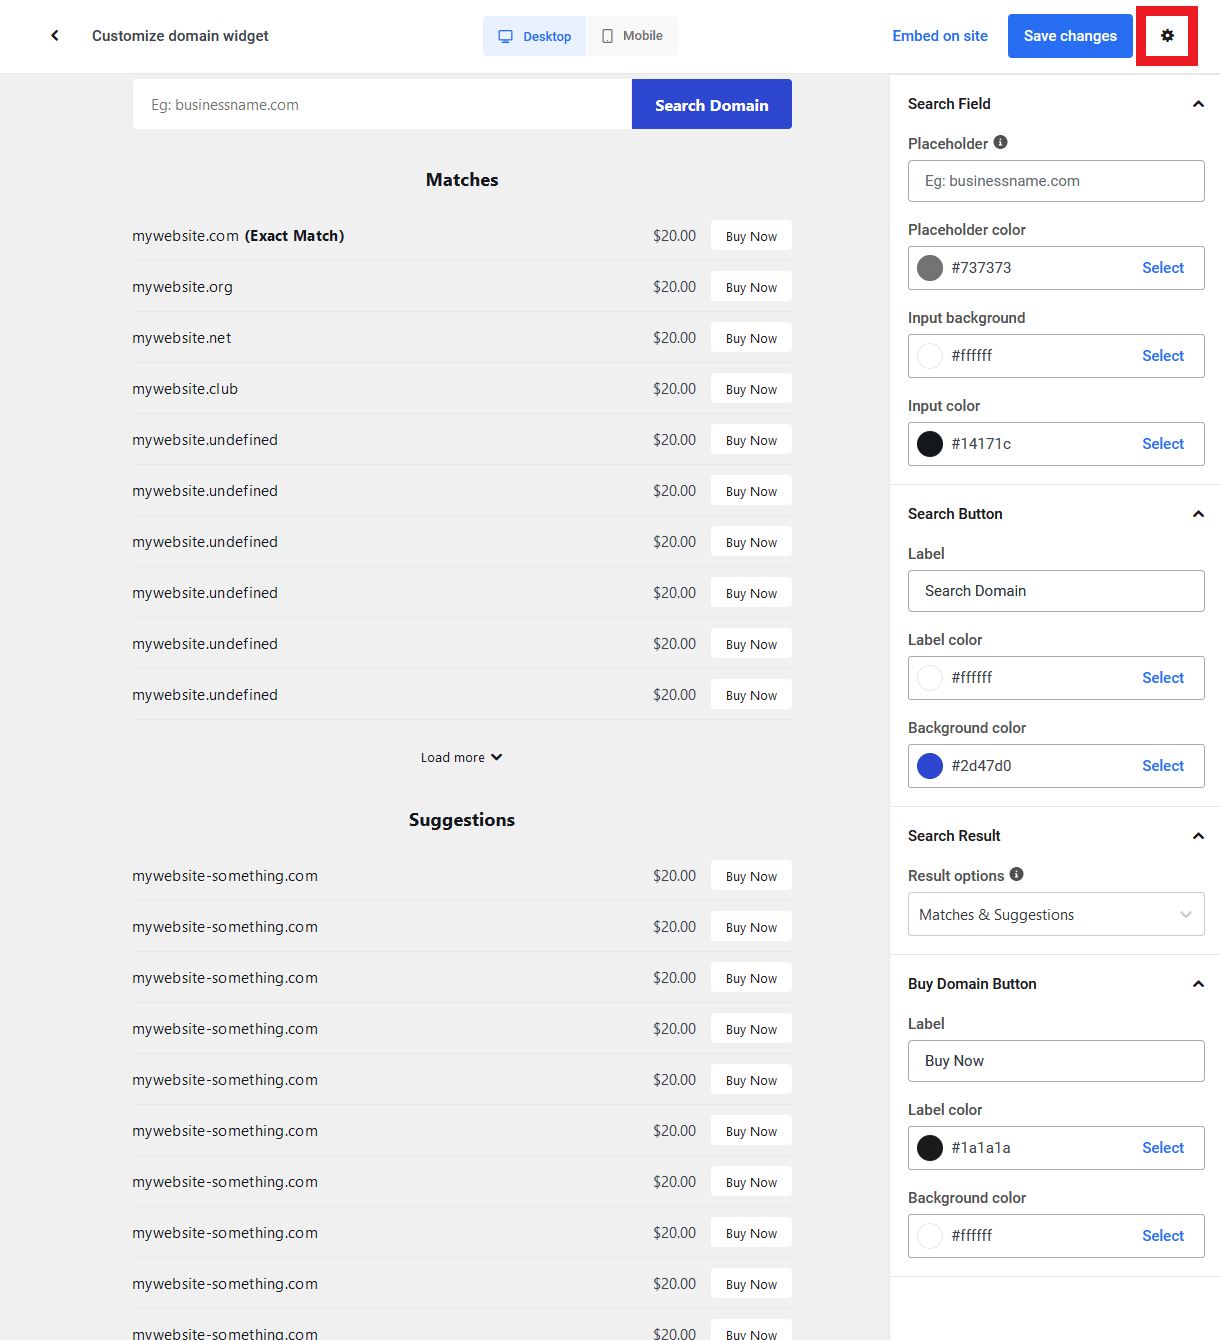
Once you’re done customizing the look of your widget, click the Save changes button at top-right. Then click the caret icon at top-left to exit the preview window.

Embed the Domain Reseller Widget
To embed your domains widget anywhere on your website, click the Embed on site link in the customizer.
Or click the Embed on site button on the Domain Reseller page.
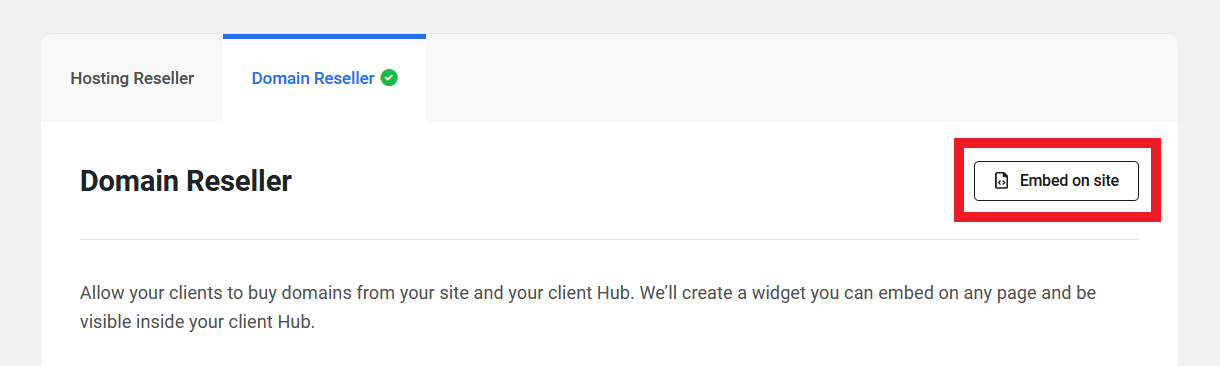
Clicking either option will pop open a modal window where you can choose the embed option that you prefer.
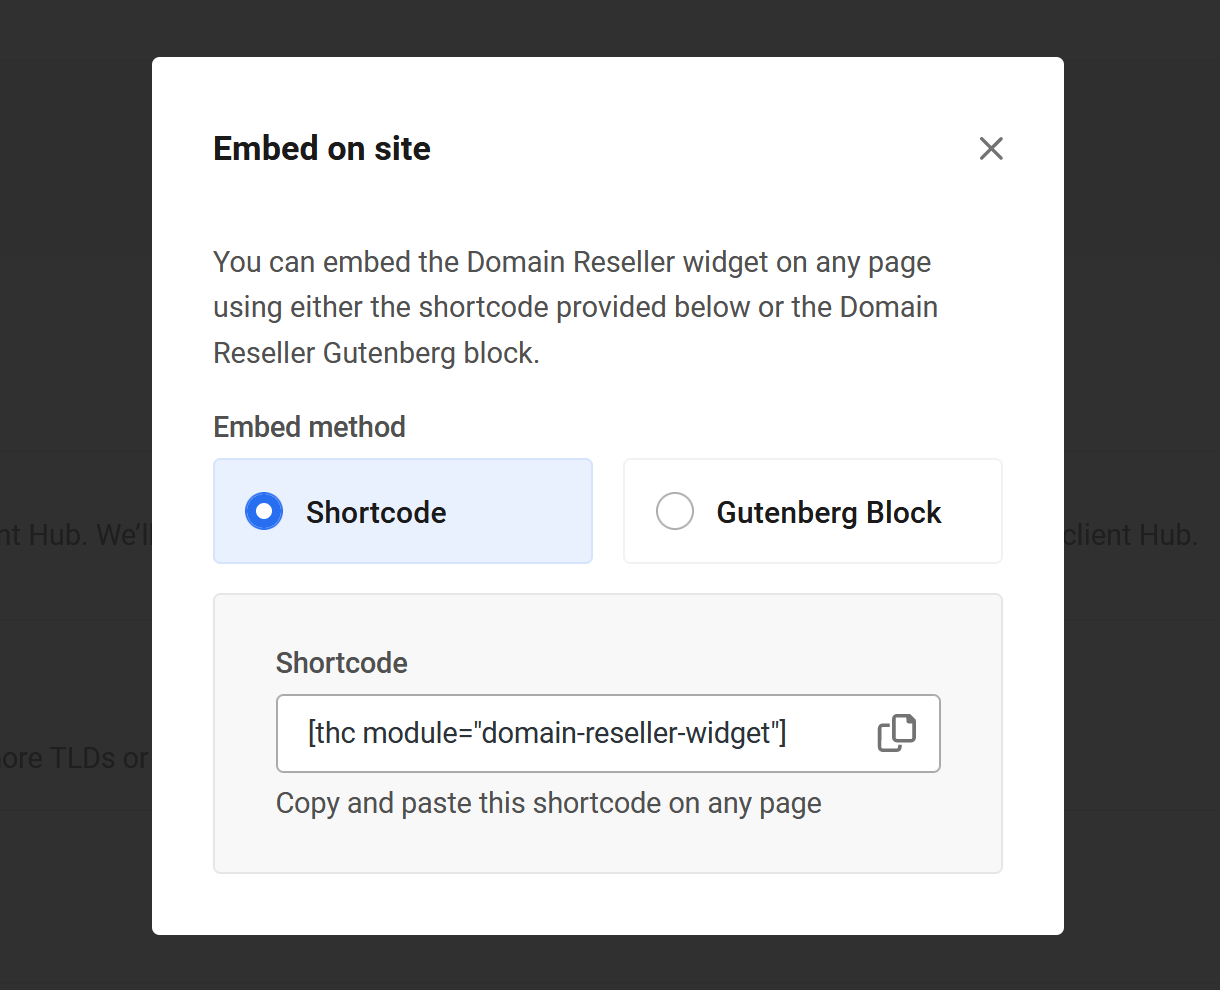
Shortcode
Simply copy the shortcode from the Shortcode field, and paste it anywhere you want to display your domains widget.

Gutenberg Block
Select this option to reveal simple instructions on using the Gutenberg block to embed your pricing table on any page, post or custom post type.
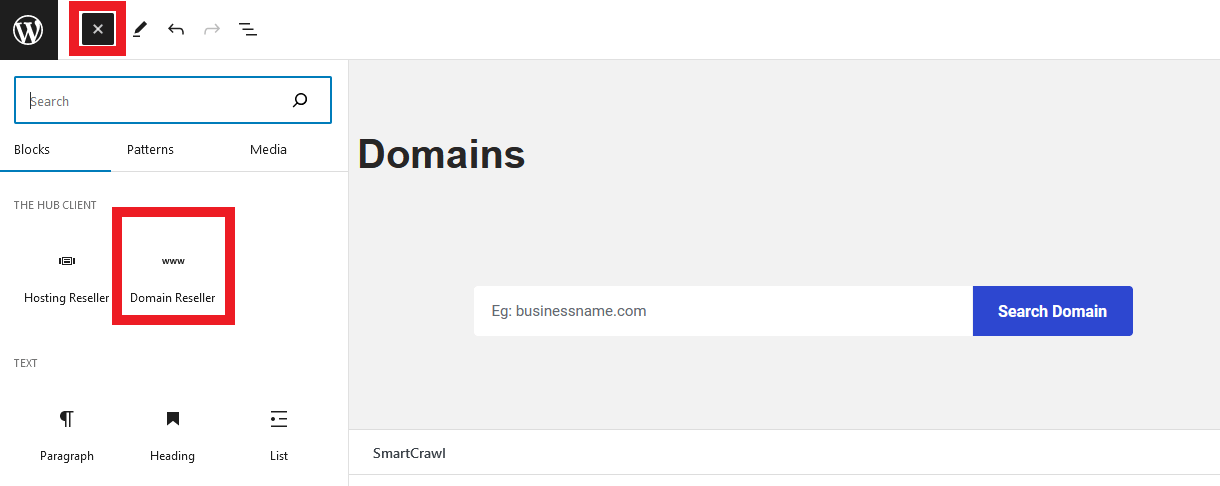
- Go to the page where you want to add the Domains widget.
- Click on the (+) icon where you want to embed the widget, and search for the Domains Reseller block.

Alternatively, you can click the (+) icon at the top-left of the editor and you’ll see The Hub Client blocks listed at the very top so they’re easy to find.
Deactivate
If you no longer wish to use the Domain Reseller feature, you can deactivate it by clicking the Deactivate button at the bottom of the Domain Reseller tab.
13.4 Settings
Copy chapter anchor to clipboardThe Settings area is where you can grant other admin users access to your Hub Client settings, and control plugin behavior.
13.4.1 Permissions
Link to chapter 4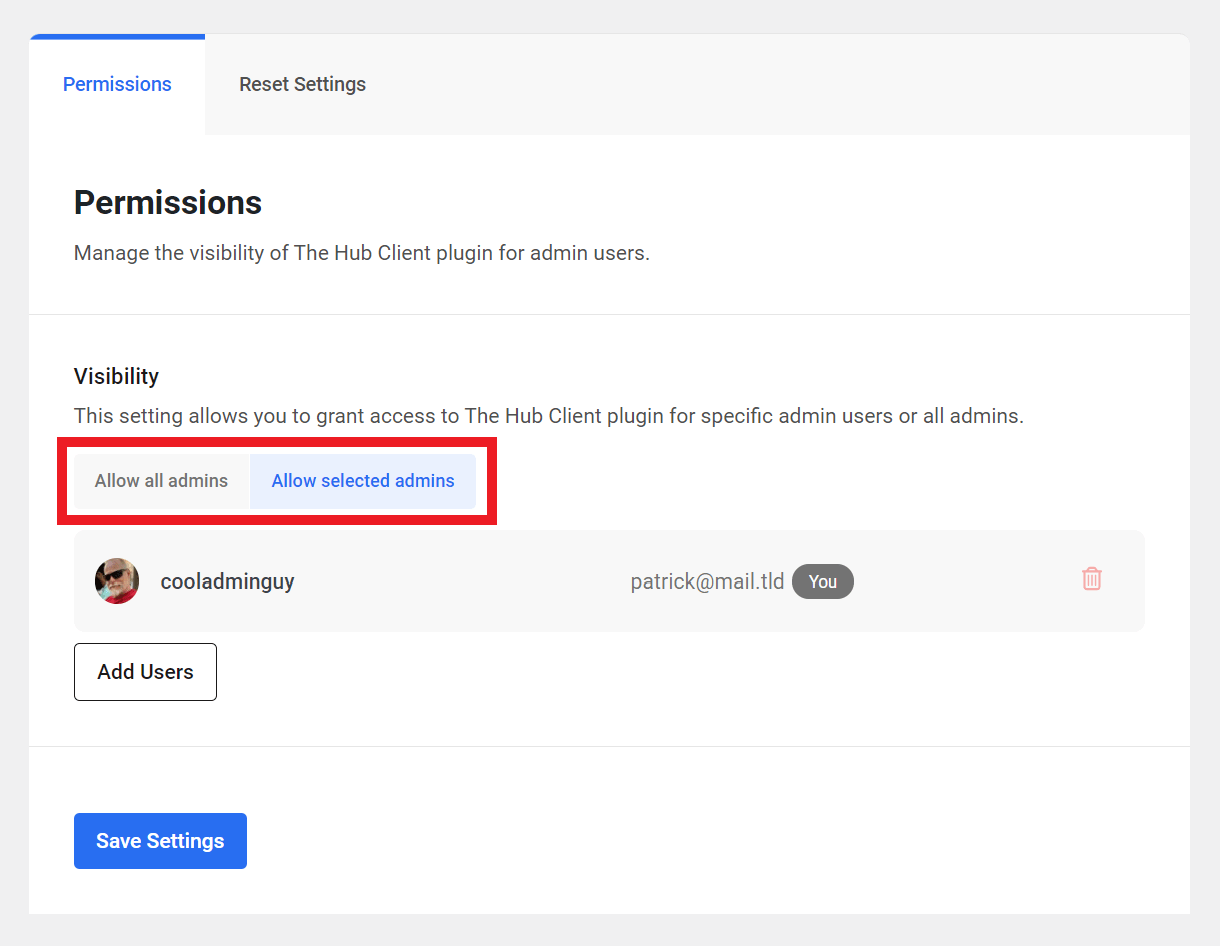
Visibility
Choose whether you want to Allow all admins to have access to the Hub Client, or only Allow selected admins to have access.
13.4.2 Reset Settings
Link to chapter 4
Uninstallation behavior
Choose whether to Preserve your settings or Reset them to their factory default if you ever uninstall the plugin.
Reset now
Enables you to Reset all settings to their factory defaults immediately.
13.5 The Client Experience
Copy chapter anchor to clipboardThis chapter provides an overview of the client experience when purchasing reseller products via your white labeled client portal.
Also see The Client Experience chapter in the Clients & Billing documentation for additional information.
13.5.1 Purchasing Hosting Reseller Products
Link to chapter 5The first step that the client undertakes in the purchase process is to select the desired hosting product & plan.
As previously noted in this document, you can enable your clients to purchase hosting reseller products by embedding the included pricing table anywhere on your site, or by using checkout links anywhere you like.
You can also toggle on the visibility option when adding or editing products to enable your clients to purchase them directly in your branded Hub (see Wizard Step 1 – Select Hosting Product below).
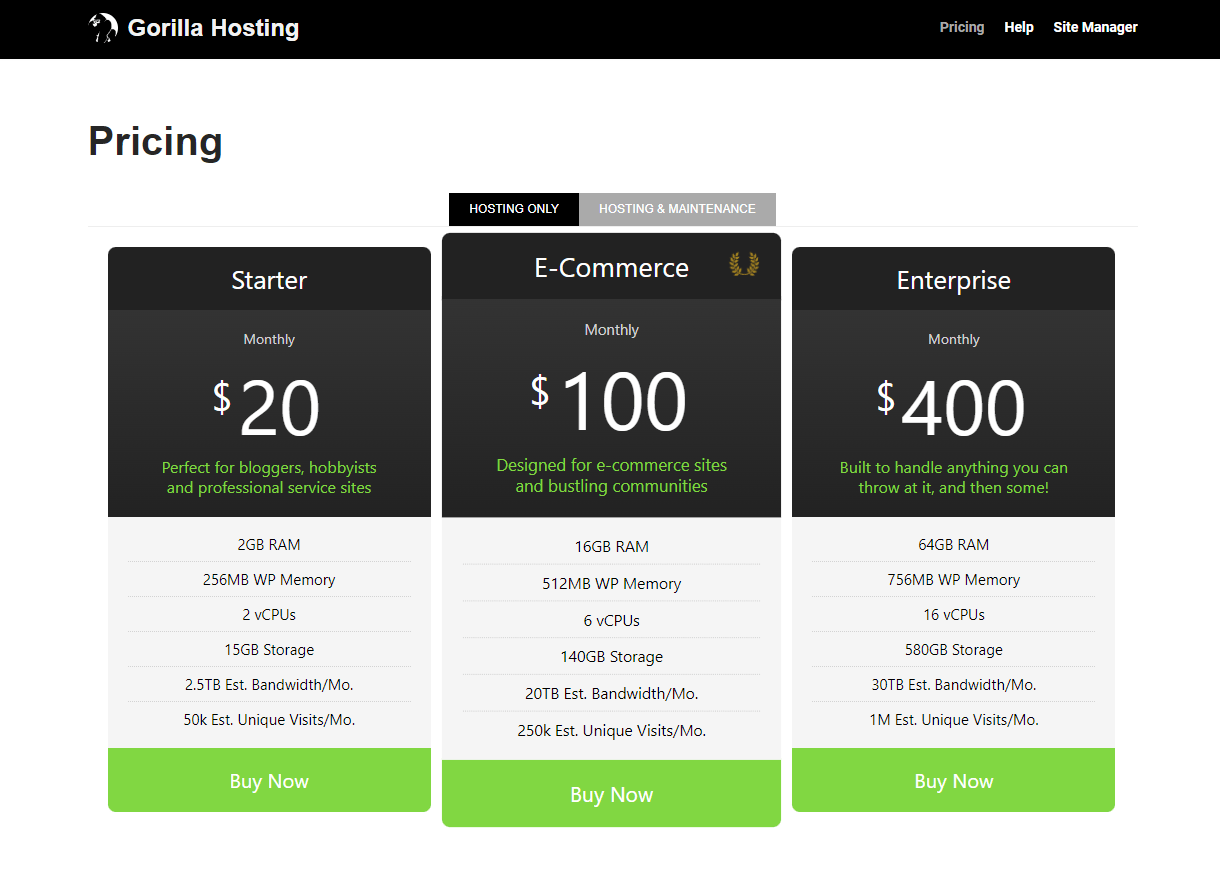
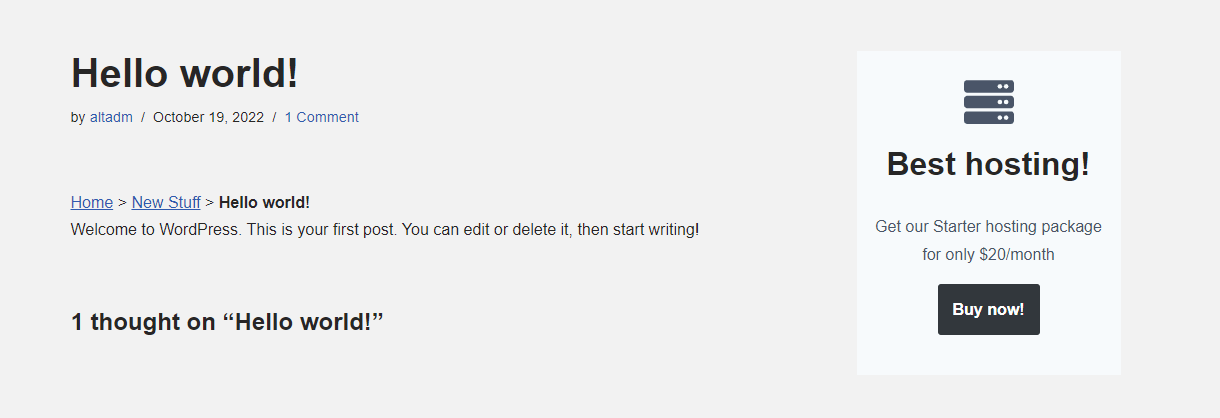
The default hosting reseller pricing table embedded on a page on your site would look something like this:
A custom pricing table using checkout links in the Buy Now buttons could look something like this:
Checkout links can even be used in blog post copy, or buttons in a Hustle popup, and could look something like this:
Regardless of whether checkout is triggered from the included pricing table, from a checkout link, or from within your branded Hub, the checkout process is the same. Clicking any button or link triggers the checkout for the specific product & pricing plan associated with that button/link.
Create Account
When the client clicks any checkout button or link on your site, they will first be prompted to create an account on your client portal if they’re not already logged into it. Note that the account they create here is different from a WordPress account; this does not log clients into your WordPress site, only the Hub client portal. Similarly, you or your team members would log into your client portal with your WPMU DEV credentials, not your WordPress credentials.
If the client already has an account on your client portal, they can click the Log in link and log into their account with their client portal credentials to continue.
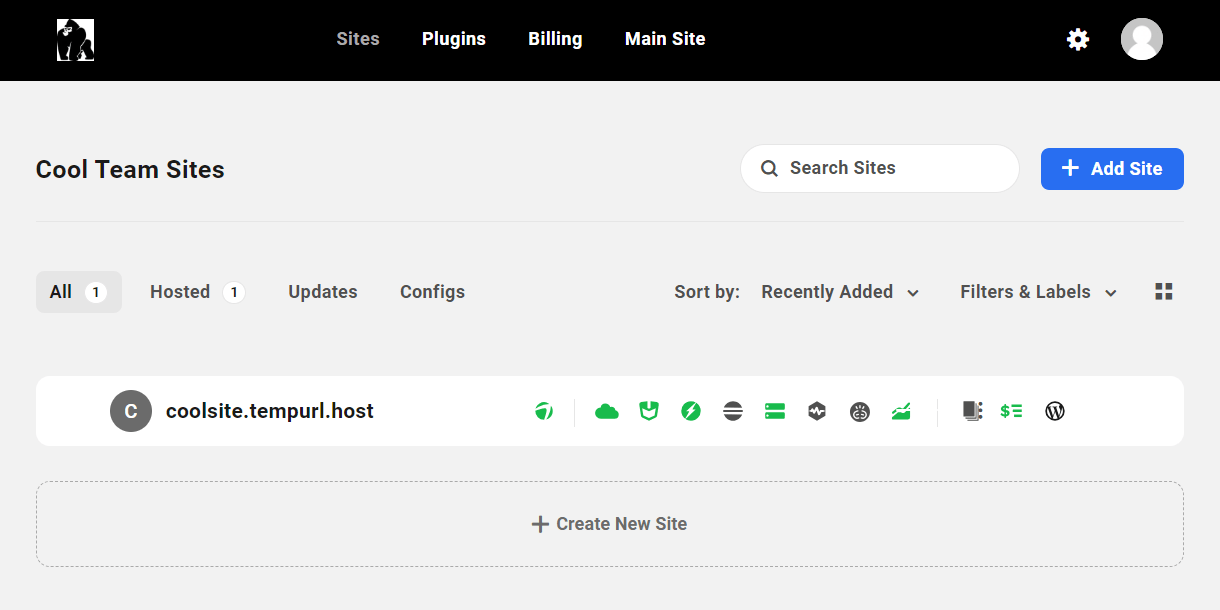
Once logged in, they’ll be taken to the site creation wizard in your branded Hub.
Wizard Step 1 – Select Hosting Product
This step only appears if a client purchases a hosting reseller product from within your branded Hub, as seen in the image below. You can enable or disable the corresponding visibility option for any product when adding or editing it.
When a client clicks the Add Site button in their client portal, this would become the first step in the site creation wizard and it would look something like this.
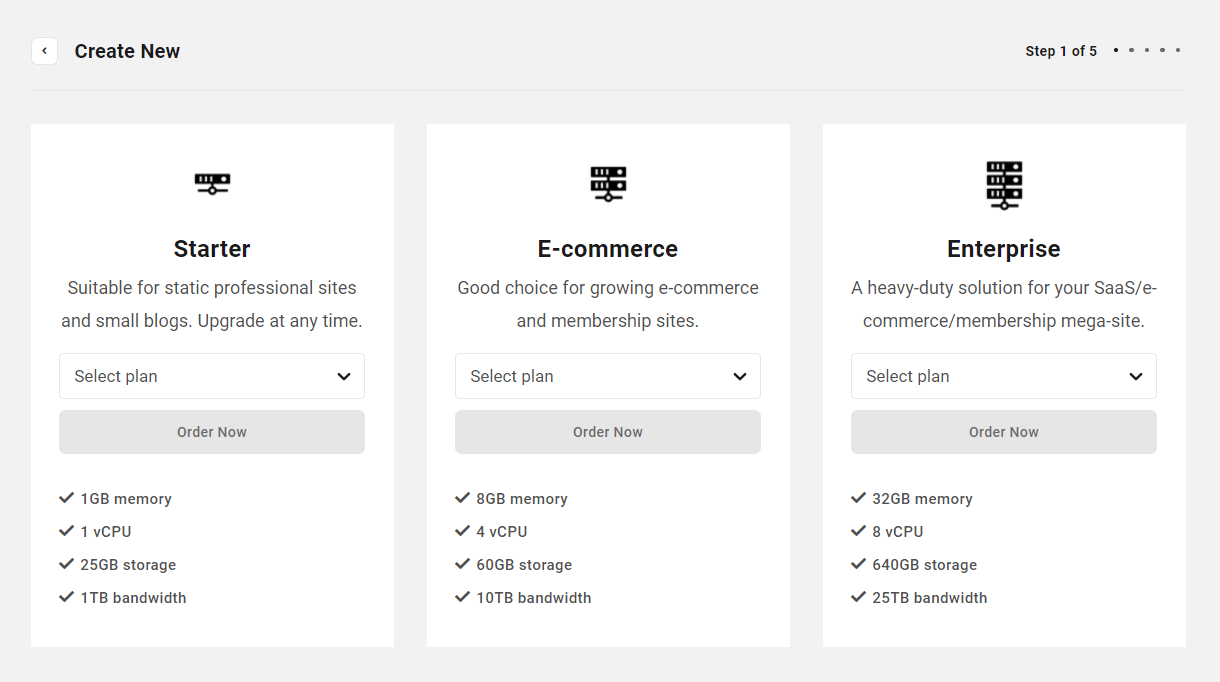
If a client clicks a checkout link or button from anywhere else, this step will be automatically skipped as they’ve already selected their product, and they’ll land on Step 2 once logged into your branded Hub.
Wizard Step 2 – Select Site Type
The client’s next step in the site creation wizard is to select whether they want to start with a blank template to create a brand new site or create a site from any site template you have made available in that product.

If you have disabled template selection in the product, this step will be automatically skipped and a new site will be created by default.
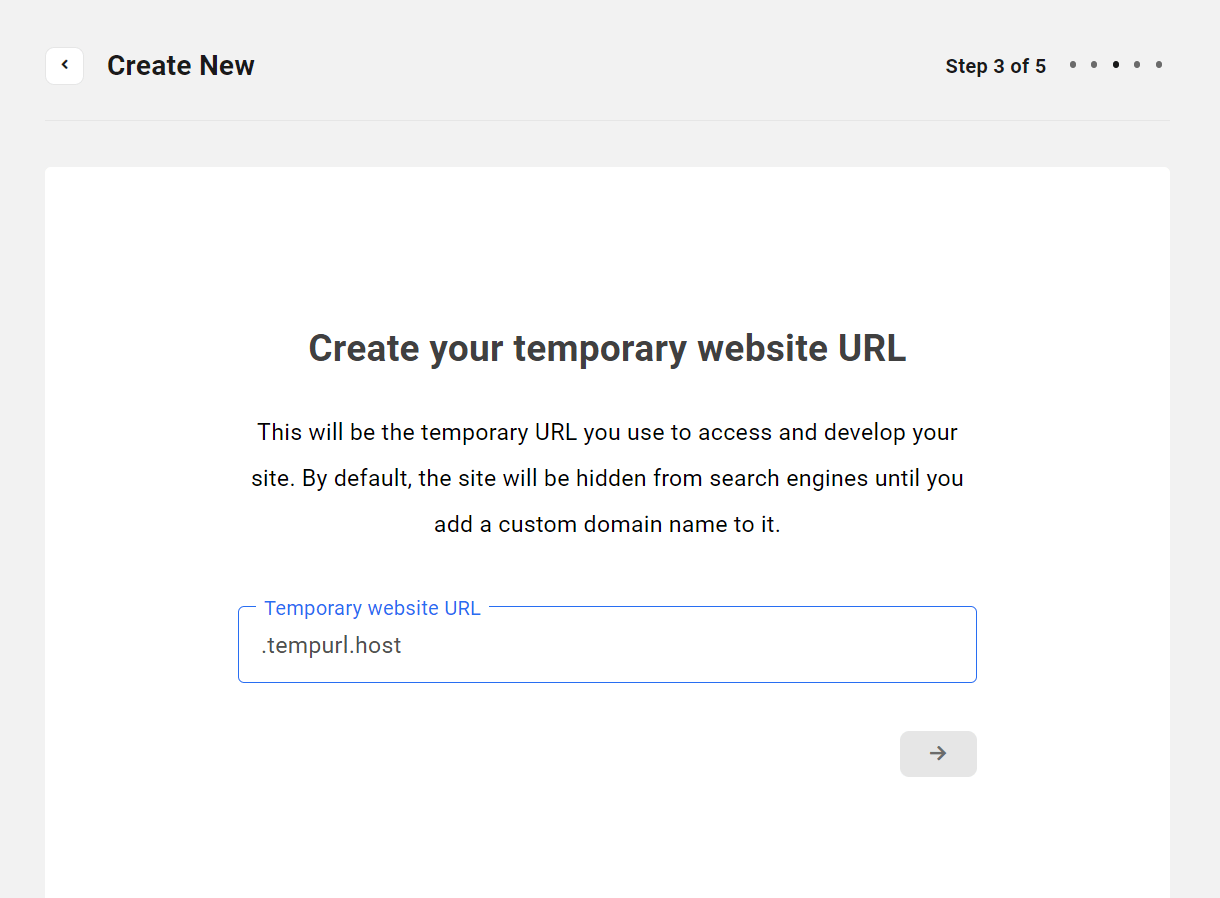
Wizard Step 3 – Enter Temporary URL
On the next step, they’ll be prompted to enter the temporary white labeled URL they wish to use for their new site.
Wizard Step 4 – Create WordPress Account
The client will then be prompted to enter the WordPress login credentials they wish to use for their site. This will create an account on their site with the client user role you specified when you created this reseller product in your Hub.

Wizard Step 5 – Select Region
Finally, the client will select the geographical region where they wish their site to be hosted.
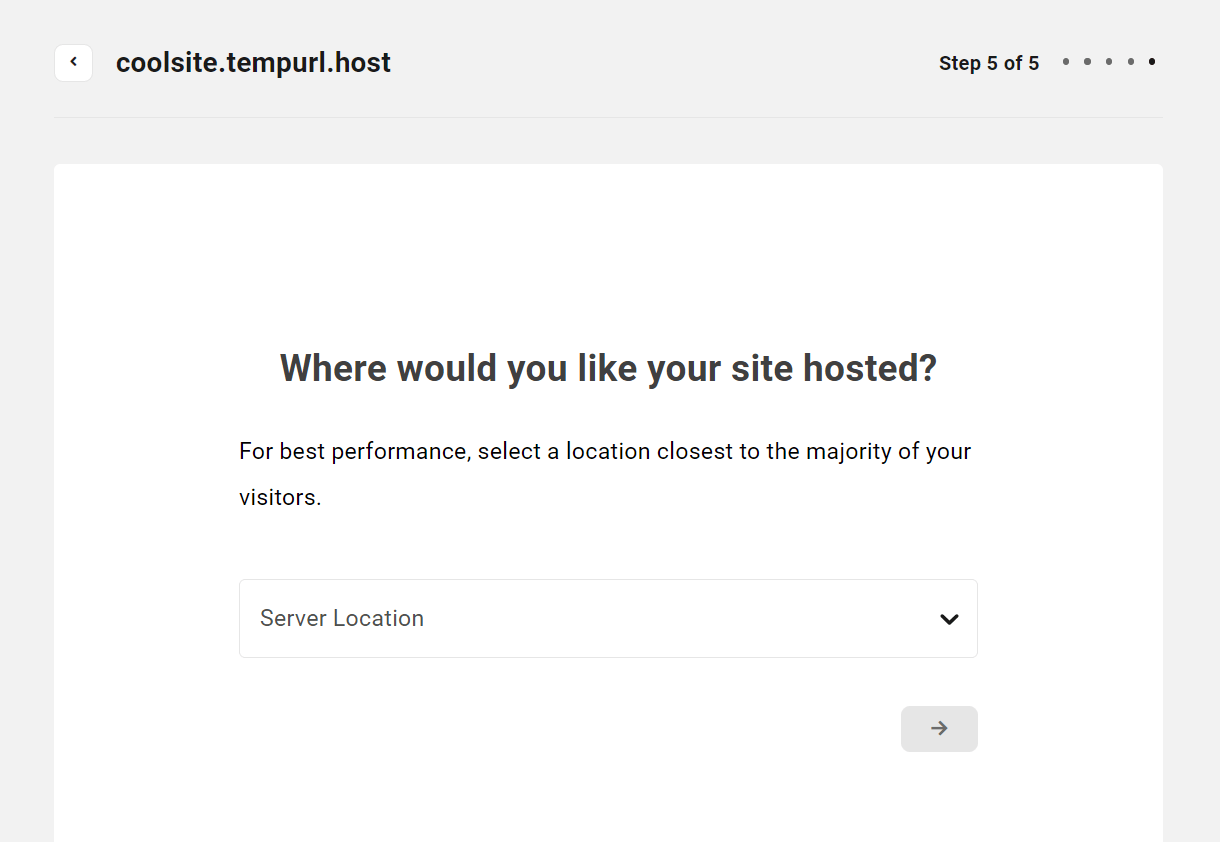
If you have chosen the Force selected location on new sites option in the product configuration, this step will be automatically skipped and your specified server location will be used by default.
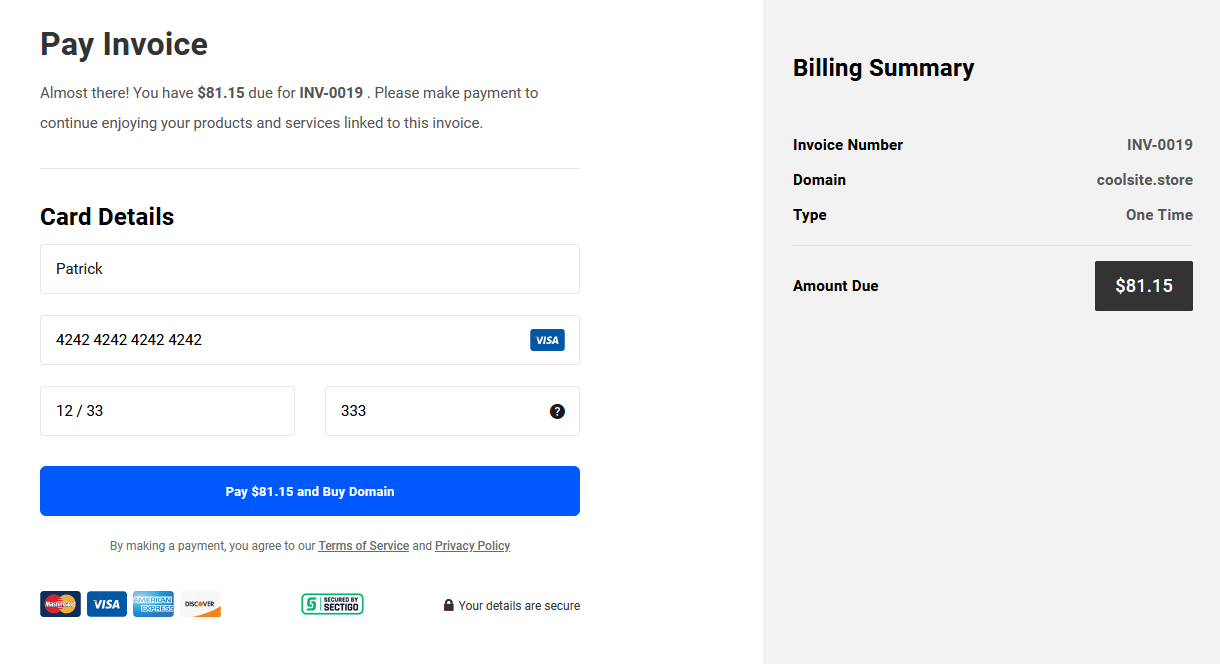
Pay Invoice
The client will then be presented with a summary of their invoice and can enter their credit card information to make the payment securely via Stripe. You’ll notice that links to the Terms of Service and Privacy Policy pages you set up in the Login & Signup settings above are included on the payment form.

Site Creation
The client will then be redirected to the Sites screen in your branded Hub where they’ll see the site creation in progress.
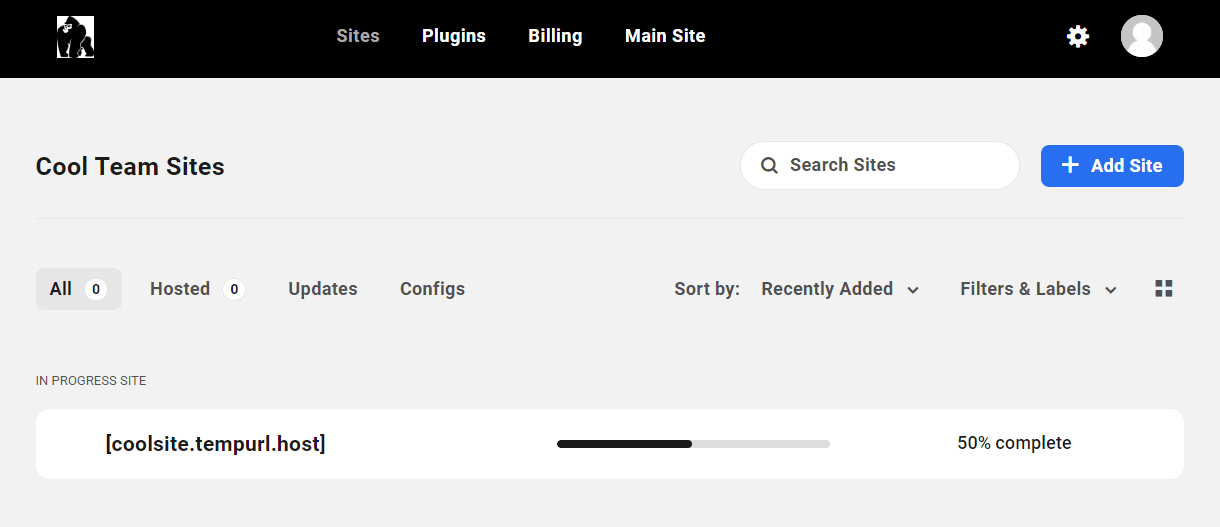
Once complete, the screen will refresh automatically and their new site will be accessible in their Hub account.
Site Deletion
If you so wish, you can enable your reseller clients to delete the hosted sites they have purchased from you, with no intervention required from you.
The following conditions must be met for your clients to have this ability:
- You must have granted the default Edit All & Access Billing (Reseller) role to the client, or have granted them a custom role that includes the Delete hosting site capability.
- The website must not be in a suspended state, either set manually by you or per the Auto suspension rule you may have set when you created the product purchased by the client.
If the above conditions are met, a Delete site option will appear in the site options menu at the far right of their hosted site in their My Sites list.

If you do not wish clients to be able to delete their hosted sites on their own, be sure to assign them a custom role that does not include the Delete hosting site capability.
13.5.2 Purchasing Domain Reseller Products
Link to chapter 5The first step that the client undertakes in the domain purchase process is to search for their desired domain name, and click the Buy Now button next to any search result.
A client can search for and purchase domains from the domains widget that you embed on a page of your website, or from the Domains tab in your white labeled client portal.
Purchasing a Domain from Your Website Page
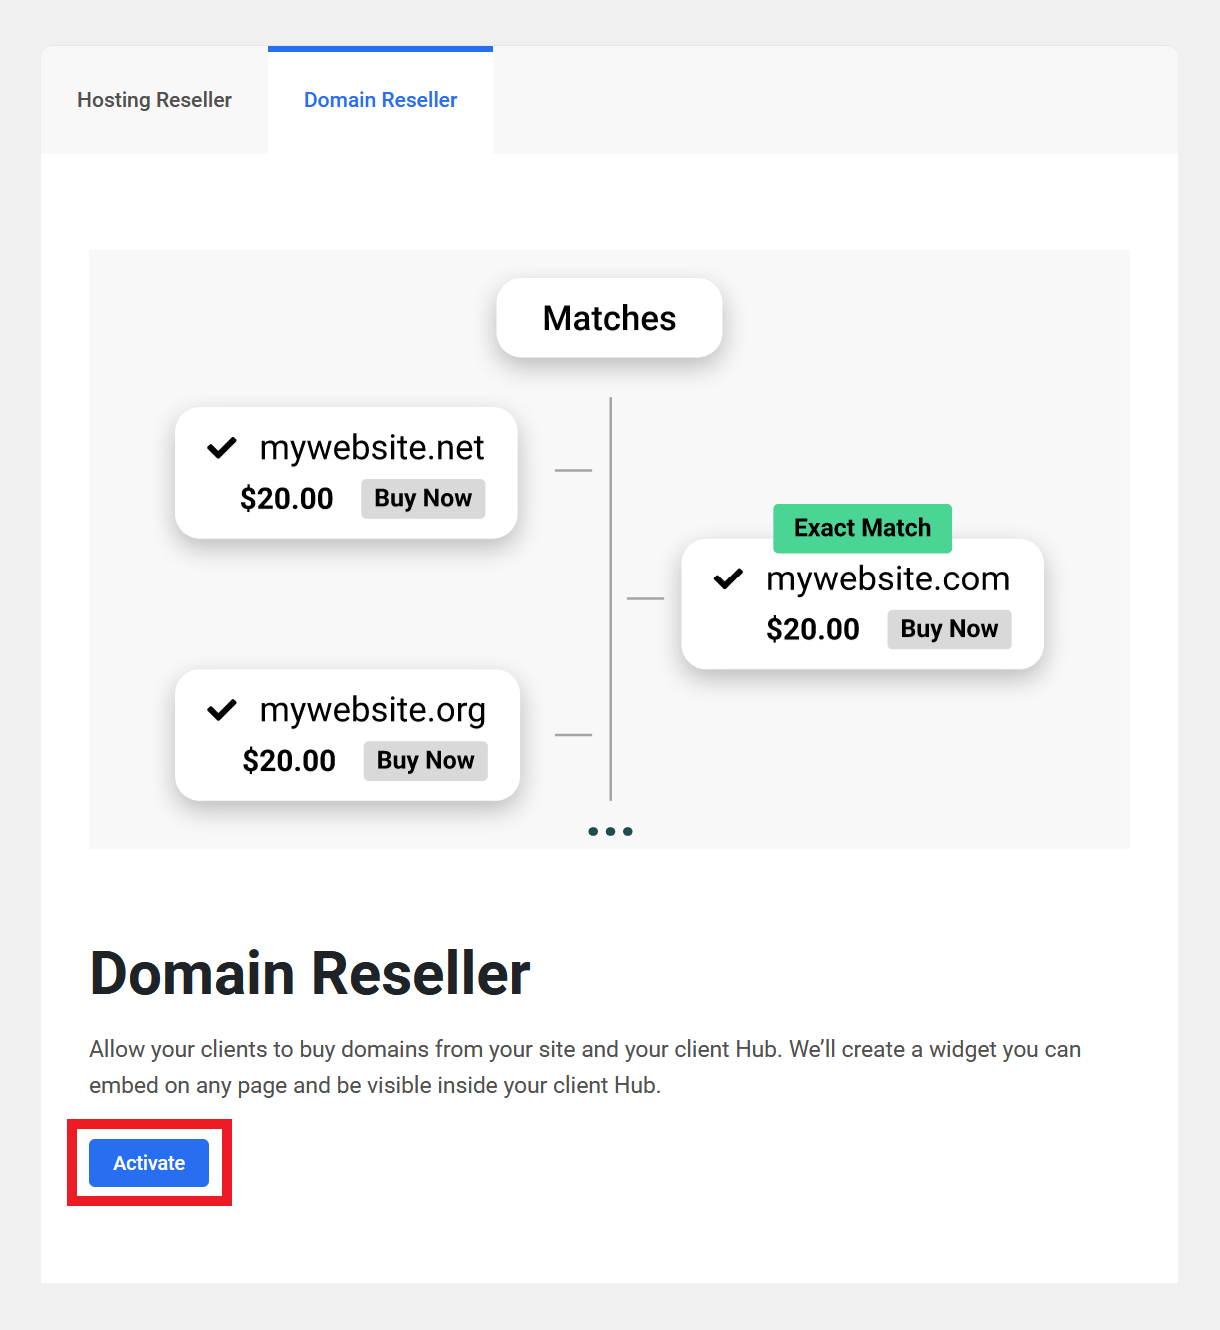
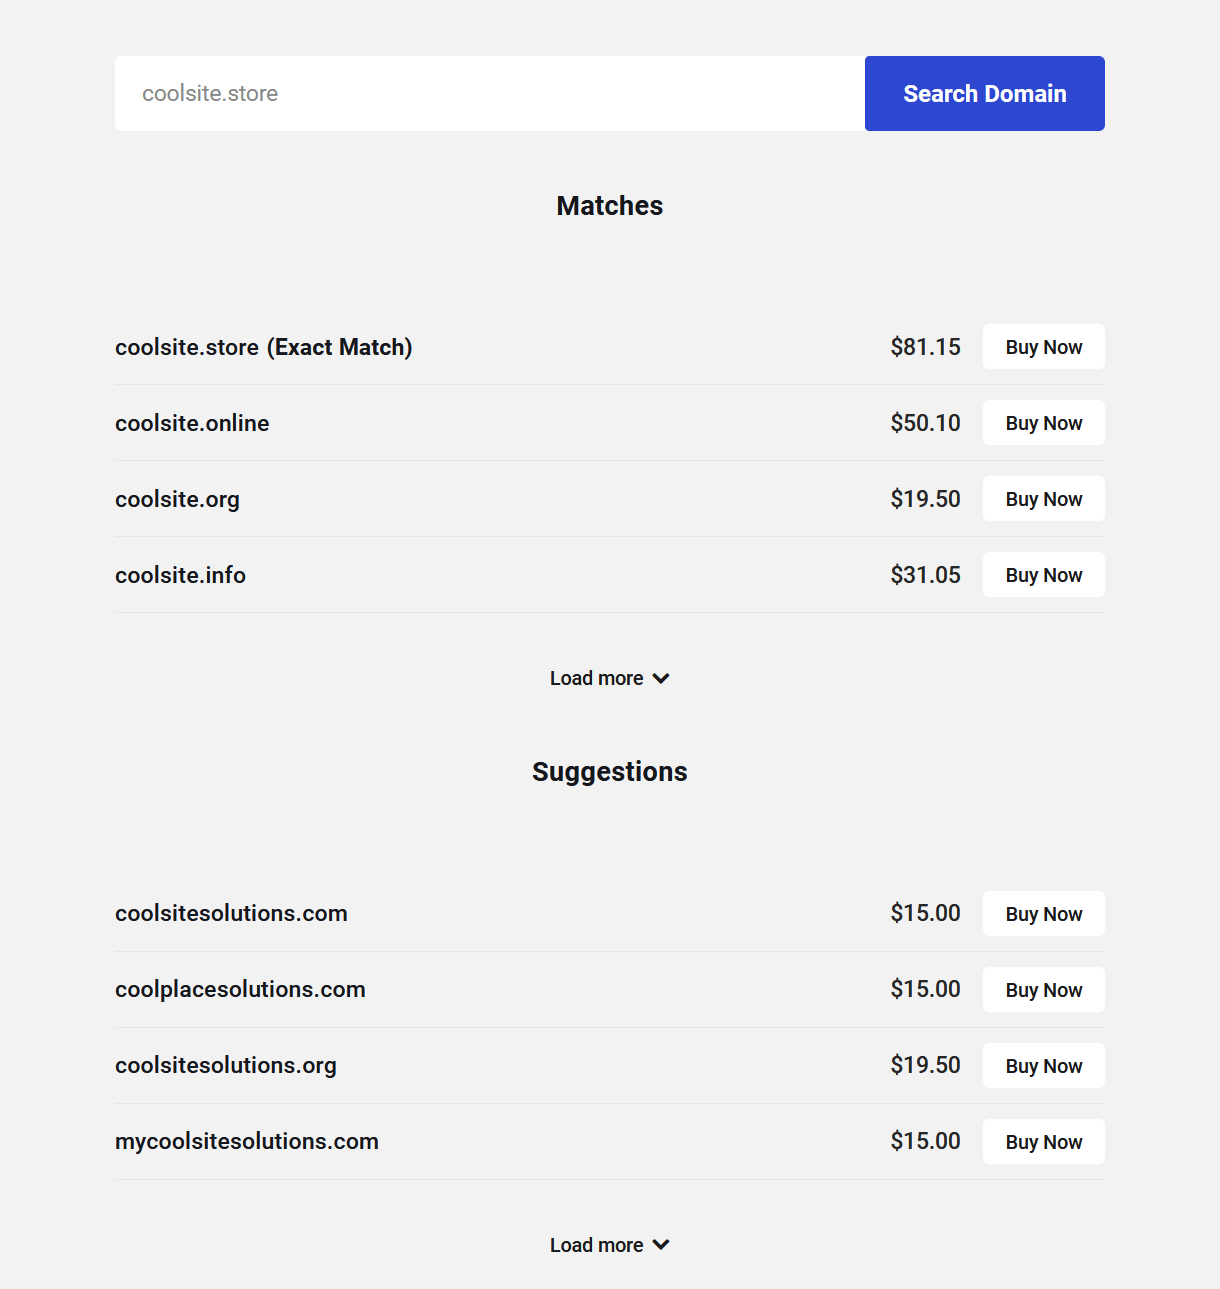
The default domain reseller widget embedded on a page of your site would look something like the image below, where the client can search for a domain name with or without the domain extension.

When a client enters their desired domain name in the search field and clicks the Search Domain button, the screen will refresh and display up to 4 closest Matches, and up to 4 additional Suggestions (if you have selected to return both Matches & Suggestions when customizing the domains widget).
Both sections will include a Load More link that can be clicked to load more search results on the same page. Of course, if you have made less than 4 TLDs available to your clients, the search results will be limited to that number and will not include any Load More links.
If the client has included the domain extension in their search and that TLD is available, it will be returned as an exact match in the results.
Create Account
When the client clicks any Buy Now button, they will first be prompted to create an account on your client portal if they’re not already logged into it. Note that the account they create here is different from a WordPress account; this does not log clients into your WordPress site, only the Hub client portal. Similarly, you or your team members would log into your client portal with your WPMU DEV credentials, not your WordPress credentials.
If the client already has an account on your client portal, they can click the Log in link and log into their account with their client portal credentials to continue.
Once logged in, they’ll be taken to the domain registration wizard in your branded Hub where they’ll fill in the Registrant Information form and proceed to the Pay Invoice step.
Purchasing a Domain from Your Client Portal
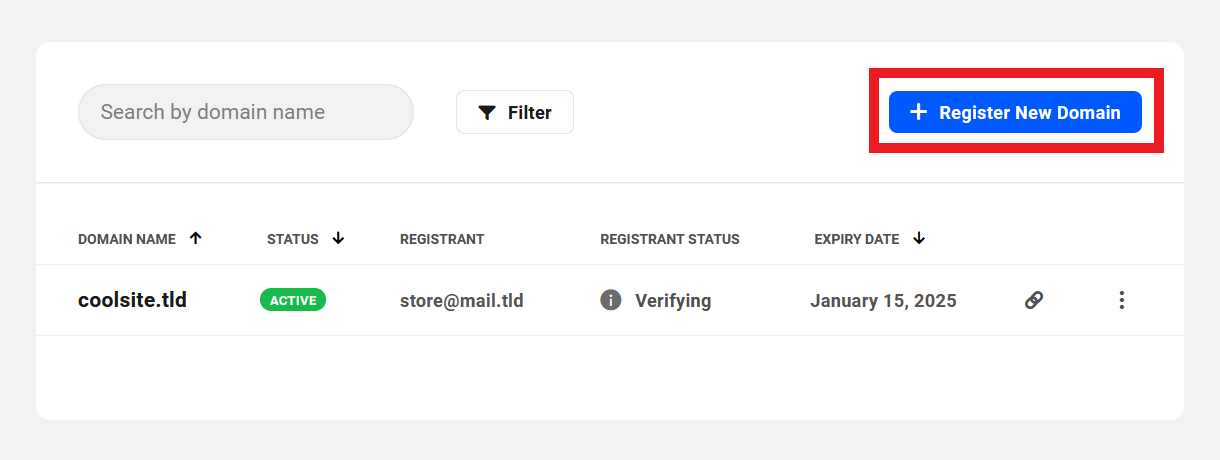
Clients can purchase domains from within your client portal by accessing the Domains area in your client portal main menu.
![]()
Note that the features available to clients under the Domains tab are limited to the registration and management of domains purchased from you. Clients cannot transfer in or connect domains from other registrars.
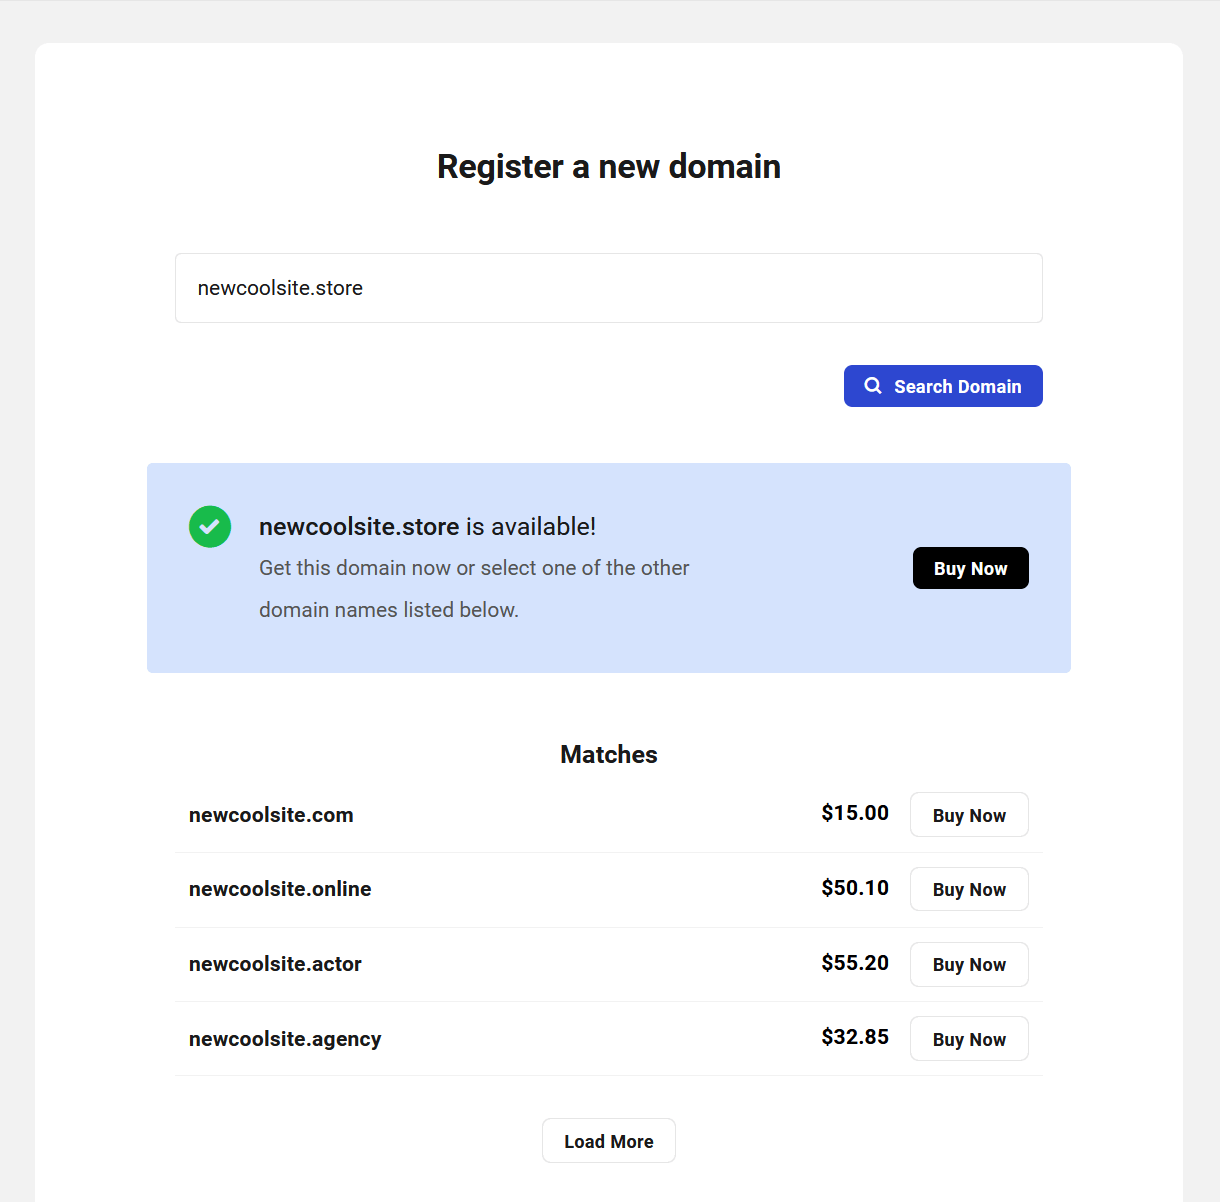
If they have already purchased one or more domains from you and wish to purchase another, they need only click on the + Register New Domain button there to be directed to the Register a new domain screen as seen below.
If they have not yet purchased any domains from you, they’ll be initially greeted by the Register a new domain screen. Clients can search for a domain name with or without the domain extension.
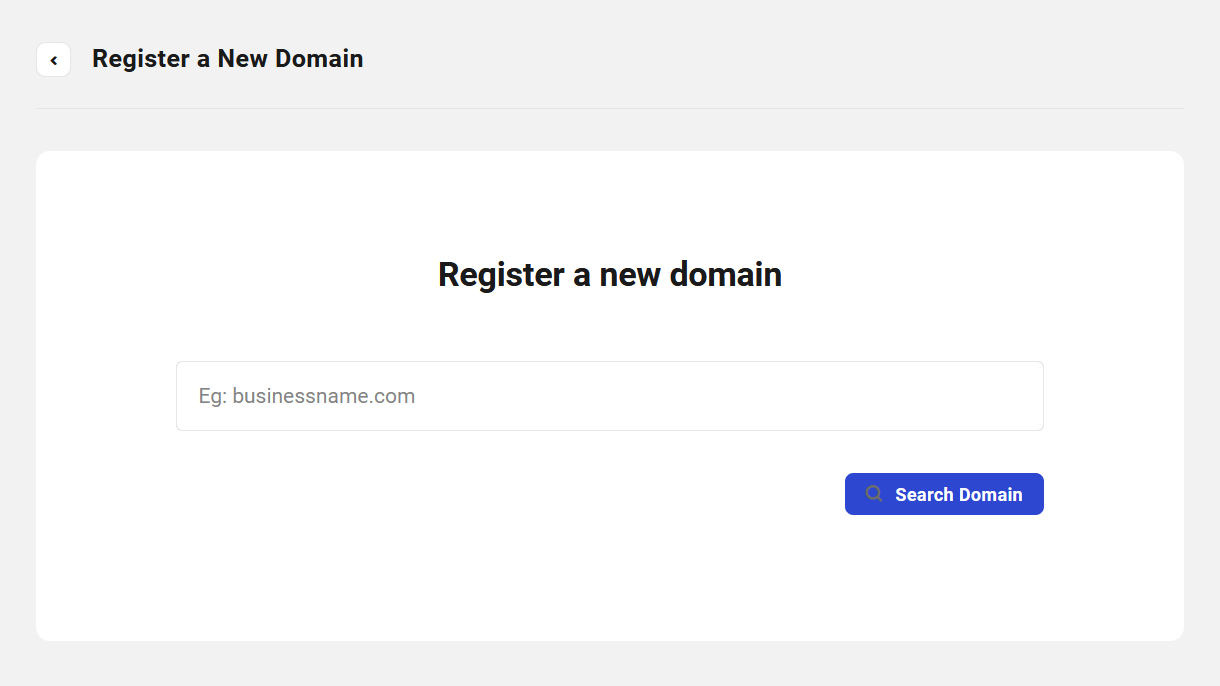
When a client enters their desired domain name in the search field and clicks the Search Domain button, the screen will refresh and display up to 10 closest Matches, and up to 10 additional Suggestions.
Both sections will include a Load More link that can be clicked to load more search results on the same page. Of course, if you have made less than 10 TLDs available to your clients, the search results will be limited to that number and will not include any Load More links.
If the client has included the domain extension in their search and that TLD is available, it will be highlighted as an exact match in the results.
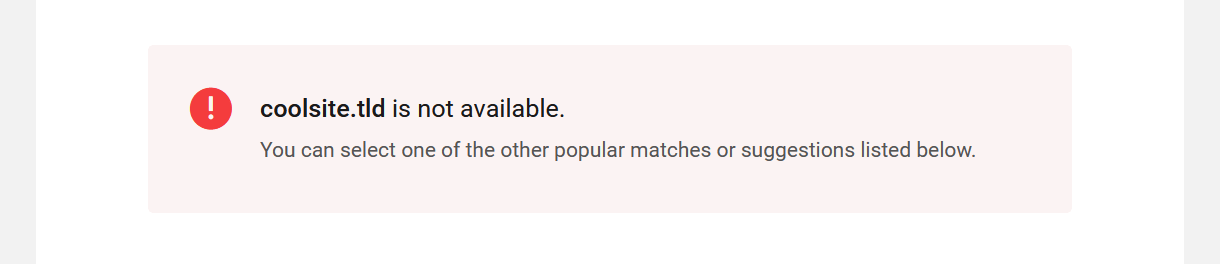
If the client has included the domain extension in their search and that TLD is not available, it will be highlighted and the client will be prompted to make another selection or they can search again.
When the client clicks any Buy Now button, they’ll be directed to the domain registration wizard where they’ll be prompted to fill in their Registrant Information.
Registrant Information
Before a client can make their domain purchase, they must fill in all required fields in the Registrant Information form. Note that none of this information will appear on WHOIS or be publicly shared in any way.
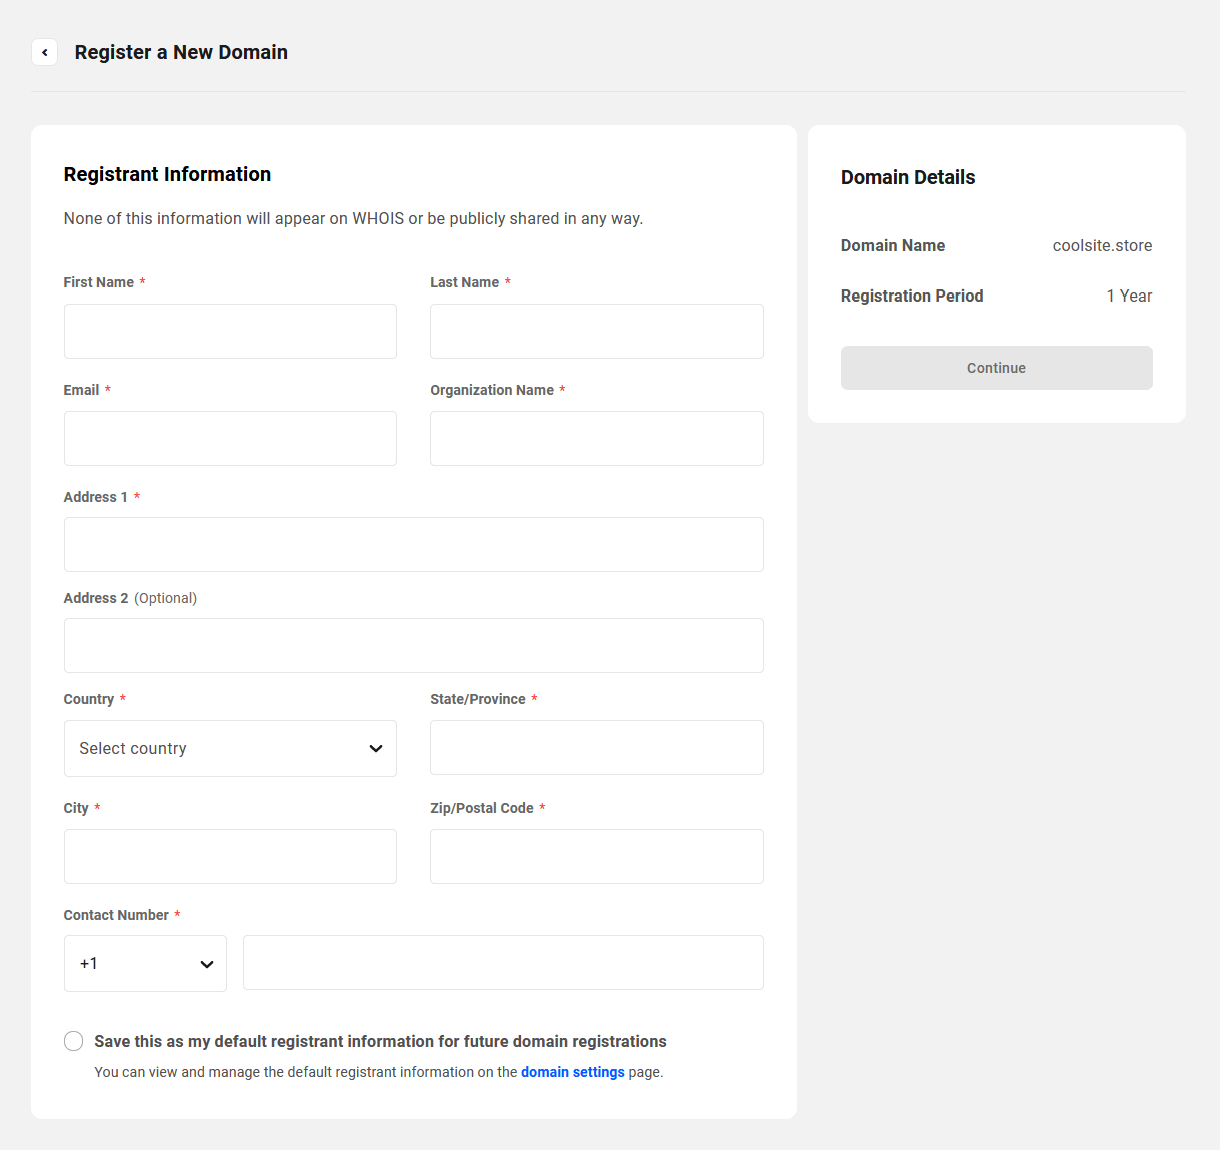
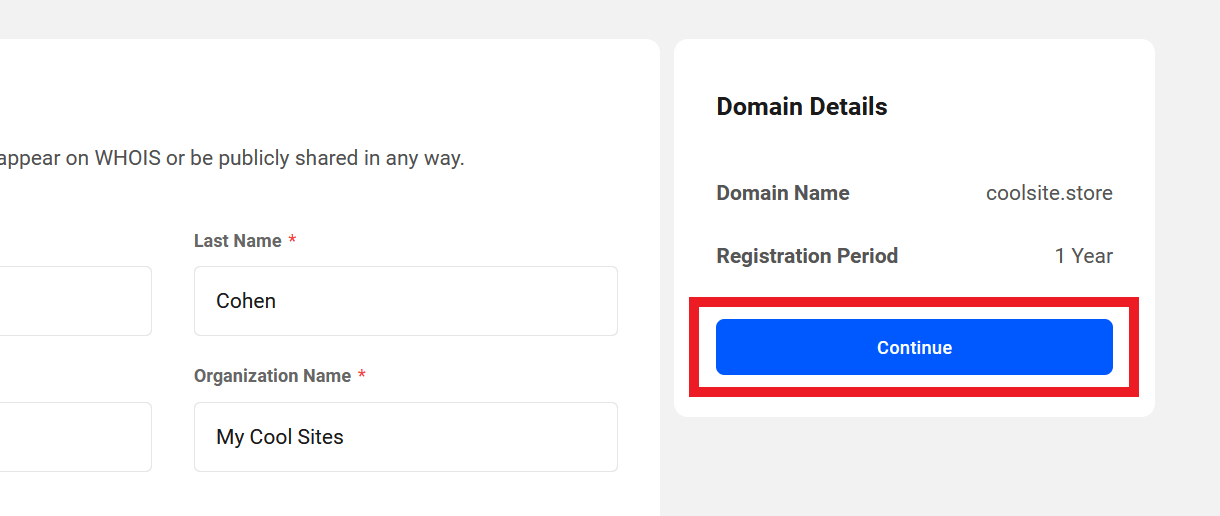
At the bottom of the form is a checkbox that the client can check to make the information that they enter here the default registrant information for all future domain registrations.
Once the form has been filled out, they would click the Continue button in the Domain Details pane to move on to the payment step.
Pay Invoice
The client will then be presented with a summary of their invoice and can enter their credit card information to make the payment securely via Stripe. You’ll notice that links to the Terms of Service and Privacy Policy pages you set up in the Login & Signup settings above are included on the payment form.
The client will then be redirected back to the Domains screen where they’ll see their new domain has been purchased.
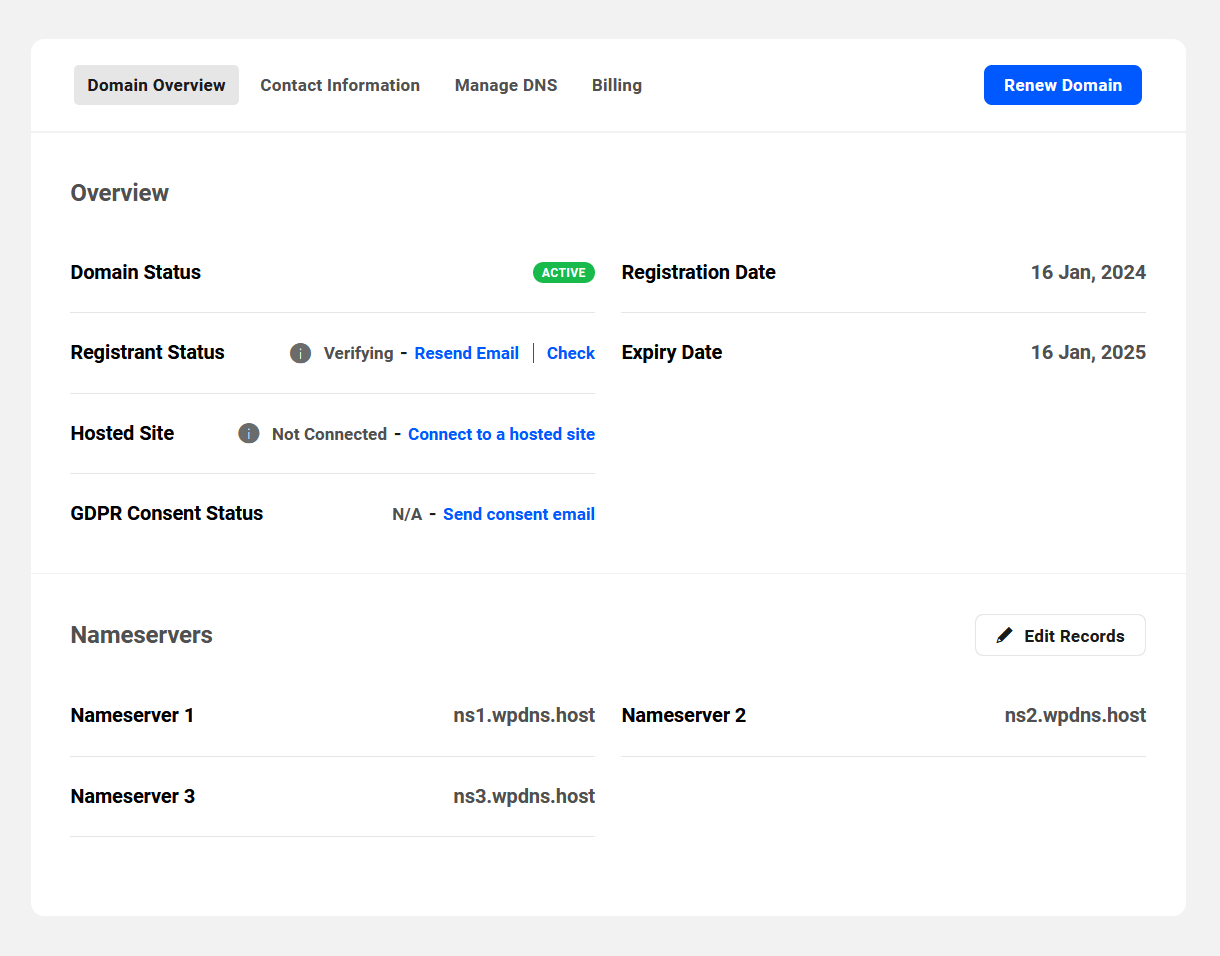
Domain Management
The client can manage their domain(s) using the same interface as when you purchase a domain as a WPMU DEV member, with a few exceptions:
- The client cannot transfer domains in or out. Thus, the Transfer Lock option is not available to them.
- The client does not have access to the Auto-Renew feature; they can only renew a domain manually if the required Renew Domain capability is included in their client role.
All other management features for a registered domain are available to your clients.
13.5.3 How to Test the Client Experience
Link to chapter 5It’s a good idea to test your reseller checkout process to be sure everything will work as expected for your clients.
This chapter outlines the recommended steps to test your hosting and/or domain reseller checkout.
It is not possible to use Test mode at Stripe for this, as only a live account can be connected to Clients & Billing. However, you can use Stripe credit to perform live transactions with a test client to ensure everything is set up correctly, so you don’t need to tie up any actual money to test things. You will need a valid credit card though (even a prepaid one with insufficient funds will work just fine for this test).
Important:
- Be sure you are not currently logged into your branded Hub in the same browser you’re testing with, as you will need to create a test client account as part of the checkout process.
- If you make a test purchase for a hosting plan, WPMU DEV will charge you for the hosted site you create. But if you delete the site right away after testing, this will only cost you a few pennies.
- If you make a test purchase for a domain, WPMU DEV will charge you for that domain, and it cannot be deleted. So this would be a domain that you’d want to keep and use on one of your own sites or a client site. To do that, remove the test client associated with the domain, update the owner contact information to your own or your actual client’s, and re-verify the registrant status by following the directions in the emails sent to both the new owner email address and the one you used for the test client.
Step 1 – Initiate the Checkout Process
To test the hosting checkout, click on the Buy Now button/link for any hosting product that you have added on your site, whether it’s in the default pricing table, a custom table, or any custom link or button.
To test the domain checkout, search for a domain you’d like to keep, either in your branded client portal or in the domains widget embedded on your site page, and click the Buy Now button.
Create a test user account in your branded client portal using any valid email address. Note that disposable and temporary addresses will not work for this.
Go through the site creation or registrant information steps until you get to the Pay Invoice page, but do not pay the invoice just yet.
Step 2 – Add Stripe Credit
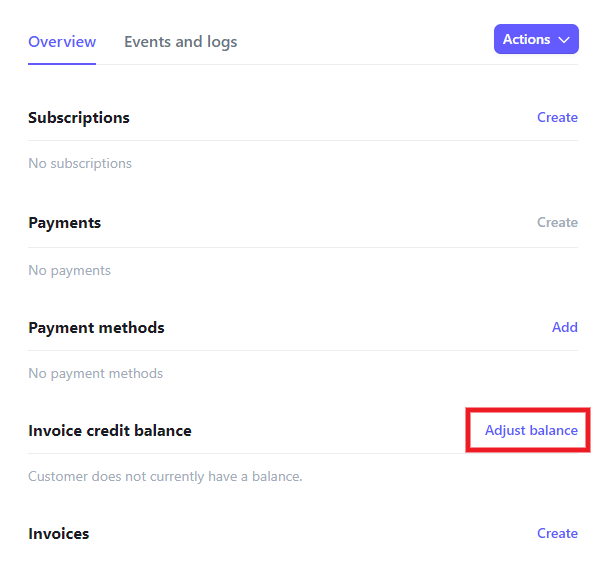
Log into your Stripe account in a new tab, and be sure you are viewing live data for the same account you connected to Clients & Billing. Then, under the Customers tab there, click on the client you just created.
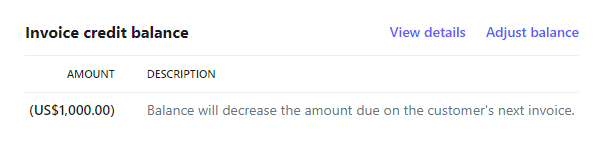
In the Overview section, scroll down to Invoice credit balance and click Adjust Balance.
Add any amount of credit you wish to that customer and click the Apply to credit balance button. Be sure the amount is equal to or greater than the price of the reseller product purchase you’re testing.
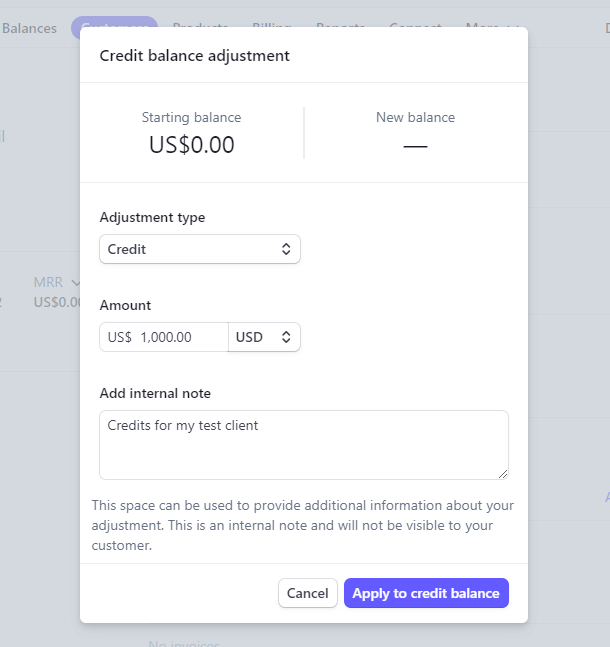
You’ll then see the new credit balance for your test client. This amount will be applied to any invoice paid by that client.
Step 3 – Pay the Invoice
Now, back on the Pay Invoice page of your branded Hub, add your credit card info as though you were actually making the payment. But don’t worry, as noted at the beginning of this chapter, no charge will be made to your card. The Stripe credit you just added to the client will be automatically used to pay the invoice once you click the Pay button.
You’ll then be redirected to the Sites screen or the Domains screen in your branded client portal where you’ll see your new site or domain.
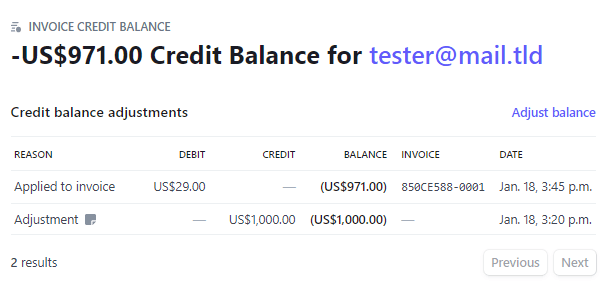
Step 4 – Confirm Credit Used at Stripe
Now if you go back to the customer’s page in your Stripe account, you’ll see the credit card info you added for the client in the Payment Methods section.
You’ll also see that the Invoice Credit Balance has decreased by the amount of the invoice you just paid.

Click the View Details link there to see additional details about the customer’s credit balance.
Step 5 – Cleanup
If you created a hosted site as a test, delete it so you’re not charged for a site you don’t need (unless you want to keep it of course).
If you created a domain as a test, review the Important points at the beginning of this chapter to ensure the new owner contact information is updated and verified.
Delete the test client from your Hub > Clients & Billing, and from your Stripe account.
13.6 Customization
Copy chapter anchor to clipboardThe Hub Client offers only a few color options to customize the public-facing interface.
However, you can customize things as much as you like by adding your own custom CSS or Javascript in a mu-plugin using the wpmudev_hub_template_head or wpmudev_hub_template_footer actions.
Add Custom CSS
If you need to add custom CSS to your Hub Client page, use the wpmudev_hub_template_head action.
Here’s the basic code you’d need; just add your custom CSS between the <style> and </style> tags.
As an example, to set a background color to the Filters & Labels button on the Sites page, you could use this:
Add Custom Javascript
If you need to add custom javascript to your Hub Client page, use the wpmudev_hub_template_footer action instead.
This can be useful if, for example, you’d like to add a live chat service that is not among the Live Chat Integrations currently supported.
For custom JS, here’s the basic code you’d need; just add your custom JS between the <script> and </script> tags.
13.7 Get Support
Copy chapter anchor to clipboardIf you still have questions or need assistance after reading this document, please don’t hesitate to contact our support superheroes using the available options under the Support tab in your Hub or via the Support tab in your WPMU DEV Dashboard.


